


If you want to prevent rust on dental instruments, the answer lies in daily handling rather than special products. Stainless steel is corrosion resistant, not corrosion proof, and its protective surface layer can break down under chlorides, harsh chemicals, moisture and contact with other metals. The ten habits below help keep that layer intact so instruments stay bright and functional. Check each instrument’s instructions for use (IFU) for compatible chemicals and processes.
Key takeaways
- Stainless steel relies on a thin passive layer that can be damaged by chlorides, bleach and abrasion.
- Prompt cleaning, thorough rinsing and complete drying prevent most rust and staining.
- Water quality in rinsing and in the sterilizer has a large effect on spotting.
- Not every discoloration is rust; a simple check helps you tell stains from corrosion.
The top 10 ways to prevent rust on dental instruments
1. Start with properly made surgical-grade steel
Instruments made from appropriate martensitic stainless steels, correctly heat treated and passivated, form a more stable protective layer. Poorly finished instruments may show rust after only a few cycles. Our comparison of 410, 420 and 440A stainless steels explains why grade and heat treatment matter.
2. Clean instruments promptly after use
Blood and saliva contain chlorides that attack stainless steel, especially when they dry on the surface. Wipe instruments at chairside and keep them moist with a holding solution if cleaning will be delayed. Never leave instruments soaking in saline or water for long periods, as extended immersion can also cause pitting.
3. Avoid bleach, chlorine and harsh chemicals
Sodium hypochlorite and other chlorine-releasing products are among the quickest ways to damage instrument steel. Strong acids and some highly alkaline cleaners can also stain.
Practical tip: use detergents labeled for medical or dental instruments, at the correct dilution, and check that your instrument IFU lists them as compatible.
4. Keep rusty and dissimilar metals apart
Rust can transfer from a corroded instrument to good ones during ultrasonic cleaning or sterilization. Mixing stainless steel with carbon steel or plated items can also cause staining.
- Remove visibly corroded instruments from circulation right away.
- Process carbon steel burs and plated items as their IFUs direct, often separately.
- Check new or loaner instruments before adding them to your sets.
5. Rinse thoroughly after cleaning
Detergent residues and dissolved minerals left on the surface can bake on during sterilization. Rinse well after ultrasonic or manual cleaning. Many clinics use distilled or deionized water for the final rinse to reduce spotting.
6. Use the water your sterilizer manufacturer specifies
Tap water in a steam sterilizer reservoir can leave mineral deposits on instruments and scale inside the chamber. Most manufacturers specify distilled or demineralized water. Our article on water quality and autoclave spotting covers the details.
7. Dry instruments completely
Moisture trapped in box joints, serrations and pouches is a common cause of rust spots. Dry instruments before packaging, run the full drying phase of the sterilizer cycle and avoid opening the door early. Packs that come out wet should be investigated, not simply left to air dry on the counter.
8. Lubricate hinged instruments
A water-soluble instrument lubricant applied as directed by the IFU helps protect box joints, which are difficult to clean and dry. It also keeps forceps, needle holders and scissors working smoothly. Avoid mineral oil and household lubricants. See lubricating hinged instruments for the method.
9. Store instruments clean, dry and protected
Store sterilized packs in a closed, dry area away from sinks and humidity. Do not store instruments under sinks or near chemicals such as bleach, whose fumes can cause corrosion over time. Keep cassettes off the floor and rotate stock.
10. Inspect regularly and identify stains early
Not every brown or dark mark is rust. A common check is to rub the mark with a pencil eraser: if it wipes off and the surface underneath is smooth, it is likely a surface stain or deposit; if pitting remains, it is corrosion. Corroded instruments should be removed from service and repaired or replaced.
Stain colors and common causes
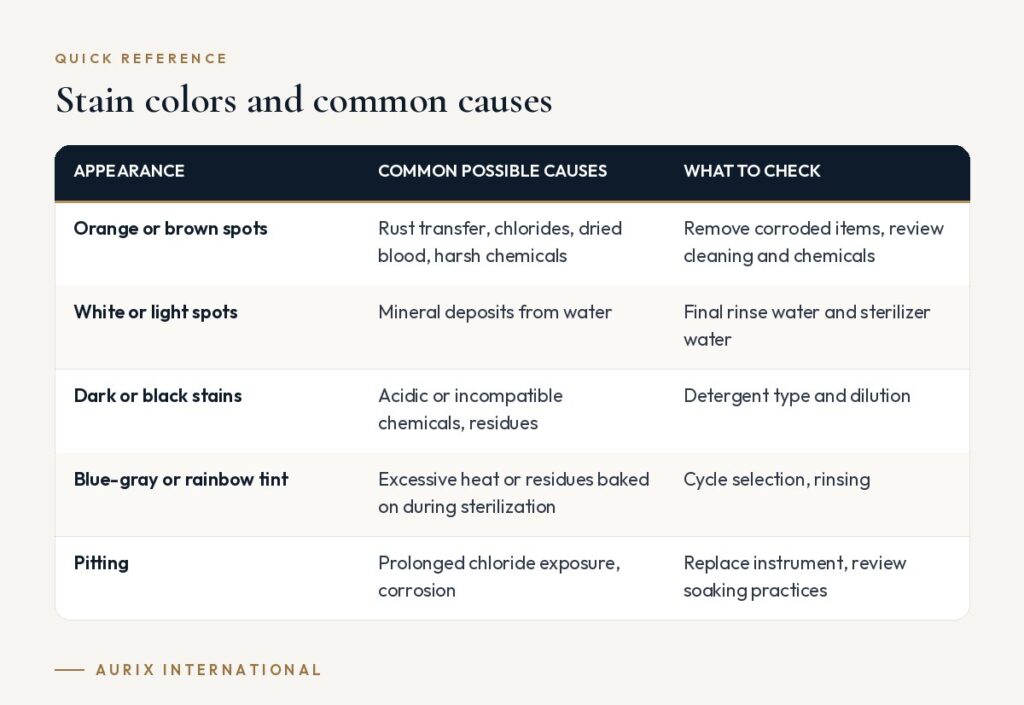
Discoloration can give clues to the source of the problem. Use this table as a starting point, then confirm with your instrument and sterilizer IFUs.
| Appearance | Common possible causes | What to check |
|---|---|---|
| Orange or brown spots | Rust transfer, chlorides, dried blood, harsh chemicals | Remove corroded items, review cleaning and chemicals |
| White or light spots | Mineral deposits from water | Final rinse water and sterilizer water |
| Dark or black stains | Acidic or incompatible chemicals, residues | Detergent type and dilution |
| Blue-gray or rainbow tint | Excessive heat or residues baked on during sterilization | Cycle selection, rinsing |
| Pitting | Prolonged chloride exposure, corrosion | Replace instrument, review soaking practices |
Buying tips to reduce rust problems
- Ask about steel grade and passivation: a reputable supplier should be able to tell you what steel is used and how instruments are finished. See why passivation matters.
- Request IFUs: written cleaning and sterilization instructions show which chemicals are safe.
- Check finish quality: smooth, uniform finishes without pits or rough joints resist deposits better.
- Test samples: run sample instruments through several of your normal cycles before ordering in volume.
- Buy compatible accessories: choose detergents, lubricants and pouches designed for surgical instruments.
Frequently asked questions
Is stainless steel supposed to rust?
Stainless steel resists rust because of a thin chromium-rich passive layer, but that layer can be damaged by chlorides, harsh chemicals, abrasion and moisture. When it breaks down, rust and pitting can occur.
Can rusty instruments be cleaned and used again?
Surface stains can sometimes be removed with products made for instrument stain removal, following the manufacturer’s directions. If the instrument is pitted or corroded, remove it from service and have it professionally assessed or replaced.
Why do brand-new instruments sometimes show spots?
Spots on new instruments are often caused by water minerals, detergent residue or contact with older corroded instruments in the same load. Review rinsing, water quality and load composition.
Does lubricant prevent rust?
A water-soluble instrument lubricant helps protect moving parts and keeps joints functioning, but it does not replace proper cleaning, rinsing and drying.
Choose instruments made for repeated reprocessing. Aurix International offers surgical-grade stainless steel dental instruments and kits backed by four generations of instrument-making heritage. Ask us about our instruments →


