


Good dental instrument care protects patients, saves money and keeps hand instruments performing the way they were designed. Most damage is not caused by age but by everyday habits in the operatory and the sterilization room. These are the ten mistakes we see most often, why they matter and what to do instead. As always, the manufacturer’s instructions for use (IFU) take priority over general advice.
Key takeaways
- Dried debris and harsh chemicals cause much of the staining and corrosion seen on stainless steel instruments.
- Hinged instruments need to be processed open and lubricated as directed by the IFU.
- Using an instrument for the wrong job is a fast way to bend tips and crack joints.
- Regular inspection catches dull, bent and cracked instruments before they fail during a procedure.
The top 10 dental instrument care mistakes
1. Letting blood and debris dry on instruments
Dried blood, saliva, bone and cement are much harder to remove and can lead to pitting under the deposits. Blood also contains chlorides, which are aggressive toward stainless steel when left in contact for long periods.
Instead: wipe instruments at chairside and, if they will wait before cleaning, keep them moist with a holding solution or enzymatic spray designed for instruments. See our guide to cleaning instruments immediately after use.
2. Using the wrong cleaning chemicals
Household bleach, chlorine-based products, strong acids and some general-purpose cleaners can stain or corrode instrument steel. Detergents used at the wrong concentration can also leave residues.
Instead: use detergents formulated for medical or dental instruments, at the dilution printed on the label, and choose products that your instrument IFU lists as compatible.
3. Scrubbing with abrasive pads or wire brushes
Steel wool, scouring pads and wire brushes scratch the protective surface of stainless steel and can leave metal particles behind that later rust. Scratches also give debris a place to hide.
Instead: if manual cleaning is needed, use soft nylon brushes with long handles while wearing heavy-duty utility gloves, and let an ultrasonic cleaner or washer do most of the work.
4. Mixing dissimilar metals in the ultrasonic or sterilizer
Placing stainless steel instruments alongside carbon steel burs, chrome-plated items or already rusty instruments can cause staining and rust transfer. Damaged instruments with corrosion can spread deposits to good ones.
Instead: process different metals separately where the IFU advises it, and remove corroded instruments from circulation promptly.
5. Skipping the rinse and dry
Detergent residue and mineral-rich tap water left on instruments can cause spots and stains during sterilization. Leaving instruments wet in a pouch also encourages wet packs.
Instead: rinse thoroughly after cleaning (many teams use distilled or deionized water for the final rinse) and dry completely before packaging.
6. Processing hinged instruments closed and never lubricating them
Forceps, needle holders, scissors and rongeurs processed with their joints closed or ratchets locked trap debris and moisture in the box joint. Over time, joints stiffen and can crack.
- Process hinged instruments open or unlatched.
- Apply a water-soluble instrument lubricant (often called instrument milk) where the IFU recommends it, typically after cleaning and before sterilization.
- Avoid household oils, which can block steam penetration.
Our article on lubricating hinged instruments explains the process step by step.
7. Ignoring water quality
Hard water leaves mineral spots on instruments and scale inside the sterilizer chamber. Many sterilizer manufacturers specify distilled or demineralized water for the reservoir for this reason.
Instead: check your sterilizer IFU for water requirements and follow them. Persistent spotting is often a water issue rather than an instrument defect.
8. Using instruments for jobs they were not designed for
Using an elevator as a pry bar against adjacent teeth, cutting wire with tissue scissors, or using a scaler to remove cement from a mixing slab all bend tips and dull edges. These habits also increase the risk of a tip fracturing in the mouth.
Instead: keep the right instrument on the tray for each task, such as wire cutters for wire and a cement spatula for mixing.
9. Dumping instruments into a pile
Instruments tossed into a sink or tray knock against each other, which damages fine tips, mirror surfaces and cutting edges. Loose handling also increases sharps injuries for the team.
Instead: keep instruments in cassettes or organized trays from chairside through cleaning and sterilization.
10. Skipping inspection and sharpening
Dull curettes and scalers require more force, which tires the clinician and can burnish calculus rather than remove it. Bent explorers and probes give inaccurate readings. Hairline cracks in joints can fail during a procedure.
Instead: inspect instruments after cleaning and keep a regular sharpening schedule for cutting instruments. When an instrument can no longer be restored, replace it.
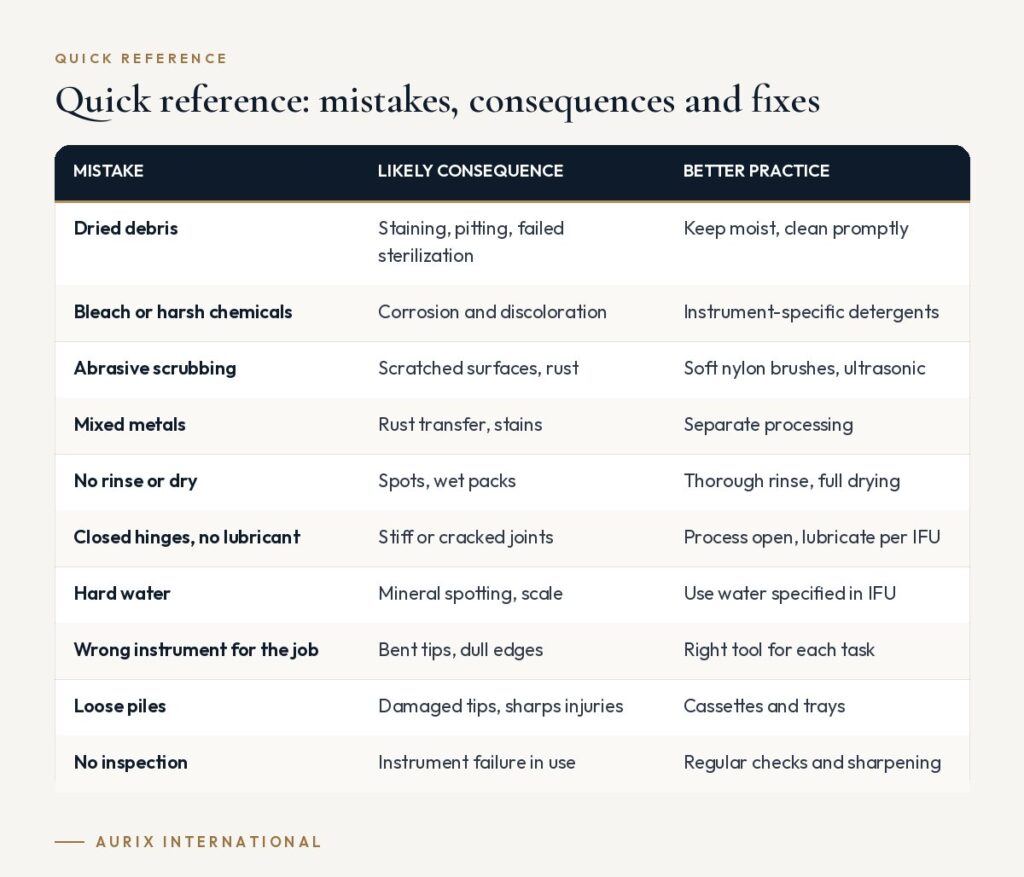
Quick reference: mistakes, consequences and fixes
| Mistake | Likely consequence | Better practice |
|---|---|---|
| Dried debris | Staining, pitting, failed sterilization | Keep moist, clean promptly |
| Bleach or harsh chemicals | Corrosion and discoloration | Instrument-specific detergents |
| Abrasive scrubbing | Scratched surfaces, rust | Soft nylon brushes, ultrasonic |
| Mixed metals | Rust transfer, stains | Separate processing |
| No rinse or dry | Spots, wet packs | Thorough rinse, full drying |
| Closed hinges, no lubricant | Stiff or cracked joints | Process open, lubricate per IFU |
| Hard water | Mineral spotting, scale | Use water specified in IFU |
| Wrong instrument for the job | Bent tips, dull edges | Right tool for each task |
| Loose piles | Damaged tips, sharps injuries | Cassettes and trays |
| No inspection | Instrument failure in use | Regular checks and sharpening |
How to choose instruments that are easier to care for
Care habits matter most, but the instruments you buy also make a difference:
- Steel quality and finish: well-hardened, passivated surgical-grade stainless steel resists corrosion better. Learn more about passivation and finishing.
- Clear IFUs: choose suppliers who provide written reprocessing instructions.
- Joint quality: smooth, tight box joints are easier to clean and lubricate.
- Sharpenable blades: cutting instruments with enough blade material can be sharpened several times before replacement.
- Cassette compatibility: instruments that fit standard cassette rails are handled less.
Frequently asked questions
Why are my stainless steel instruments rusting?
Common causes include dried blood or other chloride-containing residues, harsh chemicals, mineral-rich water, incomplete drying and contact with rusty or dissimilar metals. Lower-quality steel can also corrode more easily.
Can I use any oil to lubricate instruments?
No. Use a water-soluble lubricant made for surgical instruments and compatible with steam sterilization. Mineral oils and household lubricants can block steam from reaching the surface.
How often should cutting instruments be sharpened?
It depends on how often they are used and how they are processed. Many hygienists check sharpness regularly and sharpen whenever an edge no longer catches on a test stick. Follow your clinic’s routine and the IFU.
Start with instruments built to last. Aurix International supplies surgical-grade stainless steel dental instruments, individually or as pre-assembled and custom kits. Talk to our team →


