


Reliable dental instrument sterilization is one of the foundations of safe patient care, and most failures come from small lapses rather than broken equipment. A sterilizer can only do its job if instruments arrive clean, dry, correctly packaged and loaded properly. The ten tips below follow the reprocessing cycle from chairside to storage and are consistent with CDC guidance for dental settings. Always follow the manufacturer’s instructions for use (IFU) for both your instruments and your sterilizer.
Key takeaways
- Cleaning always comes before sterilization; debris can shield microorganisms from steam or heat.
- Critical and semicritical instruments that tolerate heat should be heat sterilized.
- Monitor every load with mechanical and chemical indicators, and use biological indicators (spore tests) at least weekly.
- Packs must be dry before handling and stored in a clean, dry, enclosed area.
- Your instrument and sterilizer IFUs are the final word on cycles, temperatures and loading.
The top 10 dental instrument sterilization tips
1. Clean every instrument thoroughly before sterilizing
Blood, saliva, cement and tissue left on an instrument can protect microorganisms from the sterilant. CDC guidance is clear that cleaning must occur before disinfection or sterilization, and it recommends automated equipment such as ultrasonic cleaners or instrument washers to improve cleaning and reduce staff contact with sharp, contaminated items.
Practical tip: wipe gross debris at chairside and, if instruments cannot be processed soon, keep them moist with a holding solution or enzymatic spray so debris does not dry on. Our guide to cleaning instruments immediately after use covers the chairside steps in detail.
2. Classify items as critical, semicritical or noncritical
The CDC classification tells you how far each item must be processed. Critical items (those that penetrate soft tissue or bone, such as forceps, elevators, scalers and surgical burs) must be sterilized. Semicritical items (those that contact mucous membranes, such as mouth mirrors and amalgam condensers) should be heat sterilized if they tolerate heat. Noncritical items that only touch intact skin generally need cleaning and, if visibly soiled, disinfection with an EPA-registered hospital disinfectant.
Post a simple classification chart in the reprocessing area so new team members do not have to guess.
3. Set up a one-way workflow
The sterilization area should move instruments in one direction: receiving and cleaning, then preparation and packaging, then sterilization, then storage. Keeping dirty and clean zones separate, even in a small room, prevents processed packs from touching contaminated items or splashes.
- Label zones clearly with signs or colored tape on the counter.
- Keep sterile storage away from sinks and ultrasonic units.
- Wear heavy-duty utility gloves, a mask, eye protection and a gown when handling contaminated instruments.
4. Rinse, dry and inspect before packaging
After cleaning, rinse instruments to remove detergent residue, then dry them completely. Inspect each item under good light, ideally with magnification, for remaining debris, cracks, corrosion or damaged tips. An instrument that is not visibly clean goes back to cleaning, not into a pouch.
Use this step to pull damaged instruments out of circulation. A regular monthly inspection checklist makes this habit easier to maintain.
5. Use packaging that matches the sterilization method
Pouches and wraps must be cleared by the FDA for the sterilization method you use and must be compatible with your sterilizer. Seal pouches correctly, avoid overfilling, and open hinged instruments such as forceps, scissors and needle holders so steam can reach the joints and inner surfaces.
Place an internal chemical indicator inside each package unless the external indicator is designed to show internal conditions. More detail is in our article on sterilization pouches and cassette wraps.
6. Load the sterilizer correctly
Overloading is one of the most common reasons for failed or wet loads. Steam must circulate freely around every package. Follow the sterilizer manufacturer’s loading guidance; many recommend placing pouches on edge in a rack, with paper sides facing in the same direction and space between packs. Cassettes should not be stacked in a way that blocks airflow or drainage.
7. Choose the correct cycle for the load
Wrapped, unwrapped, cassette and hollow loads may each require a different cycle. Check the instrument IFU for validated parameters and the sterilizer IFU for which cycle suits which load type. Never shorten a cycle to save time, and do not use unwrapped (flash-type) cycles for instruments that will be stored.
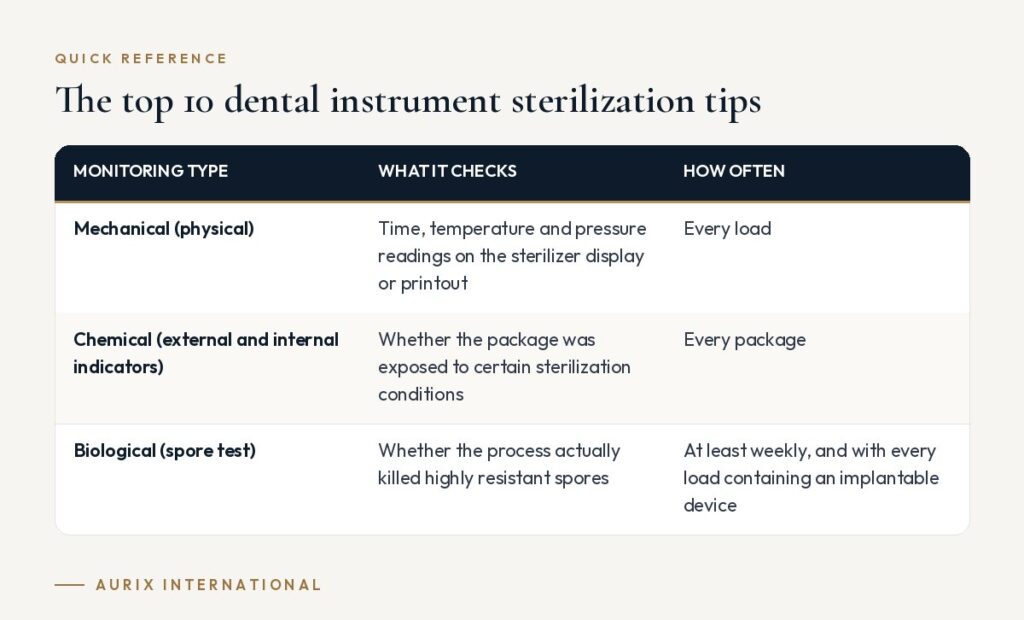
8. Monitor every cycle with three types of indicator
Sterilization monitoring has three parts, and each catches different problems.
| Monitoring type | What it checks | How often |
|---|---|---|
| Mechanical (physical) | Time, temperature and pressure readings on the sterilizer display or printout | Every load |
| Chemical (external and internal indicators) | Whether the package was exposed to certain sterilization conditions | Every package |
| Biological (spore test) | Whether the process actually killed highly resistant spores | At least weekly, and with every load containing an implantable device |
Practical tip: write down what to do if a spore test fails, including taking the sterilizer out of service, retesting and recalling items when indicated, so nobody has to improvise.
9. Let packs dry before handling them
Wet packs can wick microorganisms through the packaging. Allow the drying phase to finish and let packs cool inside or on a rack before handling. If packs come out wet regularly, check for overloading, incorrect pouch orientation or a maintenance issue.
10. Label, store and check packs before use
Label each package with the sterilization date, the sterilizer used (if you have more than one) and the cycle or load number so items can be traced. Store packs in a clean, dry, enclosed area off the floor and away from sinks. Many practices use event-related shelf life: a pack stays usable until something compromises it, such as tears, moisture or a broken seal.
Before opening a pack chairside, check the packaging and the indicator. If anything is wrong, reprocess the contents.
How to choose instruments and supplies that sterilize well
Good sterilization starts at purchasing. When buying instruments and reprocessing supplies, consider the following:
- Ask for the IFU: every reusable instrument should come with reprocessing instructions that state compatible methods and parameters.
- Choose quality stainless steel: properly hardened and passivated surgical-grade steel resists corrosion through repeated cycles.
- Prefer cassettes for routine trays: instruments that stay in a cassette from chairside to storage are handled less, which reduces sharps exposure and damage.
- Match pouch sizes to your instruments: overstuffed pouches fail more often.
- Keep spare sets: enough duplicates mean no one is tempted to rush a cycle.
For a printable reference, the CDC publishes best practices for sterilization in dental settings.
Frequently asked questions
How often should a dental office run a spore test?
CDC guidance recommends biological monitoring at least weekly for each sterilizer, and with every load that contains an implantable device. Check local regulations, which may require more frequent testing.
Do I need to sterilize mouth mirrors?
Mouth mirrors are semicritical items. If they are heat tolerant, they should be heat sterilized between patients. Follow the mirror manufacturer’s IFU.
Can I sterilize instruments without cleaning them first if the autoclave reaches the right temperature?
No. Debris can protect microorganisms from steam, so instruments must be cleaned and inspected before every sterilization cycle.
How long do sterilized packs stay sterile?
Many facilities use event-related shelf life, meaning a pack is considered sterile until its packaging is compromised. Your written policy and local regulations should define this, along with stock rotation.
Build trays that are easier to reprocess. Aurix International supplies surgical-grade stainless steel instruments and pre-assembled or custom kits that fit neatly into a cassette-based sterilization workflow. Design a custom kit →


