Dental instruments come in hundreds of patterns, but a core group of about fifty covers most of what happens in a general practice. Also, this guide lists those 50 instruments by name, grouped by procedure, with a plain-language note on what each one helps with. It is written for new assistants, students, practice managers and anyone who needs to recognize instruments on a tray or in a catalog.
Key takeaways
- Most general dentistry runs on five instrument families: examination, periodontal, restorative, surgical and endodontic/orthodontic.
- Instrument names usually combine a pattern name (Gracey, Molt, Cryer) with a number that identifies the working end.
- Many instruments come in left/right or mesial/distal pairs, so they are often sold double-ended or as sets.
- Buy by procedure and tray, not one item at a time, and check that every instrument tolerates your cleaning and sterilization process.
How dental instruments are named
Most hand instruments have three parts: the handle, the shank and the working end (a blade, nib, tip or beak). The name usually tells you the designer or pattern (for example Gracey, Columbia or Hollenback) and the number tells you the shape of the working end. Double-ended instruments carry two numbers, such as Gracey 11/12, because each end is a mirror image or companion of the other. Forceps follow their own numbering system, such as 150, 151 and 23, and surgical instruments are often named after the surgeon who popularized them, such as Minnesota, Molt or Mayo-Hegar.
Below, the 50 instruments are grouped into five families. In addition, each group has a quick-reference table with the instrument number, name and main use.
The top 50 dental instruments, by family
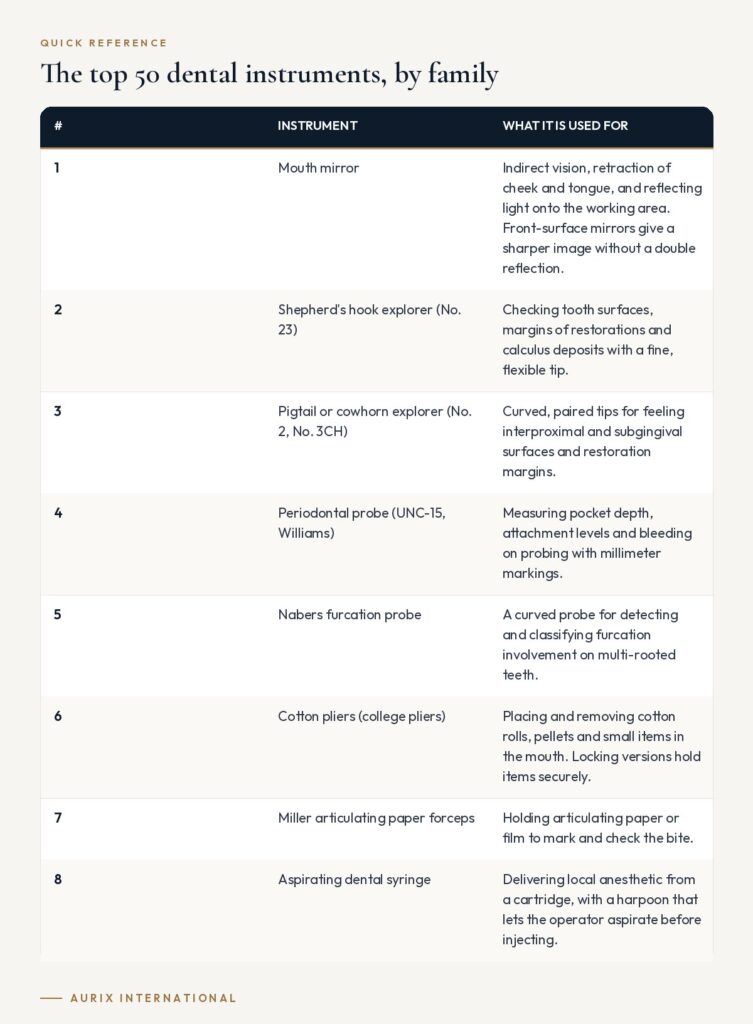
Examination and diagnostic instruments (1–8)
These are the instruments on every exam tray. A basic setup, often called a “mirror, explorer, pliers” set, is used at nearly every appointment, so practices need far more of these than any other group.
| # | Instrument | What it helps with |
|---|---|---|
| 1 | Mouth mirror | Indirect vision, retraction of cheek and tongue, and reflecting light onto the working area. Front-surface mirrors give a sharper image without a double reflection. |
| 2 | Shepherd’s hook explorer (No. 23) | Used when checking tooth surfaces, margins of restorations and calculus deposits with a fine, flexible tip. |
| 3 | Pigtail or cowhorn explorer (No. 2, No. 3CH) | Curved, paired tips for feeling interproximal and subgingival surfaces and restoration margins. |
| 4 | Periodontal probe (UNC-15, Williams) | Used when measuring pocket depth, attachment levels and bleeding on probing with millimeter markings. |
| 5 | Nabers furcation probe | A curved probe for detecting and classifying furcation involvement on multi-rooted teeth. |
| 6 | Cotton pliers (college pliers) | Used when placing and removing cotton rolls, pellets and small items in the mouth. Locking versions hold items securely. |
| 7 | Miller articulating paper forceps | Used when holding articulating paper or film to mark and check the bite. |
| 8 | Used when aspirating dental syringe | Used when delivering local anesthetic from a cartridge, with a harpoon that lets the operator aspirate before injecting. |
Tip: the probe is the instrument most often misread. Learn the marking pattern of the probes in your clinic; for example, the Williams probe has no marks at 4 and 6 mm, while the UNC-15 is marked at every millimeter to 15 with color-coded bands that highlight the 5, 10 and 15 mm zones.
Periodontal and hygiene instruments (9–16)
Periodontal instruments remove calculus and biofilm and smooth root surfaces. Scalers (sharp tip, triangular cross-section) are mainly for supragingival work, while curettes (rounded toe, half-moon cross-section) can be adapted below the gumline.
| # | Instrument | What it helps with |
|---|---|---|
| 9 | Gracey curettes (1/2 to 17/18) | Area-specific curettes for subgingival scaling and root planing. 1/2 and 3/4 for anteriors, 5/6 for anteriors and premolars, 7/8 and 9/10 for posterior facial and lingual surfaces, 11/12 and 15/16 for posterior mesials, 13/14 and 17/18 for posterior distals. |
| 10 | Universal curettes (Columbia 13/14, Barnhart 5/6) | Two cutting edges per blade, so one instrument can be adapted to most tooth surfaces. |
| 11 | Sickle scaler (H6/H7, 204S) | Used when removing supragingival calculus, especially in interproximal areas and on anterior teeth. |
| 12 | Jacquette scaler | A straight-bladed scaler for heavier supragingival deposits on anterior and premolar teeth. |
| 13 | Hoe scaler | Used when removing heavy, tenacious supragingival calculus with a pull stroke. |
| 14 | Periodontal file (Hirschfeld) | Used when crushing or roughening heavy calculus before it is removed with a curette. |
| 15 | Chisel scaler (Zerfing) | Used when removing supragingival calculus from proximal surfaces of anterior teeth with a push stroke. |
| 16 | Implant scaler | Used when debriding implant abutments and restorations with tips designed not to scratch titanium, such as plastic, resin or titanium tips. |
Tip: sharpness matters as much as pattern choice. A dull curette burnishes calculus instead of removing it, so plan for regular sharpening and eventual replacement.
Restorative instruments (17–28)
Restorative instruments remove decay, prepare cavities, and place, shape and finish filling materials.
| # | Instrument | What it helps with |
|---|---|---|
| 17 | Spoon excavator | Used when scooping out soft carious dentin and removing temporary restorations. |
| 18 | Plastic filling instrument | Used when carrying and shaping restorative materials and cements; one end is usually a paddle, the other a condenser. |
| 19 | Amalgam condenser (plugger) | Used when packing amalgam into the prepared cavity. |
| 20 | Ball burnisher | Used when smoothing and adapting restorative material and polishing amalgam margins. |
| 21 | Carvers (Hollenback, discoid-cleoid) | Used when carving occlusal anatomy and contours into amalgam and other materials. |
| 22 | Composite instruments | Used when placing and sculpting composite resin; often coated or highly polished so the resin does not stick. |
More restorative instruments (23–28)
| # | Instrument | What it helps with |
|---|---|---|
| 23 | Cement spatula | Used when mixing cements, liners and impression materials on a pad or glass slab. |
| 24 | Amalgam carrier | Used when picking up and delivering amalgam to the preparation. |
| 25 | Tofflemire matrix retainer | Used when holding a matrix band around a tooth to form a missing wall during restoration. |
| 26 | Enamel hatchet | Used when planing and cleaving unsupported enamel on cavity walls. |
| 27 | Gingival margin trimmer | Used when beveling and smoothing the gingival margin of Class II preparations. |
| 28 | Calcium hydroxide applicator | Used when placing small amounts of liner or base material on the cavity floor. |
Tip: restorative instruments are often double-ended, and the two ends may be different instruments. When you set up a tray, check both ends rather than relying on the handle.
Extraction and oral surgery instruments (29–45)
Surgical instruments are heavier and more specialized. Forceps target specific teeth and arches, and elevators loosen teeth or roots before forceps are applied.
| # | Instrument | What it helps with |
|---|---|---|
| 29 | Upper universal forceps (150) | Used when extracting maxillary incisors, canines and premolars, and roots in that region. |
| 30 | Lower universal forceps (151) | Used when extracting mandibular incisors, canines and premolars, and roots in that region. |
| 31 | Cowhorn forceps (23) | Lower molars; the pointed beaks engage the furcation between the mesial and distal roots. |
| 32 | Upper molar forceps (88R/88L, 53R/53L) | Maxillary first and second molars; right and left versions engage the buccal furcation. |
| 33 | Straight elevator (301, 34S) | Used when luxating teeth and roots before forceps; the 301 is a small, versatile pattern. |
| 34 | Cryer elevators (East/West) | Paired, triangular-tipped elevators for removing a root after the adjacent root has been taken out. |
| 35 | Periotome | Thin blades that sever the periodontal ligament with minimal trauma, useful when preserving bone for implants. |
| 36 | Periosteal elevator (Molt 9) | Used when reflecting gingiva and periosteum from bone to raise a flap. |
More oral surgery instruments (37–45)
| # | Instrument | What it helps with |
|---|---|---|
| 37 | Scalpel handle (No. 3) | Used when holding disposable blades such as the No. 15 or 15C for incisions. |
| 38 | Minnesota retractor | Used when retracting cheek, lip and tongue, and protecting soft tissue during surgery. |
| 39 | Bone rongeur | Used when trimming and contouring bone, for example after multiple extractions. |
| 40 | Bone file | Used when smoothing sharp edges of bone after extractions or alveoloplasty. |
| 41 | Surgical curette (Molt, Lucas) | Used when removing granulation tissue and debris from extraction sockets. |
| 42 | Needle holder (Mayo-Hegar, Castroviejo) | Used when gripping the suture needle; Castroviejo patterns suit fine sutures and delicate tissue. |
| 43 | Surgical scissors (Goldman-Fox, Iris, Dean) | Used when trimming soft tissue and cutting sutures. |
| 44 | Hemostat (mosquito) | Used when clamping vessels, grasping small fragments and holding tissue. |
| 45 | Tissue forceps (Adson) | Used when stabilizing soft tissue flaps during suturing; toothed tips grip without slipping. |
Tip: forceps beak shape matters more than the handle. When building an extraction set, start with 150, 151, 23 and an upper molar pair, then add patterns that match your caseload. For a deeper look, see our extraction forceps buyer’s guide and the overview of root elevator types.
Endodontic, orthodontic and isolation instruments (46–50)
| # | Instrument | What it helps with |
|---|---|---|
| 46 | Endodontic files (K-files, H-files) | Used when cleaning and shaping root canals; K-files cut on push-pull and rotation, H-files cut mainly on the pull stroke. |
| 47 | Endodontic explorer (DG-16) | Used when locating canal orifices on the pulp chamber floor. |
| 48 | Spreaders and pluggers | Used when compacting gutta-percha laterally (spreaders) or vertically (pluggers) during obturation. |
| 49 | Orthodontic pliers (Weingart, bird-beak, How) | Used when placing and bending archwires, forming loops and adjusting appliances. |
| 50 | Rubber dam clamp forceps | Used when spreading and placing rubber dam clamps on the anchor tooth. |
Endodontic files are usually single-use or have a limited working life, while spreaders, pluggers and pliers are reusable hand instruments that need regular inspection for bent tips and worn joints.
Quick reference: instrument families at a glance
| Family | Typical working end | Main purpose | Where you will find it |
|---|---|---|---|
| Examination | Mirror, fine tip, marked probe | Used when seeing, feeling and measuring | Every tray |
| Periodontal | Sharp blades and toes | Used when removing calculus and biofilm | Hygiene and perio trays |
| Restorative | Paddles, condensers, carvers | Used when preparing and filling teeth | Restorative trays |
| Surgical | Beaks, blades, jaws | Extraction, flap surgery, suturing | Extraction and surgical kits |
| Endodontic / orthodontic | Files, spreaders, plier tips | Canal treatment and wire work | Specialty trays |
How to choose and buy dental instruments
- Start with procedures. List the procedures you perform and the tray each needs, then count how many trays must be in circulation at once. Generally, the number of chairs, appointments per day and your sterilization turnaround time determine how many sets you need.
- Check the steel and finish. Most hand instruments use martensitic stainless steels that can be hardened to hold an edge. Ask your supplier which grade helps with cutting instruments and which for non-cutting instruments. Our article on 410, 420 and 440A stainless steel explains the differences.
- Consider handle design. Larger-diameter, textured handles can reduce pinch force during long scaling sessions. Furthermore, hollow handles are lighter; solid handles feel more substantial.
- Look at the joints and tips. Hinged instruments should open smoothly without play, and tips should meet evenly. Inspect a sample before placing a large order.
- Follow the IFU. Every reusable instrument should come with manufacturer’s instructions for use covering cleaning, sterilization and maintenance. In practice, confirm they match your autoclave and ultrasonic cleaner.
- Think in kits. Buying a pre-assembled or custom kit makes it easier to standardize trays across operatories and replace a complete set when needed.
Frequently asked questions
What are the four basic dental instruments?
The basic exam setup is usually described as a mouth mirror, an explorer, cotton pliers and a periodontal probe. Moreover, these four appear on nearly every tray, from routine checkups to restorative and surgical appointments.
What is the difference between a scaler and a curette?
A scaler has a pointed tip and a triangular cross-section and is mainly used above the gumline. A curette has a rounded toe and a half-moon cross-section, so it can be adapted below the gumline with less risk of injuring soft tissue.
Why do dental instruments have numbers?
The number identifies the shape and angle of the working end within a pattern. For example, Gracey 11/12 and 13/14 have the same blade style but different shank angles for mesial and distal surfaces, and forceps 150 and 151 target the upper and lower arches respectively.
How long do dental hand instruments last?
There is no fixed lifespan. Also, it depends on steel quality, how often the instrument is used, sharpening, and how it is cleaned and sterilized. Replace an instrument when it no longer works as designed: thin or bent blades, worn tips, loose joints, cracks or corrosion that cannot be removed.
Building trays from scratch? Aurix International supplies surgical-grade stainless steel instruments individually and as pre-assembled or custom kits, so you can equip every procedure from one source. Design a custom kit →