

Dental implant surgery instruments go well beyond the implant system’s drill kit. The motor, drills and drivers come from the implant manufacturer, but the flap, the site preparation checks, any bone work and the closure all depend on a set of general surgical hand instruments. This list covers the ten instruments most implant surgeons keep on the tray, with practical notes on how each is used.
Key takeaways
- The implant system supplies drills, drivers and usually a torque wrench; the rest of the tray is general surgical instruments.
- A clean full-thickness flap starts with a sharp blade and a well-designed periosteal elevator.
- Measuring tools such as calipers, probes and parallel pins help confirm position before and during drilling.
- Fine suturing instruments are needed for tension-free closure around implants and grafts.
- Follow both the implant manufacturer’s and the instrument maker’s IFU for cleaning and sterilization.
The top 10 dental implant surgery instruments
1. Scalpel handle and blades
A round or flat No. 3 scalpel handle with No. 15 and 15C blades is the standard for crestal and sulcular incisions. A No. 12 or 12B blade is useful for reaching distal of the last tooth, and a round microsurgical handle suits fine papilla incisions.
Tip: change the blade as soon as it drags; a dull blade tears the periosteum and makes flap reflection harder.
2. Periosteal elevator
A periosteal elevator such as the Molt No. 9 reflects a full-thickness mucoperiosteal flap to expose the ridge. Many implant surgeons also keep a thinner, sharper elevator for papillae and thin biotypes.
Keep the working end against bone and use controlled, sweeping strokes so the periosteum lifts in one layer.
3. Retractors
Minnesota, Seldin or Obwegeser-style retractors hold the cheek, lip and flap away from the drill. Good retraction protects soft tissue from rotating instruments and keeps irrigation and visibility where they need to be.
4. Tissue forceps
Toothed tissue forceps such as Adson 1×2 or fine micro forceps stabilize the flap during reflection, positioning and suturing. Fine tips are especially helpful when handling thin tissue around the implant collar.
5. Tissue punch
For flapless or minimally invasive placement where the soft tissue allows, a circular tissue punch removes a disc of gingiva over the implant site. Punches are usually sized to match implant diameters and are often system-specific.
A flapless approach depends on adequate keratinized tissue and bone volume, so case selection matters more than the instrument.
6. Measuring instruments: calipers and probes
Bone or tissue calipers measure ridge width and the distance between adjacent teeth or implants. A periodontal probe with clear millimeter markings, such as a UNC-15, checks soft-tissue thickness, osteotomy depth and spacing.
These quick checks support the planning done from radiographs and, where used, a surgical guide.
7. Parallel pins and depth gauges
Parallel pins (direction indicators) are placed in the pilot osteotomy to check angulation relative to adjacent teeth, the opposing arch and other implants. Depth gauges confirm osteotomy depth before final drilling. These are usually supplied with the implant system and matched to its drill sequence.
Tip: secure small pins with floss when possible so they cannot be swallowed or aspirated.
8. Bone curettes
A Lucas or Molt surgical curette removes granulation tissue from an extraction site before immediate placement and cleans soft tissue from the ridge. Bone curettes are also useful for gathering small amounts of autogenous bone.
9. Rongeur and bone file
A small rongeur trims sharp ridge edges and irregularities, and a bone file smooths the crest before placement or closure. They are essential when a knife-edge ridge needs flattening to give a platform for the implant.
10. Suturing instruments
A needle holder (Mayo-Hegar or Castroviejo), suture scissors and fine tissue forceps complete the tray. Fine sutures such as 4-0 to 6-0 are common for implant and graft closures, so choose a needle holder with jaws suited to the needle size.
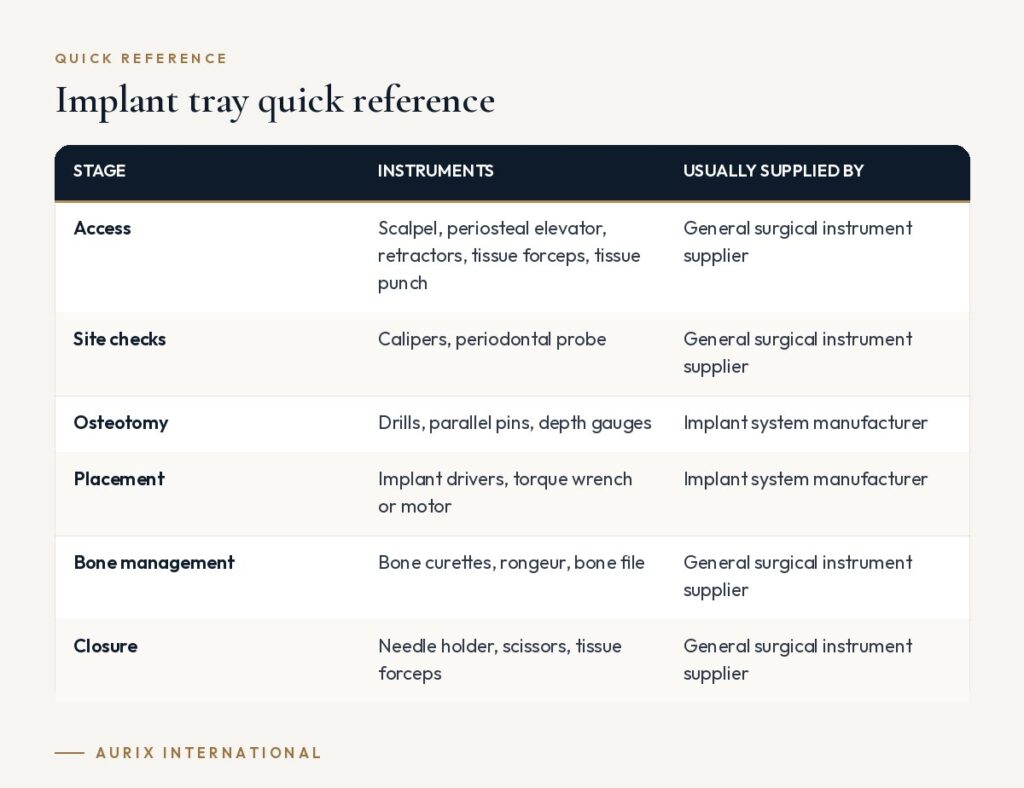
Implant tray quick reference
| Stage | Instruments | Usually supplied by |
|---|---|---|
| Access | Scalpel, periosteal elevator, retractors, tissue forceps, tissue punch | General surgical instrument supplier |
| Site checks | Calipers, periodontal probe | General surgical instrument supplier |
| Osteotomy | Drills, parallel pins, depth gauges | Implant system manufacturer |
| Placement | Implant drivers, torque wrench or motor | Implant system manufacturer |
| Bone management | Bone curettes, rongeur, bone file | General surgical instrument supplier |
| Closure | Needle holder, scissors, tissue forceps | General surgical instrument supplier |
How to choose implant surgery instruments
- Separate system-specific and general instruments. Drills, drivers and torque devices must match your implant system. Everything else can be standardized across systems.
- Prioritize sharpness and fine tips. Thin tissue and tight spaces around implants reward slim periosteal elevators and fine forceps.
- Plan for grafting. If you graft at the time of placement, add carriers, pluggers and membrane instruments; see our list of the top 10 bone grafting instruments.
- Use a cassette. A dedicated implant cassette keeps the hand instruments organized and the sequence predictable for your assistant.
- Check materials and finish. Surgical-grade stainless steel with a satin finish reduces glare under surgical lights.
Our guide to dental implant surgical instruments beyond the drill kit goes deeper into each stage, and the periosteal elevators guide covers tip widths and handles. Once implants are restored, a different set of instruments is needed for maintenance; see the top 10 instruments for implant maintenance.
Frequently asked questions
Do I need different hand instruments for each implant system?
Generally no. Drills, drivers and torque devices are system-specific, but scalpels, elevators, retractors, curettes, rongeurs and suturing instruments work with any system.
What periosteal elevator is best for implant surgery?
The Molt No. 9 is a common all-round choice. Many surgeons add a thinner, sharper elevator for papillae and delicate tissue. Choose based on your flap designs and tissue types.
Are titanium instruments needed for implant surgery?
Not for surgery itself; surgical-grade stainless steel hand instruments are standard. Titanium or plastic instruments become more relevant when cleaning restored implant surfaces during maintenance.
How should implant surgical instruments be processed?
Clean, inspect, package and sterilize them according to each manufacturer’s IFU and CDC guidance for critical instruments. Disassemble multi-part items where the IFU requires it.
Build an implant tray that works with any system. Aurix International can assemble the general surgical hand instruments for implant procedures into a custom kit matched to your workflow. Design your implant surgery kit →


