


Dental instrument samples are your best chance to judge a supplier before committing to a larger order. A quick look on arrival is not enough, though; many problems only show up under magnification, in the hand, or after several cleaning and sterilization cycles. Use these ten checks to evaluate samples systematically and compare suppliers fairly.
Key takeaways
- Inspect samples under good light and magnification, not just at arm’s length.
- Test instruments clinically and in your own reprocessing workflow.
- Check that patterns and numbers match the order exactly.
- Record your findings so you can compare suppliers objectively.
The top 10 things to check in dental instrument samples
1. Correct pattern and markings
Start by confirming you received exactly what you asked for. A Gracey 11/12 should be a Gracey 11/12, a #150 forceps should have the correct beak design for maxillary teeth, and a Williams probe should have the right markings. Check that pattern names, numbers and any supplier markings are clear, straight and permanent rather than faint or easily rubbed off.
2. Tip and beak alignment
For forceps, pliers, needle holders and tissue forceps, close the instrument and look at the tips against the light. The jaws should meet evenly without gaps, overlap or twisting. For double-ended instruments, check that the working ends are true to the handle and that mirror-image ends really are mirror images.
3. Blade sharpness and geometry
Scalers, curettes and chisels should arrive sharp. Use a plastic test stick to see whether the edge grabs rather than slides, and look at the blade under magnification: the cutting edge should be continuous and free of nicks or burrs. On Gracey curettes, check that the blade is offset correctly to the terminal shank and that only one edge is the cutting edge.
4. Surface finish
Look for a uniform satin or mirror finish without pits, cracks, grinding marks, scale or discoloration. Rough areas, especially in serrations and around joints, trap debris and are harder to clean. Our article on satin versus mirror finishes explains what each finish offers.
5. Joint action
Hinged instruments should open and close smoothly with even resistance through the full range. There should be no grinding, wobble or side-to-side play. Box joints should be neat and free from cracks, and ratchets on needle holders and hemostats should engage securely at each step and release cleanly.
6. Serrations and jaw surfaces
Check serrations on tissue forceps, needle holders, hemostats and extraction forceps under magnification. They should be crisp, evenly spaced and meshing correctly. Tungsten carbide inserts, where present, should be firmly seated with no gaps where debris could collect.
7. Handle design, balance and weight
Hold each instrument the way you would during a procedure. Consider handle diameter, knurling or texture, weight and balance. A well-balanced instrument feels stable and reduces hand fatigue. Ask clinicians who will use the instruments daily for their view, since preference varies. Our guide to handle diameter and hand fatigue can help frame the discussion.
8. Shank rigidity and strength
Some instruments need flexibility and others need rigidity. A periodontal curette shank should transmit tactile feedback without being flimsy; an elevator or luxator must not bend under appropriate working force. Check that shanks are straight, smoothly joined to the handle and free from visible weak points.
9. Performance after cleaning and sterilization
This is the check most often skipped. Run samples through your normal process several times: cleaning, ultrasonic cycle if used, drying, packaging and autoclaving, all according to the instrument’s IFU. Then inspect again for spotting, staining, rust, changes in joint action or loss of markings. Instruments that change noticeably after a handful of cycles are unlikely to last.
10. Documentation and packaging
Samples should arrive with the information you need: product identification, care and reprocessing instructions, and packaging that protects tips and edges. Poorly protected sharp instruments often arrive with damaged tips. Missing documentation is itself a useful finding about the supplier.
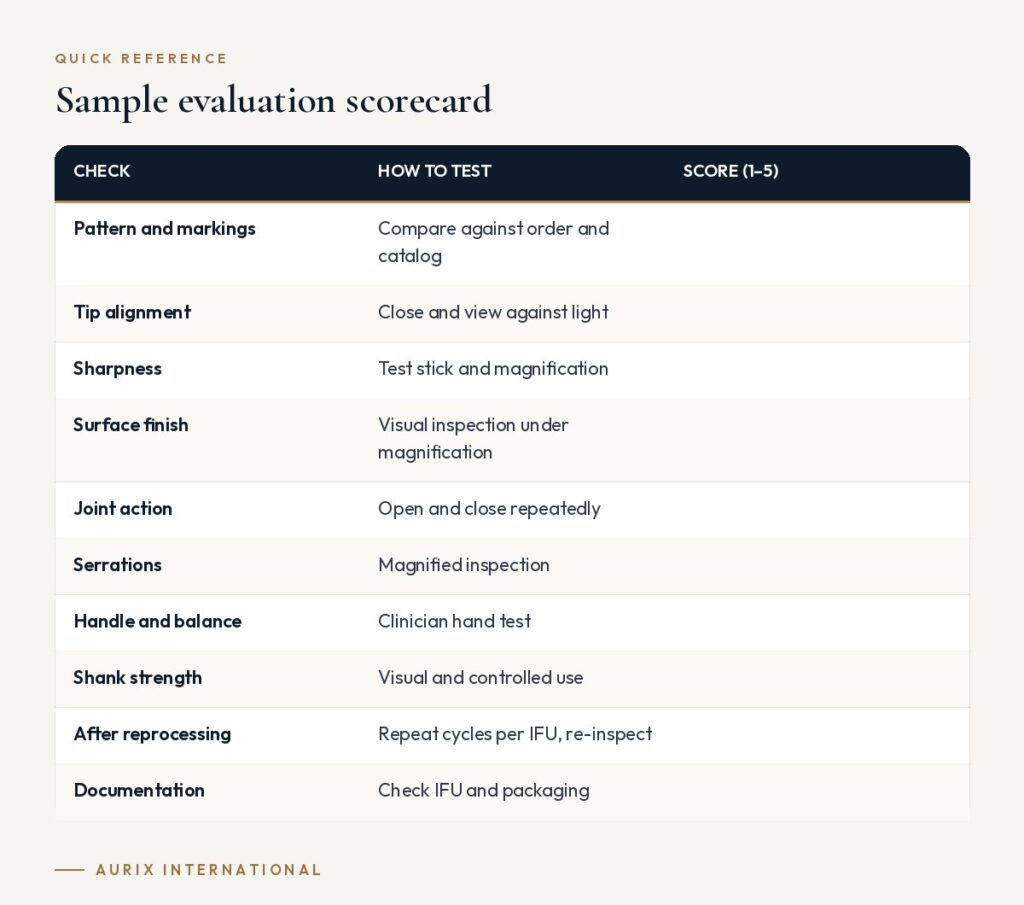
Sample evaluation scorecard
| Check | How to test | Score (1–5) |
|---|---|---|
| Pattern and markings | Compare against order and catalog | |
| Tip alignment | Close and view against light | |
| Sharpness | Test stick and magnification | |
| Surface finish | Visual inspection under magnification | |
| Joint action | Open and close repeatedly | |
| Serrations | Magnified inspection | |
| Handle and balance | Clinician hand test | |
| Shank strength | Visual and controlled use | |
| After reprocessing | Repeat cycles per IFU, re-inspect | |
| Documentation | Check IFU and packaging |
How to run a fair sample comparison
- Request the same patterns from each supplier so you are comparing like with like.
- Label samples discreetly so evaluators judge performance rather than brand.
- Involve both clinicians and sterilization staff; they notice different problems.
- Allow enough time for multiple reprocessing cycles before making a decision.
- Keep notes and photos of any defects to discuss with the supplier.
For a full testing timeline, see our protocol for evaluating supplier samples, and once you place an order, apply the same checks to incoming stock using our guide to quality checks on arrival.
Frequently asked questions
How many samples should I request?
Ask for your highest-use instruments and at least one example from each key category, such as a curette, a forceps and a hinged instrument like a needle holder. That gives a good picture of overall quality.
How many sterilization cycles should samples go through?
There is no fixed number, but several full cycles following the IFU will reveal most finish and corrosion problems. Longer clinical use over a few weeks shows how edges and joints hold up.
Should samples be free?
Policies vary between suppliers. Some provide free samples, others charge and credit the cost against a later order. What matters is that the samples represent the products you will actually receive.
Put our instruments to the test. Aurix International welcomes evaluation of its surgical-grade stainless steel instruments by clinics, groups and distributors. Request information →


