
Samples are the single best way to judge a dental instruments supplier — but only if you test them properly. “It feels nice” is not enough to justify a large order to partners or a procurement board. This four-week protocol turns sample testing into evidence: what to request, what to test on arrival, how to run reprocessing trials and how to score the results.
Key takeaways
- Request samples that represent hinged, cutting, fine-tipped instruments and a kit.
- Inspect on day one, then test through 2–4 weeks of normal reprocessing.
- Photograph samples at the start and end to compare staining and wear.
- Check that production orders match approved samples.
Which samples to request
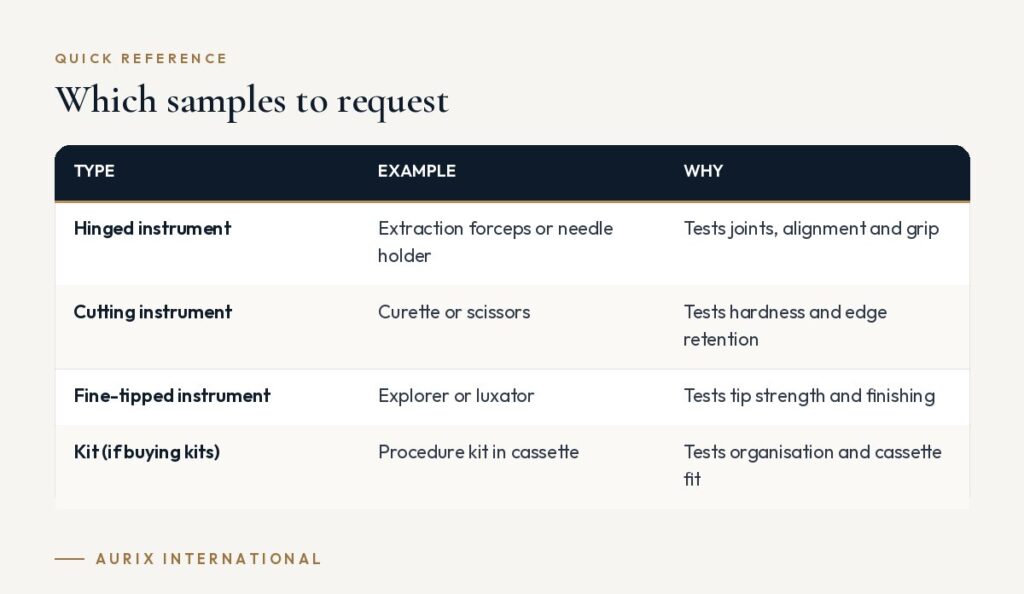
| Type | Example | Why |
|---|---|---|
| Hinged instrument | Extraction forceps or needle holder | Tests joints, alignment and grip |
| Cutting instrument | Curette or scissors | Tests hardness and edge retention |
| Fine-tipped instrument | Explorer or luxator | Tests tip strength and finishing |
| Kit (if buying kits) | Procedure kit in cassette | Tests organisation and cassette fit |
Day 1: Arrival inspection
- Photograph each sample.
- Inspect finish under magnification for burrs, pits, cracks and uneven polishing.
- Check markings, packaging and any documentation provided.
- Run the function tests below.
Function tests by instrument
| Instrument | Test | Pass |
|---|---|---|
| Extraction forceps | Close and hold to light; open and close 20 times | Beaks meet evenly; smooth joint, no lateral play |
| Needle holder | Grip your usual needle; engage ratchet | No rotation; ratchet holds and releases cleanly |
| Scissors | Cut latex or wet gauze | Clean cut along full blade |
| Curette / scaler | Test stick | Edge bites, does not slide |
| Explorer / luxator | Magnified tip inspection | Fine, straight, sharp |
| Cassette | Load instruments; place in autoclave | Secure fit; fits chamber |
Weeks 1–4: Use and reprocessing trial
- Use samples clinically where appropriate.
- Reprocess exactly as normal: cleaning, ultrasonic, drying, steam sterilisation.
- Record staining, spotting, stiffness or loss of edge after each week.
- Run supplier samples side by side under identical conditions.
If samples stain, rule out process causes first — water quality, detergent residues and chloride exposure — using our guide to rust and staining.
Scoring sheet
| Criterion | Weight | Score 1–5 | Notes |
|---|---|---|---|
| Finish quality | 15% | ||
| Function (joints, tips, grip) | 25% | ||
| Sharpness and edge retention | 20% | ||
| Ergonomics and balance | 15% | ||
| Corrosion resistance after cycles | 20% | ||
| Packaging and documentation | 5% |
Involve the team
Ask the clinicians and assistants who will use the instruments to score ergonomics and function. Their buy-in matters as much as the numbers.
From samples to production
Once a supplier passes, place a moderate first order and compare production instruments against the approved samples. Consistency between samples and production is one of the strongest signs of a reliable supplier. For OEM and private-label projects, keep approved samples as “golden samples” for future batches.
Documenting results
Photograph each sample when it arrives and again after a few weeks of reprocessing. Side-by-side photos make differences in staining or wear obvious and are useful if you need to justify the decision to others.
Frequently asked questions
Do suppliers charge for samples?
Policies vary; some charge and credit the cost against a later order.
How long should testing take?
Two to four weeks of normal reprocessing usually reveals finishing and corrosion issues.
How many samples do I need?
Four to six instruments covering the categories above are usually enough for a clinic; distributors may test more.
Next steps
Request samples from Aurix, use our receiving checklist for production orders, and compare suppliers in our top 10 US guide.