


A well-organized hygiene tray saves time at every appointment and helps make sure nothing is missing when the patient is already in the chair. The core of the tray is the same in most practices: assessment instruments first, then supragingival and subgingival debridement tools, then polishing. This list covers the ten instruments that belong on a standard hygiene tray, arranged in the order they are typically used.
Key takeaways
- Lay instruments out in order of use, left to right, so the workflow is predictable.
- A basic hygiene tray needs a mirror, explorer, probe, cotton pliers, sickles, curettes and polishing items.
- Cassettes keep instruments together through cleaning, sterilization and storage.
- Keep a separate perio add-on pack for scaling and root planing appointments.
The top 10 instruments for a hygiene tray
1. Mouth mirror
The first instrument picked up and usually the last put down. The mirror retracts soft tissue, reflects light and gives indirect vision of lingual and distal surfaces.
Tray tip: place it first in the cassette, and keep spare mirror heads in stock so scratched ones can be swapped quickly.
2. Explorer
A double-ended explorer, often a Shepherd’s hook (No. 23) on one end, checks for supragingival calculus, defective margins and sealant integrity. Also, many practices also include an ODU 11/12 explorer for subgingival detection.
3. Periodontal probe
Used for periodontal charting at recall visits. A UNC-15, Williams or color-coded probe is standard; some practices use an explorer/probe combination instrument to save a slot.
Tray tip: keep the same probe type in every hygiene cassette so charting stays consistent.
4. Cotton pliers
Locking or non-locking cotton pliers (tweezers) carry cotton rolls, gauze and floss into the mouth and remove debris. Serrated tips hold materials securely.
Tray tip: check that the tips meet evenly when closed. Pliers with misaligned or sprung tips drop cotton rolls and should be repaired or replaced.
5. Anterior sickle scaler
A straight sickle removes supragingival calculus on anterior teeth, especially lingual of mandibular incisors. It is often the first debridement instrument used after assessment.
Tray tip: a double-ended design such as an H6/H7 can cover anteriors and premolars, which may free up a slot in a compact cassette.
6. Posterior sickle scaler
A contra-angled sickle such as a 204S reaches the interproximal surfaces of premolars and molars just below the contacts. Its mirror-image ends let the clinician work mesial and distal surfaces without changing instruments.
7. Universal curette
A universal curette such as the Columbia 13/14 handles light subgingival deposits on most surfaces. For routine prophylaxis appointments it may be the only curette needed.
Tray tip: because both edges cut, a universal curette needs sharpening on both sides. Note this in your sharpening routine so one edge is not neglected.
8. Gracey curettes (11/12 and 13/14)
At minimum, include Gracey 11/12 for posterior mesial surfaces and 13/14 for posterior distal surfaces. Add a 1/2 or 5/6 for anteriors if the universal curette does not adapt well to your patients’ anatomy.
Tray tip: keep the full Gracey series in a separate perio add-on pack for scaling and root planing visits, so the standard tray stays lean. Our guide to Gracey curette sets explains what a complete set includes.
9. Ultrasonic scaler insert or tip
If the practice uses powered scaling, include a sterilized insert or tip in the setup. Standard inserts handle heavier deposits; slim inserts are for deeper pockets.
Tray tip: store inserts so their tips are protected from knocks in the cassette, and check them regularly against the manufacturer’s wear guide.
10. Prophy angle
Disposable or reusable prophy angles pair with prophy paste for polishing after debridement. Reusable angles must be cleaned, lubricated and sterilized according to the manufacturer’s instructions for use (IFU).
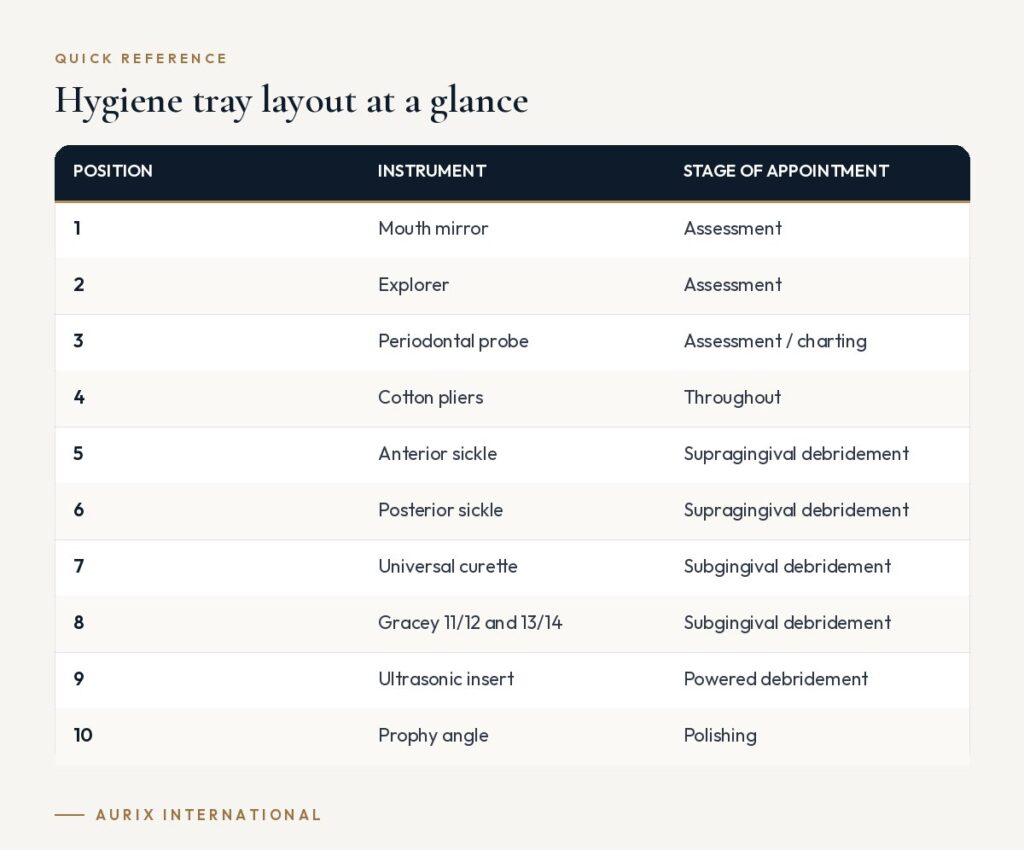
Hygiene tray layout at a glance
| Position | Instrument | Stage of appointment |
|---|---|---|
| 1 | Mouth mirror | Assessment |
| 2 | Explorer | Assessment |
| 3 | Periodontal probe | Assessment / charting |
| 4 | Cotton pliers | Throughout |
| 5 | Anterior sickle | Supragingival debridement |
| 6 | Posterior sickle | Supragingival debridement |
| 7 | Universal curette | Subgingival debridement |
| 8 | Gracey 11/12 and 13/14 | Subgingival debridement |
| 9 | Ultrasonic insert | Powered debridement |
| 10 | Prophy angle | Polishing |
Tips for setting up and choosing hygiene tray instruments
- Use cassettes. Instruments that stay in a cassette from chair to washer to sterilizer are less likely to go missing or be damaged. See cassette organization tips.
- Arrange in order of use. A consistent left-to-right sequence makes it easier for any team member to set up or assist.
- Keep disposables nearby, not on the tray. Air/water syringe tips, saliva ejectors, gauze, floss and paste can be added at setup.
- Standardize across rooms. Identical trays simplify ordering and training. Our step-by-step hygiene tray guide covers the full setup routine.
- Check instruments at each reprocessing cycle. Look for dull edges, bent tips, corrosion and loose color rings before packaging.
Pre-assembled hygiene kits are an efficient way to equip several operatories identically; Aurix International offers both ready-made kits and custom configurations.
Frequently asked questions
What is the minimum set of instruments for a hygiene tray?
A mirror, explorer, probe, cotton pliers, at least one sickle scaler and one curette form a minimal tray. In addition, most practices add a second sickle and a pair of Gracey curettes for more complete coverage.
Should hygiene and perio trays be different?
Many practices keep a standard recall tray and a separate periodontal add-on pack containing the full Gracey series, extended-shank curettes and files for scaling and root planing appointments.
How should hygiene tray instruments be sterilized?
Clean instruments after use (ideally in their cassette), inspect, wrap or pouch them and sterilize in a heat sterilizer, following CDC guidance for dental settings and the manufacturer’s IFU. Store packages in a clean, dry area until use.
How many hygiene trays does a practice need?
Plan for enough complete trays to cover every hygiene appointment between reprocessing cycles, plus a few spares. The exact number depends on schedule length, the number of hygiene chairs and how quickly instruments can be cleaned, sterilized and cooled.
Set up every hygiene room the same way. Aurix can assemble a hygiene tray to your exact instrument list using our online kit builder. Build your hygiene kit →


