


Good instrument cassette organization makes room turnover faster, reduces handling of sharp instruments and keeps procedures running smoothly. A cassette that is set up the same way every time lets clinicians reach for the right instrument without looking and lets assistants spot a missing item at a glance. These ten tips help you design cassettes that work for both the operatory and the sterilization area.
Key takeaways
- Standardize each cassette by procedure and arrange instruments in order of use.
- Tray maps and color coding help new staff set up and check cassettes correctly.
- Keeping instruments in the cassette from chairside to storage reduces sharps exposure and damage.
- Plan enough cassettes for your schedule and review setups regularly.
The top 10 instrument cassette organization tips
1. Standardize cassettes by procedure
Create a defined setup for each common procedure, such as examination, hygiene, restorative, endodontic and extraction. Every cassette of that type should contain the same instruments in the same positions. Standardization reduces errors, speeds setup and makes it easier to stock replacements.
Practical tip: start with what your team actually uses. Remove instruments that are rarely picked up and keep them in a separate pouch.
2. Arrange instruments in order of use
Place instruments left to right (or right to left for left-handed operators) in the sequence they are usually needed. For an examination setup, that typically means mirror, explorer, probe and cotton pliers first. For a restorative cassette, it may run from diagnostic instruments through placement and carving instruments.
3. Create a tray map for every cassette
A tray map is a photo or diagram showing each instrument in its slot. Keep laminated copies in the sterilization area and the operatory. Tray maps make it easy to train new assistants and to check cassettes before they are wrapped. Our guide to training assistants on instrument identification pairs well with this approach.
4. Use color coding thoughtfully
Color-coded cassettes, rings or tape can identify procedure type, operatory or clinician. Keep the system simple and documented. If you use instrument tape, follow the manufacturer’s directions and inspect it regularly, because worn or lifting tape can trap debris. See the pros and cons in our article on color coding instruments.
5. Choose the right cassette size
Overcrowded cassettes make it hard to clean instruments thoroughly and to sterilize them effectively. Cassettes that are too large waste chamber space. Choose sizes that hold your standard set with a little room, and check that they fit your ultrasonic cleaner and sterilizer.
- Measure your sterilizer chamber and ultrasonic tank before ordering.
- Look for cassettes with rails or clips that hold instruments securely.
- Leave space for accessories you use often, such as a rubber dam clamp or matrix band holder.
6. Keep instruments in the cassette throughout reprocessing
One of the biggest advantages of cassettes is that instruments can stay in them from chairside through ultrasonic cleaning or washing, drying, wrapping and sterilization. Less handling means fewer sharps injuries and less damage to fine tips. Follow the cassette and cleaner IFUs for cycle times, which are often longer for cassettes than for loose instruments.
7. Plan where sharps and disposables go
Scalpel blades, needles and other single-use sharps should be removed and discarded at the point of use, not processed in the cassette. Decide in advance where reusable sharp instruments sit in the cassette so tips face the same direction and away from hands when it is opened.
8. Wrap and label cassettes consistently
Use wraps that are FDA-cleared for your sterilization method and compatible with your sterilizer. Wrap cassettes the same way every time, add an internal chemical indicator if required, and label each one with the date, sterilizer and load number. Consistent labeling supports traceability. Our guide to pouches and cassette wraps covers technique.
9. Build enough sets to match your schedule
Count how many procedures of each type you perform in a typical day and allow for the full reprocessing time. Without enough cassettes, teams are tempted to rush cleaning or overload the sterilizer. Having a buffer of extra sets keeps the schedule moving.
10. Audit and update cassettes regularly
Workflows change as techniques and staff change. Review your cassette contents periodically, ask clinicians what they add or remove most often, and update tray maps when you make changes. Use the audit to remove worn instruments and replace them with matching patterns.
Example cassette setups
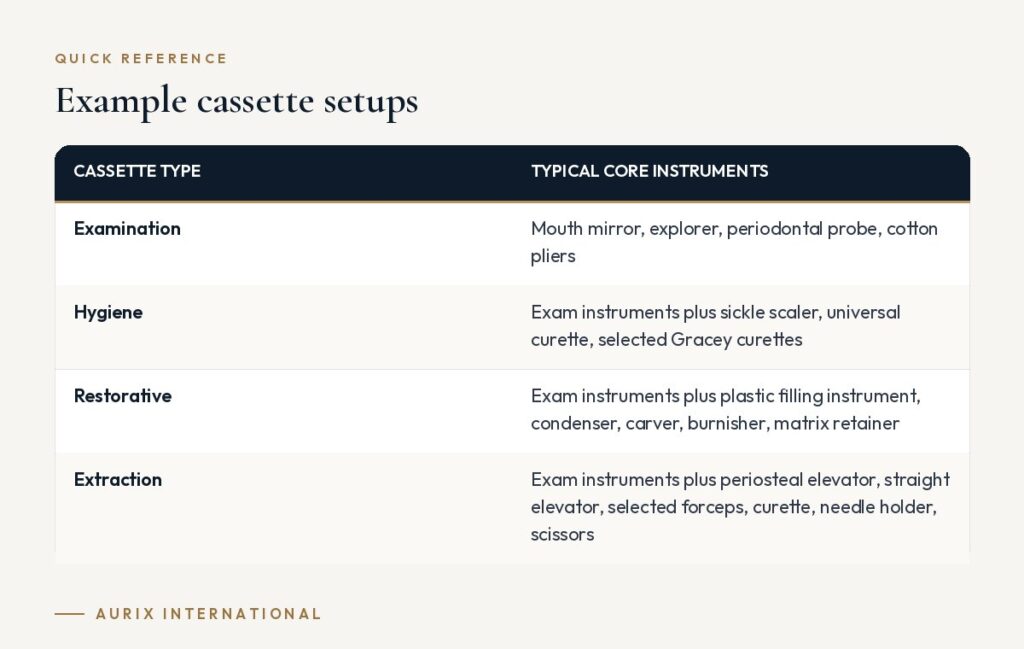
The table below shows typical contents. Adjust it to your clinicians’ preferences and procedures.
| Cassette type | Typical core instruments |
|---|---|
| Examination | Mouth mirror, explorer, periodontal probe, cotton pliers |
| Hygiene | Exam instruments plus sickle scaler, universal curette, selected Gracey curettes |
| Restorative | Exam instruments plus plastic filling instrument, condenser, carver, burnisher, matrix retainer |
| Extraction | Exam instruments plus periosteal elevator, straight elevator, selected forceps, curette, needle holder, scissors |
For more detailed setups, see setting up a hygiene tray and our guide to organizing cassettes for faster turnover.
How to choose cassettes and kits
- Material and build: look for cassettes that withstand repeated washing and steam sterilization without warping.
- Secure holding: instruments should not move or touch each other during cleaning.
- Drainage: perforated designs allow solution, water and steam to flow through.
- Compatibility: check fit with your washer, ultrasonic tank and sterilizer.
- Kit options: buying a pre-assembled or custom kit can make it easier to fill each cassette with matching instruments.
Frequently asked questions
Are cassettes better than pouches?
Cassettes suit procedures with many instruments because they reduce handling and keep sets organized. Pouches work well for single instruments or small groups. Many clinics use both.
Can cassettes go in the ultrasonic cleaner?
Many are designed for ultrasonic cleaning or instrument washers. Check the cassette IFU and allow the longer cycle times usually recommended for cassettes.
How many instruments should be in a cassette?
Only what the procedure routinely needs. Overfilled cassettes are harder to clean and sterilize, so keep occasional extras in separate pouches.
Fill your cassettes with a matched set. With Aurix International’s online kit builder you can choose the instruments for each procedure and order them as a custom kit. Build your kit →


