

A dental instruments checklist helps a new practice avoid two expensive mistakes: buying patterns nobody uses and running out of the instruments everyone needs. This checklist covers 25 essential hand instruments for a general practice, grouped by tray, with notes on what each is for and what to check when it arrives. Use it as a starting point and adapt it to the procedures your team actually performs.
Key takeaways
- The 25 instruments below are grouped into exam, hygiene, restorative, isolation and matrix, and surgical trays.
- Order quantities by how many appointments each tray covers during one full cleaning and sterilization cycle.
- Agree on preferred patterns with every clinician before ordering, especially for restorative and surgical instruments.
- Inspect every instrument on arrival and keep the manufacturer’s instructions for use (IFU) on file.
Before you start: how to use this checklist
Work through the list tray by tray. For each instrument, decide which pattern you will standardize on, how many sets each operatory needs, and whether you will buy it individually or as part of a kit. A simple way to estimate quantities is to count how many times a tray is used in the time it takes to clean, package, sterilize, dry and return a set to the operatory, then add spares to cover busy days, sharpening and repairs.
It is also worth recording a “standard tray card” for each procedure: a list or photo of the instruments in the order they are used. Tray cards make setup consistent, help new staff learn quickly and make reordering easier.
The top 25 dental instruments for a new practice
Exam tray (1–5)
These five instruments are used at almost every appointment, so they are bought in the largest numbers.
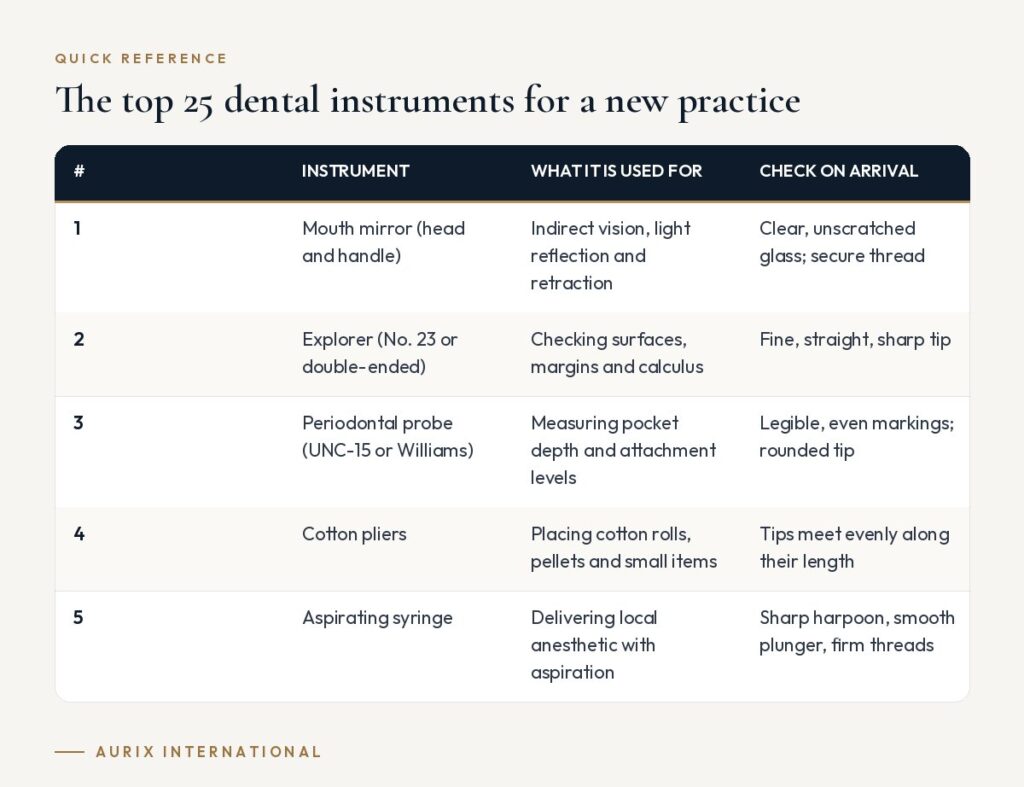
| # | Instrument | What it is used for | Check on arrival |
|---|---|---|---|
| 1 | Mouth mirror (head and handle) | Indirect vision, light reflection and retraction | Clear, unscratched glass; secure thread |
| 2 | Explorer (No. 23 or double-ended) | Used when checking surfaces, margins and calculus | Fine, straight, sharp tip |
| 3 | Periodontal probe (UNC-15 or Williams) | Used when measuring pocket depth and attachment levels | Legible, even markings; rounded tip |
| 4 | Cotton pliers | Used when placing cotton rolls, pellets and small items | Tips meet evenly along their length |
| 5 | Aspirating syringe | Used when delivering local anesthetic with aspiration | Sharp harpoon, smooth plunger, firm threads |
Many practices buy mirror heads separately from handles so worn heads can be replaced cheaply. Agree on one probe pattern for charting so readings are comparable between clinicians.
Hygiene tray (6–10)
Hygiene instruments see heavy, repetitive use. Plan for extra sets so instruments can be rotated out for sharpening without disrupting the schedule.
| # | Instrument | What it is used for | Check on arrival |
|---|---|---|---|
| 6 | Sickle scaler (H6/H7 or 204S) | Used when removing supragingival calculus, especially interproximally | Sharp point and cutting edges; straight shank |
| 7 | Universal curette (Columbia 13/14 or Barnhart 5/6) | Supra- and subgingival scaling on most surfaces | Even blade; rounded toe |
| 8 | Gracey curettes (at least 11/12 and 13/14) | Area-specific root planing: 11/12 posterior mesials, 13/14 posterior distals | Correct offset blade; clear pattern marking |
| 9 | Implant scaler | Used when debriding implant abutments without scratching titanium | Tips compatible with implant surfaces |
| 10 | Sharpening stone | Used when restoring the cutting edge of scalers and curettes | Correct grit; flat, undamaged surface |
Many hygienists add Gracey 1/2 or 5/6 for anterior teeth and 7/8 for posterior facial and lingual surfaces. Ask your hygiene team what they prefer before ordering. Our guide to setting up a hygiene tray shows a typical layout.
Restorative tray (11–17)
Restorative instruments are the most personal choice in a practice. Ask each dentist for their preferred patterns and try to agree on a common core set.
| # | Instrument | What it is used for | Check on arrival |
|---|---|---|---|
| 11 | Spoon excavator | Used when removing soft carious dentin and temporary materials | Sharp blade edge; both ends intact |
| 12 | Plastic filling instrument | Used when carrying and shaping soft restorative materials and cements | Smooth paddle and condenser ends |
| 13 | Amalgam condenser or composite plugger | Used when packing restorative material into the preparation | Flat, even nib face |
| 14 | Ball burnisher | Used when smoothing restorations and adapting matrix bands | Polished, smooth ball |
| 15 | Carver (Hollenback or discoid-cleoid) | Used when carving occlusal anatomy and removing excess material | Sharp, symmetrical blades |
| 16 | Composite placement instrument | Used when placing and sculpting composite resin | Non-stick coating or high polish without defects |
| 17 | Cement spatula | Used when mixing cements, liners and bases | Flat, flexible blade; secure handle |
If your practice no longer places amalgam, swap the amalgam condenser for composite pluggers and consider removing amalgam carriers from your list entirely. See our article on setting up a restorative tray for more detail.
Isolation and matrix (18–19)
| # | Instrument | What it is used for | Check on arrival |
|---|---|---|---|
| 18 | Tofflemire matrix retainer | Used when holding a matrix band to form a missing wall during Class II restorations | Smooth screw action; vise holds band firmly |
| 19 | Rubber dam kit (frame, punch, clamp forceps, clamps) | Used when isolating teeth for endodontics and restorations | Punch cuts clean holes; clamp forceps spread smoothly; clamps for molars, premolars and anteriors |
Rubber dam isolation keeps the field dry, protects the airway and improves visibility. Stock a range of clamp sizes; a single “universal” clamp rarely fits every tooth.
Extraction and surgical tray (20–25)
Surgical instruments are needed in smaller numbers than exam sets, but pattern choice matters. Build a core set, then add patterns to match your caseload.
| # | Instrument | What it is used for | Check on arrival |
|---|---|---|---|
| 20 | Extraction forceps (150, 151, 23, upper molar pair) | Used when removing teeth: 150 upper anteriors and premolars, 151 lowers, 23 lower molars, 88R/88L or 53R/53L upper molars | Beaks meet evenly; smooth hinge with no play |
| 21 | Elevators (straight 301, Cryer pair) | Used when luxating teeth and removing roots | Undamaged tips; secure handles |
| 22 | Periosteal elevator (Molt 9) | Used when reflecting gingiva and periosteum to raise a flap | Smooth, sharp but not cutting edges |
| 23 | Scalpel handle (No. 3) | Used when holding disposable blades such as No. 15 and 15C | Blade fits securely |
| 24 | Needle holder (Mayo-Hegar or Castroviejo) | Used when gripping suture needles during closure | Jaws hold the needle without slipping; ratchet locks reliably |
| 25 | Surgical scissors (Goldman-Fox, Iris or Dean) | Used when trimming soft tissue and cutting sutures | Clean cut along the full blade length |
Commonly added surgical instruments include a Minnesota retractor, a surgical curette for socket debridement, Adson tissue forceps, a hemostat, a bone file and a rongeur. Our guide to setting up an extraction tray walks through the sequence.
Summary checklist
| Tray | Instruments | Relative quantity |
|---|---|---|
| Exam | 1–5: mirror, explorer, probe, cotton pliers, aspirating syringe | Highest |
| Hygiene | 6–10: sickle scaler, universal curette, Gracey curettes, implant scaler, sharpening stone | High; extra sets for sharpening rotation |
| Restorative | 11–17: excavator, plastic instrument, condenser, burnisher, carver, composite instrument, cement spatula | Medium to high |
| Isolation and matrix | 18–19: Tofflemire retainer, rubber dam kit | Medium |
| Surgical | 20–25: forceps, elevators, periosteal elevator, scalpel handle, needle holder, scissors | Lower, based on surgical volume |
Buying tips for a new practice
- Standardize patterns across operatories. The same instruments in every room make setup faster, reduce errors and simplify reordering.
- Consider kits and cassettes. Pre-assembled kits and cassettes keep procedure sets together through reprocessing. If your workflow is unusual, a custom kit can match your exact tray card.
- Check steel and construction. Cutting instruments need hardened stainless steel that holds an edge; hinged instruments need well-fitted joints. Ask your supplier about steel grades and finishing.
- Match your reprocessing. Make sure instruments and cassettes fit your ultrasonic cleaner and sterilizer, and that their IFU matches your cycles and cleaning chemistry.
- Inspect on arrival. Check every instrument against your order, and look at tips, markings, joints and finish before putting them into service.
- Budget for maintenance. Include sharpening, lubrication of hinged instruments, repairs and replacements in your first-year budget.
- Choose a reliable supplier. Consistency of supply matters as much as price when you need to reorder or expand. Our guide on how to choose a dental instrument supplier lists the questions to ask.
Common ordering mistakes to avoid
New practices tend to make the same handful of mistakes when they order instruments for the first time. Most are easy to avoid with a little planning.
- Ordering one set per operatory. One set per room means the chair sits idle while instruments are being processed. Count sets against your sterilization cycle, not against the number of rooms.
- Letting every clinician choose everything. Personal preferences matter, but if each dentist uses different patterns for every instrument, tray setup and reordering become complicated. Agree on a shared core and allow a small number of personal additions.
- Forgetting the less glamorous items. Spare mirror heads, extra cotton pliers, rubber dam clamps in several sizes, sharpening stones and cassettes are easy to leave off a first order and awkward to be without.
- Buying surgical patterns you will rarely use. A large forceps collection looks impressive but ties up budget. Start with the core patterns listed above and add others when your caseload shows a real need.
- Skipping incoming inspection. Instruments with misaligned tips, stiff joints or unclear markings are much easier to return before they have been used and sterilized.
- Ignoring reprocessing capacity. Instruments, cassettes and pouches must fit your ultrasonic cleaner and sterilizer. Check chamber sizes and the IFU before you order large cassettes.
Caring for new instruments from day one
Good habits from the first week extend instrument life considerably. Remove gross debris at chairside and keep instruments moist if cleaning will be delayed, because dried blood and cement are harder to remove and can lead to staining and corrosion. Clean instruments in an ultrasonic cleaner or washer-disinfector, rinse and dry them thoroughly, and inspect each one under good light, ideally with magnification, before packaging.
Lubricate hinged instruments such as forceps, needle holders and scissors with a sterilization-compatible lubricant as the manufacturer recommends, and process them in the open position so steam can reach the joint. Sterilize in pouches or wrapped cassettes, monitor your sterilizer with mechanical, chemical and biological indicators according to CDC guidance, and store sterile packages in a clean, dry, enclosed area. Finally, set a regular schedule for sharpening scalers and curettes and for a quick monthly inspection of every tray, so worn instruments are replaced before they fail during a procedure.
Frequently asked questions
What instruments does a new dental practice need first?
Start with exam setups, hygiene instruments and restorative instruments, since these are used at most appointments. Add extraction and surgical instruments based on the procedures you plan to offer from day one, and a rubber dam kit for isolation.
How many exam setups should a new practice buy?
Enough to cover every appointment that takes place during one full processing cycle, plus spares. A practice with more chairs, shorter appointments or a slower sterilization process will need more sets.
Should every operatory have identical instruments?
Ideally, yes. Identical setups make it easier for any assistant to work in any room and for any clinician to find what they need. Personal preferences can be handled with a few clinician-specific cassettes.
What else should be on a new practice instrument budget?
Cassettes, sterilization pouches, instrument cleaning supplies, sharpening equipment and spares for high-use items. Budget for regular replacement of instruments that wear out, such as curettes and explorers.
Turn your checklist into ready-to-use trays. Aurix International supplies surgical-grade stainless steel instruments individually or as pre-assembled and custom kits for every procedure in a new practice. Build your practice kits →


