

Periodontal instruments are the hand and powered tools used to assess, debride and maintain the tissues that support the teeth. A well-chosen set lets a clinician measure pockets accurately, detect calculus by feel and remove deposits without gouging the root surface. This guide covers the ten instruments that appear on almost every periodontal tray, what each one does and how to get the most from it.
Key takeaways
- Assessment instruments (probes and explorers) come first: you cannot treat what you have not measured and felt.
- Sickle scalers are for supragingival calculus; curettes work below the gumline.
- Gracey curettes are area-specific, while universal curettes adapt to most surfaces with one design.
- Hoes, files and chisels are specialist tools for heavy or tenacious deposits in accessible areas.
- Sharp, well-maintained instruments give better results with less force and less hand fatigue.
The top 10 periodontal instruments
1. Periodontal probe
The probe is the foundation of periodontal assessment. It is a slender, calibrated working end used to measure probing depths, clinical attachment levels, bleeding on probing and recession. Common designs include the Williams probe (marks at 1, 2, 3, 5, 7, 8, 9 and 10 mm) and the UNC-15, which is marked at every millimeter up to 15 mm with color bands for faster reading.
Tip: walk the probe in small steps around each tooth with light pressure, keeping it as parallel as possible to the long axis of the tooth. Use the same probe design across your team so readings stay consistent between visits. Our guide to periodontal probes and their markings goes deeper.
2. Explorer
Explorers are thin, flexible wires that transmit vibrations to the fingers, letting you detect subgingival calculus, root irregularities and restoration margins. For periodontal work the ODU 11/12 is a favorite because its curved shank reaches posterior pockets and line angles. The Shepherd’s hook (No. 23) is better suited to supragingival and caries assessment.
Tip: use a light grasp and let the tip glide. Gripping hard dulls your tactile sense.
3. Anterior sickle scaler
A sickle scaler has a pointed tip, a triangular cross-section and two cutting edges. Anterior designs have a straight shank and remove supragingival calculus on incisors and canines, especially the heavy lingual deposits seen on mandibular anteriors.
Tip: keep the sickle above the gingival margin. Its pointed back and tip can traumatize soft tissue if pushed into the sulcus.
4. Posterior sickle scaler
Posterior sickles, such as the 204S or H6/H7-style double-enders, have contra-angled shanks that reach the proximal surfaces of premolars and molars. They are efficient at removing supragingival interproximal calculus just below the contact point.
Tip: use short, controlled pull strokes with a firm finger rest, and keep the tip pointed toward the contact area.
5. Universal curette
Universal curettes have a rounded toe, a semicircular cross-section and two cutting edges. The face is set at 90 degrees to the terminal shank, so one instrument can adapt to most tooth surfaces in the mouth. The Columbia 13/14 and Barnhart 5/6 are widely used examples.
Tip: tilt the lower shank slightly toward the tooth surface to achieve a working angle of roughly 70 to 80 degrees.
6. Gracey curettes
Gracey curettes are area-specific. Each blade is offset about 70 degrees from the terminal shank and only the lower edge cuts, which makes them ideal for subgingival debridement and root planing. The standard series runs from 1/2 through 17/18: 1/2 to 5/6 for anterior teeth and premolars, 7/8 and 9/10 for posterior facial and lingual surfaces, 11/12 and 15/16 for posterior mesial surfaces, and 13/14 and 17/18 for posterior distal surfaces.
Tip: when the terminal shank is parallel to the surface being instrumented, the blade is at the correct angle. See our guide to Gracey curette numbers for a tooth-by-tooth breakdown.
7. Periodontal hoe
The hoe has a single straight cutting edge set at about 100 degrees to the shank. It pairs with a pull stroke to remove heavy, ledge-like calculus on accessible surfaces, typically the facial and lingual of posterior teeth with shallow, open pockets.
Tip: make two-point contact (blade and shank) against the tooth to stabilize the hoe and avoid gouging the root.
8. Periodontal file
Files such as the Hirschfeld and Orban designs have several small cutting edges lined up on a base. They crush or fracture burnished calculus so it can then be removed with a curette.
Tip: files are not finishing instruments. Follow them with a curette to smooth the root surface.
9. Periodontal chisel
The chisel has a straight cutting edge in line with a slightly curved shank and pairs with a push stroke, mostly to remove supragingival calculus from the proximal surfaces of anterior teeth where interdental papillae are missing.
Tip: reserve the chisel for open embrasures. It cannot adapt to tight contacts or curved root surfaces.
10. Ultrasonic scaler and inserts
Powered scalers (magnetostrictive or piezoelectric) use rapid tip vibration and water flow to remove calculus and biofilm. Thin, periodontal-style tips reach deep pockets and furcations that are hard to access with hand instruments, and many clinicians use them for gross debridement before finishing with curettes.
Tip: use light pressure and keep the side of the tip, not the point, against the tooth. Replace worn inserts according to the manufacturer’s wear guide.
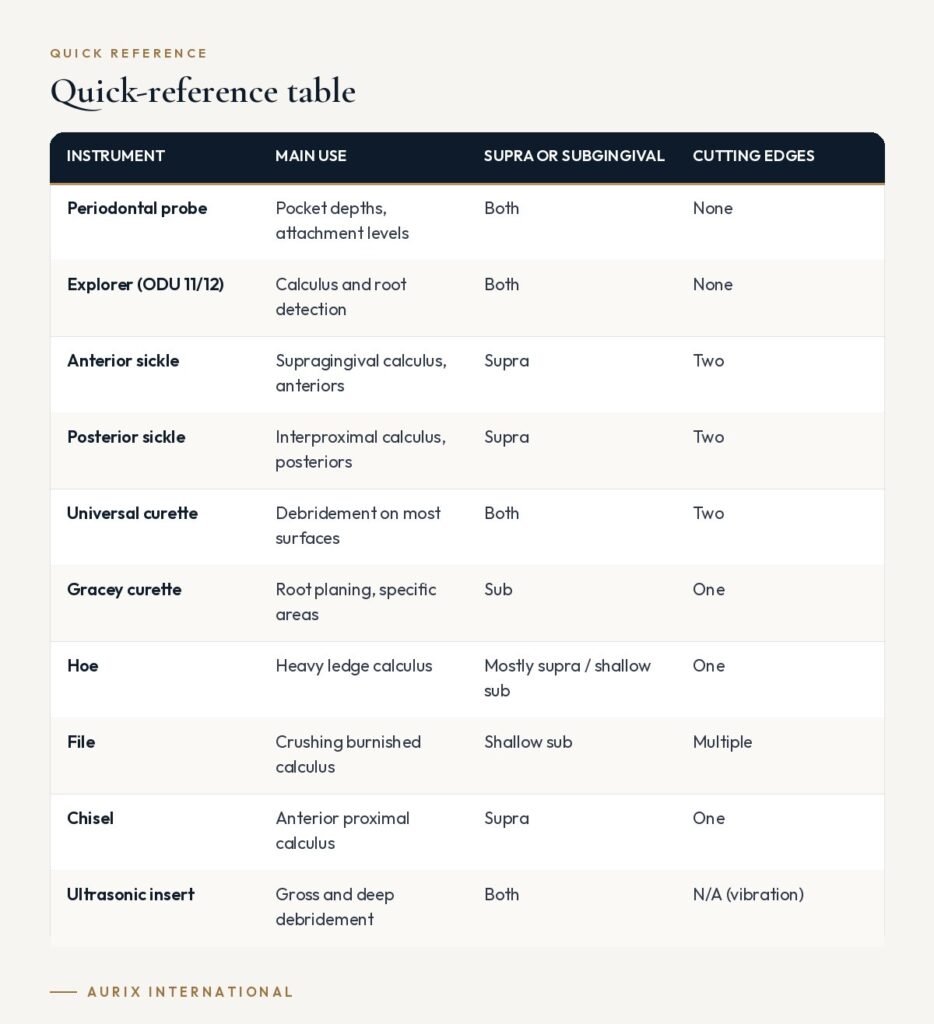
Quick-reference table
| Instrument | Main use | Supra or subgingival | Cutting edges |
|---|---|---|---|
| Periodontal probe | Pocket depths, attachment levels | Both | None |
| Explorer (ODU 11/12) | Calculus and root detection | Both | None |
| Anterior sickle | Supragingival calculus, anteriors | Supra | Two |
| Posterior sickle | Interproximal calculus, posteriors | Supra | Two |
| Universal curette | Debridement on most surfaces | Both | Two |
| Gracey curette | Root planing, specific areas | Sub | One |
| Hoe | Heavy ledge calculus | Mostly supra / shallow sub | One |
| File | Used when crushing burnished calculus | Shallow sub | Multiple |
| Chisel | Anterior proximal calculus | Supra | One |
| Ultrasonic insert | Gross and deep debridement | Both | N/A (vibration) |
How to choose periodontal instruments
- Start with a core set. A probe, an explorer, one anterior and one posterior sickle, a universal curette and Gracey 11/12 and 13/14 cover most routine cases. Add the rest of the Gracey series as your case mix grows.
- Check the steel and the edge. Look for surgical-grade stainless steel that holds an edge and resists corrosion through repeated sterilization cycles.
- Consider handle design. Larger-diameter, lightweight, textured handles reduce pinch force. Our article on handle diameter and hand fatigue explains why it matters.
- Plan for sharpening. Every curette and scaler will need regular sharpening, so choose blades with enough metal to tolerate it and budget for a stone and test stick.
- Standardize trays. Matching cassettes across operatories make setup and inventory simpler.
If you are equipping a practice or hygiene department, a supplier such as Aurix International can provide individual periodontal instruments, pre-assembled kits or a custom tray built around your protocol.
Frequently asked questions
What is the difference between a scaler and a curette?
A sickle scaler has a pointed tip and a triangular cross-section and targets supragingival calculus. A curette has a rounded toe and a semicircular cross-section, so it can be used below the gumline with less risk of tissue trauma.
Which Gracey curettes should I buy first?
Many clinicians start with 11/12 for posterior mesial surfaces and 13/14 for posterior distal surfaces, plus 5/6 or 1/2 for anterior teeth. These cover a large share of typical subgingival work.
Do I still need hand instruments if I use an ultrasonic scaler?
Yes. Most clinicians combine both. Ultrasonics are efficient for gross debridement and deep areas, while hand instruments give tactile feedback for detection, root planing and fine finishing.
How should periodontal instruments be reprocessed?
Clean them promptly after use, inspect them, package them and sterilize them following CDC guidance for dental settings and the manufacturer’s instructions for use (IFU).
Build a periodontal tray that matches how you work. Aurix supplies surgical-grade stainless steel probes, scalers and curettes individually or as custom kits for practices and hygiene teams. Design your custom periodontal kit →


