


Composite placement instruments have one job that sounds simple and is not: carry, adapt and shape resin without it sticking, slumping or pulling away from the cavity walls. The right instruments make it easier to build good contacts, natural anatomy and well-sealed margins before curing. Here are the 10 instruments most clinicians rely on for direct composite work, with practical tips for each.
Key takeaways
- Non-stick tips, through high polish or coatings such as titanium nitride, make composite easier to handle.
- A small set of pluggers, paddles and burnishers covers most posterior and anterior work.
- Sectional matrices, rings and wedges are as important as the placement instruments for good contacts.
- Coated tips need gentle cleaning; check the manufacturer’s instructions for use (IFU).
The top 10 composite placement instruments
1. Double-ended plastic filling instrument
The workhorse of composite placement: a flat paddle at one end for carrying and shaping increments, and a small plugger at the other for condensing. Variations differ in paddle width, angle and plugger diameter.
Tip: Choose one pattern as the standard for all trays so every clinician knows what to expect when they pick it up.
2. Composite pluggers (condensers)
Composite pluggers are used to adapt increments into line angles and against the matrix. Small round or flat ends in a range of diameters let you push material into corners without dragging it out.
Unlike amalgam condensing, composite adaptation needs only light pressure. The goal is close contact with the walls, not compaction.
3. Interproximal composite instrument
A thin, slightly flexible blade designed to slide between the matrix and adjacent tooth or to shape the proximal surface of a restoration. It helps remove excess at the gingival margin before curing and reduces the need for heavy finishing later.
4. Ball burnisher
The ball burnisher is used before placement to contour matrix bands and create a proximal convexity, and during placement to shape occlusal fossae in uncured composite. Several ball diameters are useful.
Tip: Burnishing the band against the adjacent tooth before placing composite helps achieve a tighter, better-shaped contact.
5. Acorn or football burnisher
The acorn (football) shape is well suited to establishing cusp inclines and fossae in posterior composites. It gives smooth, natural-looking anatomy that needs less adjustment with burs after curing.
6. Fine anatomy instrument
A fine, pointed or thin-bladed instrument is used to define fissures and secondary anatomy in the final increment. Some clinicians use a dedicated composite carving instrument; others use a fine explorer-style tip reserved for composite.
Keep this instrument separate from your diagnostic explorer so the tip stays clean and sharp for each use.
7. Broad facial spatula
For anterior restorations and direct veneers, a broad, thin and flexible spatula helps spread and smooth composite over facial surfaces. Its flexibility lets it follow the curvature of the tooth.
8. Modeling brush and handle
A fine synthetic brush, lightly wetted with a compatible modeling resin or bonding agent, smooths the surface of uncured composite and blends margins. Brushes are typically disposable or have replaceable heads, while the handle can be reprocessed according to its IFU.
Tip: Use very little liquid on the brush. Too much can dilute the surface of the composite.
9. Composite dispensing gun
A dispensing gun extrudes composite from single-use compules directly into the preparation. It reduces handling, helps limit voids in deep boxes and avoids contaminating bulk syringes.
Check that the gun is compatible with the compule brands you use, and that its mechanism can be cleaned and reprocessed as the manufacturer directs.
10. Sectional matrix ring forceps
Ring forceps spread and place the separating rings used with sectional matrix systems. A secure grip on the ring and a smooth, controlled spreading action reduce the risk of the ring springing off.
Our comparison of Tofflemire and sectional matrix systems explains when sectional rings make the biggest difference.
Tip finishes compared
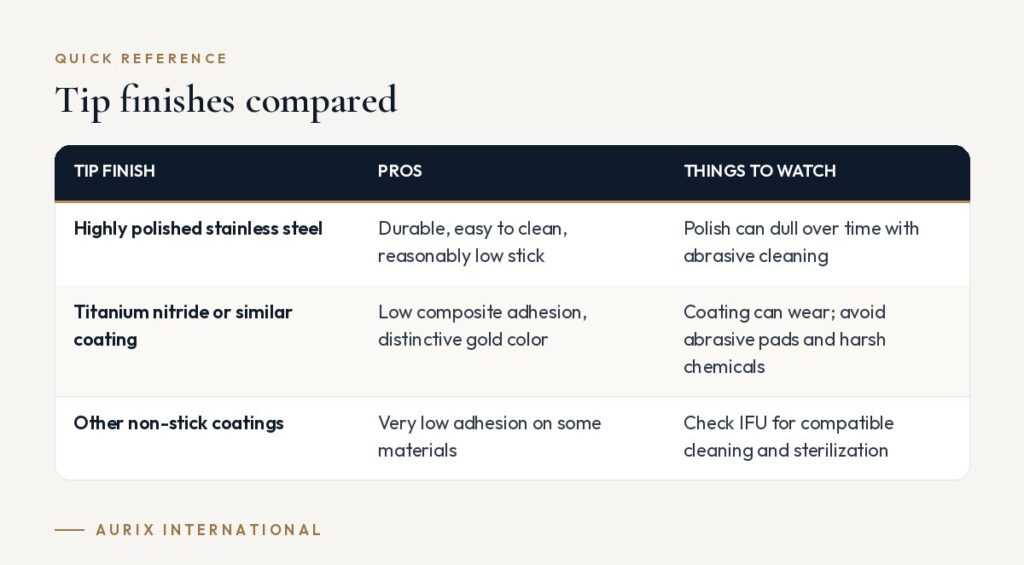
| Tip finish | Pros | Things to watch |
|---|---|---|
| Highly polished stainless steel | Durable, easy to clean, reasonably low stick | Polish can dull over time with abrasive cleaning |
| Titanium nitride or similar coating | Low composite adhesion, distinctive gold color | Coating can wear; avoid abrasive pads and harsh chemicals |
| Other non-stick coatings | Very low adhesion on some materials | Check IFU for compatible cleaning and sterilization |
How to choose composite placement instruments
- Start with your most common restorations. Posterior Class II work leans on pluggers, ball burnishers and matrix tools; anterior work needs facial spatulas and thin interproximal blades.
- Prioritize non-stick performance. Test samples with your own composite, as stickiness varies with material, temperature and technique.
- Check tip thinness and flexibility. Interproximal and facial instruments should be thin enough to reach without distorting the matrix.
- Look at handle comfort. Composite work involves many small, controlled movements, so a lighter, wider handle can reduce fatigue.
- Keep sets together. A dedicated composite cassette prevents mixing with amalgam instruments. Our guide to composite filling instrument sets lists what a good set contains.
For background on the wider category, see plastic filling instruments and condensers explained, and for the matrix side of the procedure, our list of the top 10 matrix systems and instruments. Aurix International offers composite instruments individually or as part of a custom kit.
Frequently asked questions
Why does composite stick to my instruments?
Resin adheres more readily to rough or worn surfaces and to instruments that are warm or contaminated with bonding agent. Polished or coated tips, clean instruments and a light touch all reduce sticking.
Are gold-colored composite instruments better?
The gold color usually indicates a titanium nitride coating, which many clinicians find reduces sticking. Performance still depends on the material and the instrument’s design, so test before standardizing.
Can I use amalgam instruments for composite?
It is better not to. Amalgam residue can discolor composite, and amalgam condensers are designed for heavier compaction than composite needs.
How should coated instruments be cleaned?
Avoid abrasive pads and harsh chemicals that can wear the coating. Clean, package and sterilize according to the manufacturer’s IFU and CDC guidance for dental settings.
Put together a composite set that suits your technique. Aurix can combine placement, shaping and matrix instruments into one kit for your composite procedures. Start your composite kit →


