


Knowing when dental instruments need replacing protects patients, saves clinicians from fighting worn tools and avoids surprises mid-procedure. Also, even well-made stainless steel instruments wear with use, sharpening and repeated reprocessing. Sharpening or repair fixes some problems, but others mean it is time to retire the instrument. In addition, use these ten signs as part of your regular inspection routine.
Key takeaways
- Pitting, cracks and corrosion that will not clean off are reasons to remove an instrument from service.
- Misaligned jaws and tips, loose joints and slipping ratchets compromise control and safety.
- Cutting instruments that repeated sharpening has made thin are at risk of breaking.
- Unreadable probe markings and bent explorers give inaccurate diagnostic information.
The top 10 signs your dental instruments need replacing
1. Rust, pitting or corrosion that will not come off
You can often remove surface stains, but pitting means damage to the metal itself. Generally, pits trap debris, make cleaning unreliable and can spread corrosion to other instruments in the same load. A pencil eraser test helps: if the mark rubs off cleanly it is likely a stain; if pits remain, remove the instrument from circulation.
2. Cracks in box joints, shanks or tips
Hairline cracks often appear in the box joints of forceps, needle holders, hemostats and rongeurs, or where a shank meets a working end. Furthermore, cracks can lead to sudden failure during use. Inspect joints under magnification, especially on heavily used surgical instruments.
Retire any instrument with a crack rather than repairing it with tape or adhesive.
3. Misaligned jaws, beaks or tips
Forceps beaks that no longer meet evenly, scissors blades that cross unevenly, and tissue forceps whose tips do not align all reduce control. In practice, hold the instrument up to the light and close it gently: the jaws should meet along their full length or at the tips as designed.
4. Blades worn thin from sharpening
Curettes and scalers lose metal each time you sharpen them. A blade that has become noticeably thinner or narrower is weaker and more likely to break in a periodontal pocket. Many hygienists compare a worn instrument with a new one to judge when to replace it.
Our guide to sharpening curettes and scalers covers technique and when to stop sharpening.
5. Edges that will not hold sharpness
If a curette, scaler or pair of scissors still feels dull after correct sharpening, the edge geometry may be lost or the steel worn beyond its useful life. Dull instruments require more force, increase hand fatigue and can burnish calculus instead of removing it.
6. Bent tips and working ends
Explorers, probes, condensers and fine elevators can bend if dropped or misused. Moreover, straightening a bent tip can weaken the metal. A bent explorer loses tactile sensitivity, and a bent probe can give misleading pocket depth readings.
7. Faded or unreadable markings
Periodontal probes depend on clear markings, whether Williams, UNC-15 or color-banded designs. If bands or notches look worn or difficult to read, replace the probe. Learn more in our guide to periodontal probe markings.
8. Loose, gritty or stiff joints
Hinged instruments should open and close smoothly without play. Looseness at the joint can make jaws misalign, while stiffness may signal corrosion or debris inside the box joint. Lubrication helps with minor stiffness, but persistent problems usually mean repair or replacement.
9. Ratchets that slip or worn serrations and inserts
Needle holders and hemostats rely on ratchets that hold securely. If the ratchet slips open under light pressure, or if serrations and tungsten carbide inserts wear smooth, the instrument cannot grip needles or tissue reliably. A repair service can replace some inserts; otherwise replace the instrument.
10. Damaged handles, mirrors and attachments
Cracked resin handles, loose cone-socket tips, dented hollow handles and cloudy or scratched mirror heads all reduce safety and performance. Also, damaged handles can trap debris, and poor mirror surfaces make it harder to see and work accurately.
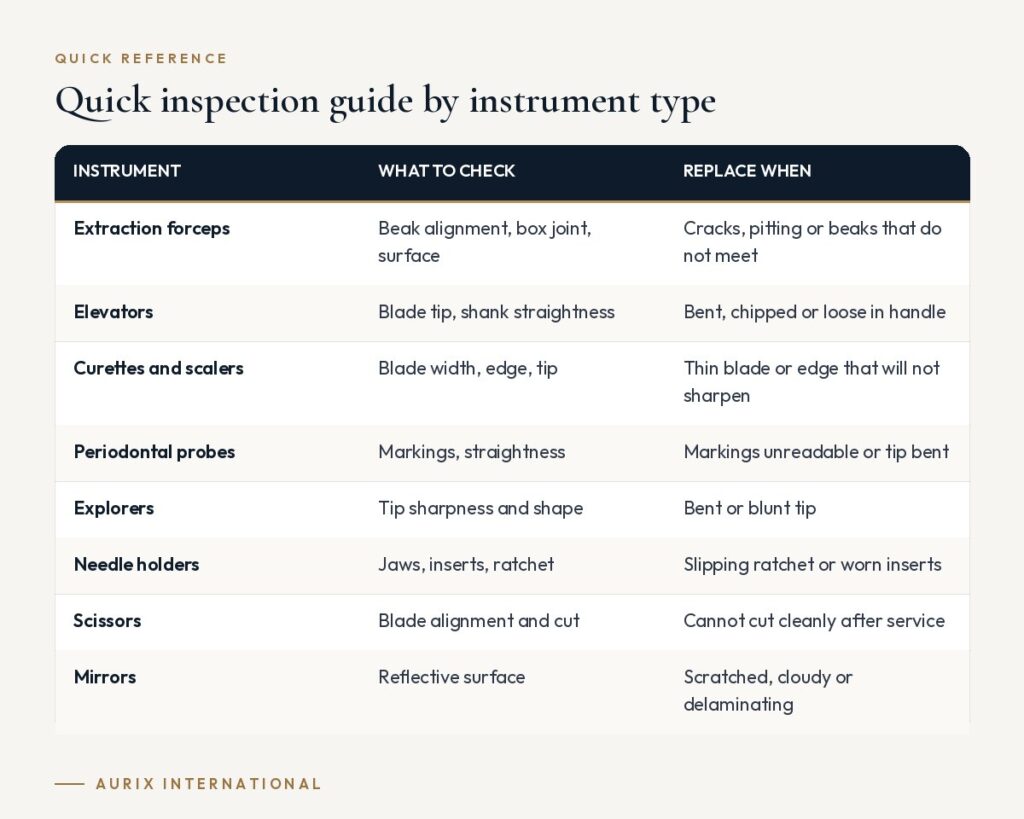
Quick inspection guide by instrument type
| Instrument | What to check | Replace when |
|---|---|---|
| Extraction forceps | Beak alignment, box joint, surface | Cracks, pitting or beaks that do not meet |
| Elevators | Blade tip, shank straightness | Bent, chipped or loose in handle |
| Curettes and scalers | Blade width, edge, tip | Thin blade or edge that will not sharpen |
| Periodontal probes | Markings, straightness | Markings unreadable or tip bent |
| Explorers | Tip sharpness and shape | Bent or blunt tip |
| Needle holders | Jaws, inserts, ratchet | Used when slipping ratchet or worn inserts |
| Scissors | Blade alignment and cut | Cannot cut cleanly after service |
| Mirrors | Reflective surface | Scratched, cloudy or delaminating |
Use our monthly instrument inspection checklist to make these checks routine.
Repair, re-tip or replace: how to decide
You do not need to throw away every worn instrument. Consider these points:
- Safety first: always retire cracked, pitted or severely bent instruments.
- Repair value: scissors, needle holders and some forceps can go to a professional for sharpening, realignment or new inserts.
- Re-tipping: instruments with replaceable working ends, such as cone-socket designs, can be re-tipped while keeping the handle.
- Cost comparison: compare repair cost and downtime with the price of a new instrument.
- Standardization: replacing worn items with the same patterns keeps trays consistent.
Our article on when to repair, re-tip or replace goes into more depth.
Frequently asked questions
How long do dental hand instruments last?
There is no fixed lifespan. In addition, it depends on steel quality, frequency of use, sharpening and reprocessing. Regular inspection is the best way to decide when an instrument has reached the end of its useful life.
Can a bent instrument be straightened?
Bending a tip back can weaken the metal and is generally not recommended for fine working ends. A professional repair service can advise, but you should replace many bent tips.
Should damaged instruments be kept as spares?
No. Remove damaged instruments from circulation and mark them clearly so they do not end up back on a tray.
Time to refresh worn instruments? Aurix International supplies surgical-grade stainless steel replacements individually, in pre-assembled kits or in wholesale quantities for groups and distributors. See wholesale options →


