


Orthodontic instruments go beyond pliers. Alongside the holding and cutting pliers used at every archwire change, a typical orthodontic tray includes instruments for placing brackets accurately, tying and tucking ligatures, seating bands and placing separators. This list covers the 10 orthodontic instruments most practices rely on, with tips on how each is used and what to look for.
Key takeaways
- A practical orthodontic tray combines pliers, cutters, ligature instruments and bracket-positioning tools.
- The Mathieu needle holder and ligature director make ligation faster and more secure.
- Bracket placement tweezers and a height gauge support accurate bonding.
- Standardizing instruments across chairs speeds up appointments and training.
The top 10 orthodontic instruments
1. Weingart utility pliers
The Weingart plier has long, tapered, serrated tips used to guide archwires into brackets and tubes and to remove them. It is often the first instrument picked up at an adjustment visit.
2. Distal end cutter
The distal end cutter trims the archwire behind the last molar tube and holds the cut end so it cannot drop into the mouth. Check the rated wire size and test the safety-hold feature regularly.
3. Ligature cutter
A fine-tipped ligature cutter cuts stainless steel ligature ties close to the bracket. Keep it for ligature wire only, so the delicate edges stay sharp.
Tip: Label or segregate fine cutters so they are not used on archwires by mistake.
4. Mathieu needle holder
The Mathieu needle holder (often called a Mathieu plier) has a spring and ratchet lock that holds a ligature or elastic module securely. It is used to place elastomeric ligatures and to twist stainless steel ligatures around brackets.
The lock lets the operator release the grip with one hand, which speeds up ligation.
5. Ligature director (tucker)
The ligature director has a notched or forked tip used to push ligature wire under bracket wings and to tuck twisted ligature ends safely so they do not irritate the lip or cheek. Many are double-ended with a plain and a notched end.
6. Band pusher and band seater
A band pusher, with a serrated tip, helps push molar bands into position. A band seater (bite stick) lets the patient bite to seat the band fully. Both are used together during banding.
Tip: Check band fit before cementing; a band that is hard to seat may be the wrong size.
7. Bracket placement tweezers
Reverse-action or locking tweezers hold brackets securely while they are carried to the tooth and positioned. Fine, angled tips allow good visibility during placement.
8. Bracket height gauge
A bracket height gauge (for example a star-shaped or Boone-style gauge) measures the distance from the incisal edge or cusp tip to the bracket slot, helping place brackets at consistent heights. This supports the planned tooth positions in the finished case.
9. Band and bracket removing pliers
Band removing pliers lift molar bands off the tooth, using a padded beak on the occlusal surface for leverage. Bracket removing pliers grip the bracket base to break the bond at debond. Many practices keep both in a debond tray.
10. Separator placing pliers
Separator pliers stretch elastomeric separators so they can be flossed through contacts between teeth to create space before banding. The tips hold the separator securely without tearing it.
Consistent separator placement makes the banding appointment much easier.
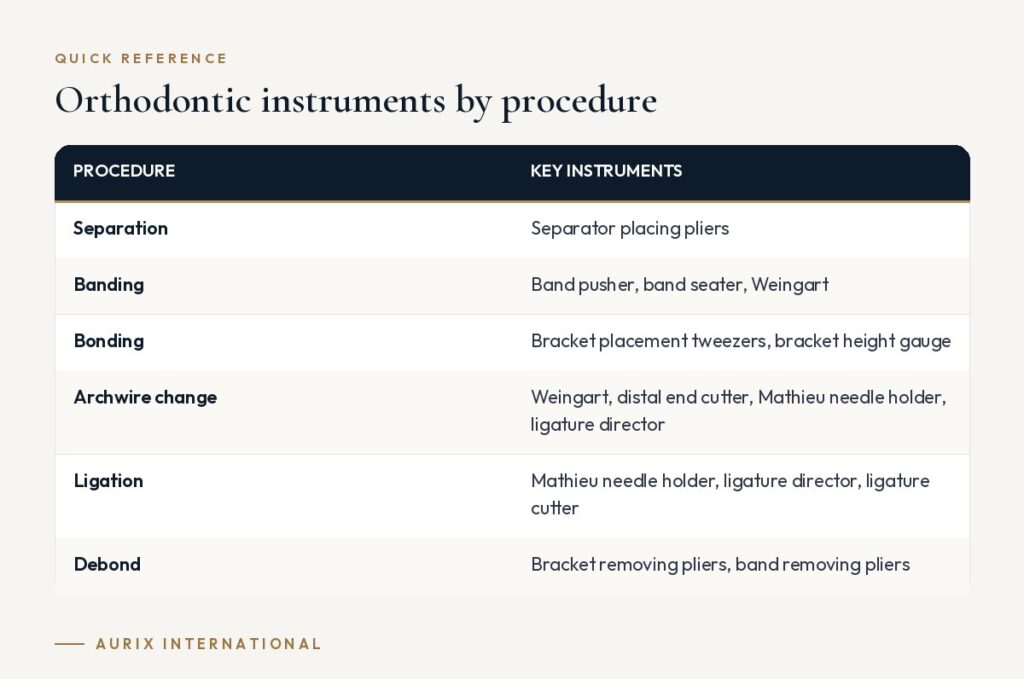
Orthodontic instruments by procedure
| Procedure | Key instruments |
|---|---|
| Separation | Separator placing pliers |
| Banding | Band pusher, band seater, Weingart |
| Bonding | Bracket placement tweezers, bracket height gauge |
| Archwire change | Weingart, distal end cutter, Mathieu needle holder, ligature director |
| Ligation | Mathieu needle holder, ligature director, ligature cutter |
| Debond | Bracket removing pliers, band removing pliers |
Buying tips for orthodontic instruments
- Buy by procedure. Build separate setups for bonding, adjustment and debond so each tray contains only what is needed.
- Check precision. Tips should meet evenly, ratchets should engage cleanly, and joints should move smoothly without play.
- Respect cutter ratings. Cutters should state the maximum wire size; staying within it protects the edges.
- Plan maintenance. Hinged instruments need cleaning, drying and lubrication before sterilization, following the manufacturer’s instructions for use (IFU).
- Choose a dependable supplier. Consistent patterns from order to order make restocking simple. Our guide to choosing an orthodontic instruments supplier covers what to ask.
For details on each plier pattern, see our list of the top 10 orthodontic pliers, the practical orthodontic pliers guide and our overview of ligature instruments and wire cutters. Aurix International supplies orthodontic instruments to clinics and distributors, including private label options.
Care and maintenance
Orthodontic instruments combine fine tips, cutting edges, springs and ratchets, so they need a little more attention than simple hand instruments. Clean them promptly after use so adhesive, cement and debris do not dry on the tips, and open hinged instruments fully so cleaning solution reaches the joint. Dry everything thoroughly, lubricate joints where the manufacturer recommends it, and inspect each instrument before packaging.
- Check that Mathieu ratchets engage and release cleanly.
- Look for chipped or dull edges on cutters, especially fine ligature cutters.
- Confirm that distal end cutters still hold the cut wire securely.
- Make sure tweezers and placement tips meet evenly and are not bent.
A short monthly inspection routine catches worn instruments before they slow down an appointment or damage wire and brackets.
Frequently asked questions
What instruments are on a basic orthodontic tray?
A basic adjustment tray usually includes a mirror, explorer, Weingart pliers, distal end cutter, ligature cutter, Mathieu needle holder and ligature director.
What is a Mathieu plier used for?
It holds and places elastomeric ligatures and twists stainless steel ligatures, with a lock that keeps the ligature secure.
Why use a bracket height gauge?
It helps place brackets at consistent, measured heights, supporting accurate tooth positioning according to the treatment plan.
How should orthodontic instruments be sterilized?
Clean, dry and lubricate hinged instruments, then package and sterilize them according to the manufacturer’s IFU and CDC guidance for dental settings.
Offer orthodontic instruments under your own brand. Aurix works with distributors and clinics on orthodontic instruments, including OEM and private label programs. Explore private label →


