


A well-organized extraction tray lets the clinician move from anesthesia to closure without hunting for instruments or interrupting the procedure. The exact contents vary with the tooth and the surgical plan, but most routine extraction trays share the same core instruments. Here are the 10 instruments to include, the order they are common in and practical tips for setting the tray up.
Key takeaways
- Lay out instruments in the order they will be used, from left to right.
- The core of any extraction tray is a periosteal elevator, an elevator and the correct forceps.
- Include a surgical curette, suction tip and hemostat for debridement and fragment retrieval.
- Add a needle holder and suture scissors even when you do not expect to suture.
- Keep the tray in a cassette to protect instruments and simplify reprocessing.
The top 10 instruments for an extraction tray
1. Mouth mirror
The mouth mirror retracts the cheek and tongue, reflects light into the field and gives indirect vision of the lingual and distal surfaces. A front-surface mirror head gives a sharper image without a double reflection.
2. Aspirating syringe
An aspirating (breech-loading) syringe delivers local anesthetic from a cartridge, with a harpoon that engages the plunger so the clinician can aspirate before injecting. Disposable needles are attached for each patient.
Tip: Use a one-handed scoop technique or a recapping device when recapping needles, in line with sharps safety guidance.
3. Periosteal elevator
A Molt #9 periosteal elevator separates the gingival attachment and reflects soft tissue before elevator and forceps are placed. Even in simple extractions, freeing the gingival cuff reduces tearing.
4. Straight elevator
A straight elevator, such as the 301 or 34S, enters the PDL space to luxate the tooth before forceps are applied. Many extractions are completed with this instrument alone. Add Cryers or root tip picks for molars and fragile roots.
Tip: See our list of the top 10 dental elevators to decide which patterns to keep on standby.
5. Extraction forceps
Choose forceps based on the tooth: a 150 or 151 for single-rooted teeth and premolars, a 53R/53L or 88R/88L for upper molars, a 17 or 23 for lower molars, and a 69 for root tips. Our guide to the top 10 dental extraction forceps explains each pattern.
6. Surgical curette
A surgical curette, such as a Lucas or Molt pattern, removes granulation tissue and debris from the socket after the tooth is out. Debride gently, as aggressive curettage can damage the socket walls.
7. Surgical suction tip
A narrow surgical aspirator keeps the field clear and lets you see root tips and socket walls. It is far more precise than a standard high-volume evacuation tip in a small extraction site.
8. Hemostat
A curved mosquito hemostat retrieves small fragments, removes loose tissue tags and can hold gauze or sutures. Its locking mechanism gives a secure grip without constant hand pressure.
9. Needle holder
A Mayo-Hegar needle holder places sutures after the extraction, whether to approximate papillae, secure a flap or hold a hemostatic dressing in place.
10. Suture scissors
Suture scissors cut suture tails after knotting. Some clinicians use a combination instrument, such as an Olsen-Hegar, which pairs a needle holder with a scissor blade.
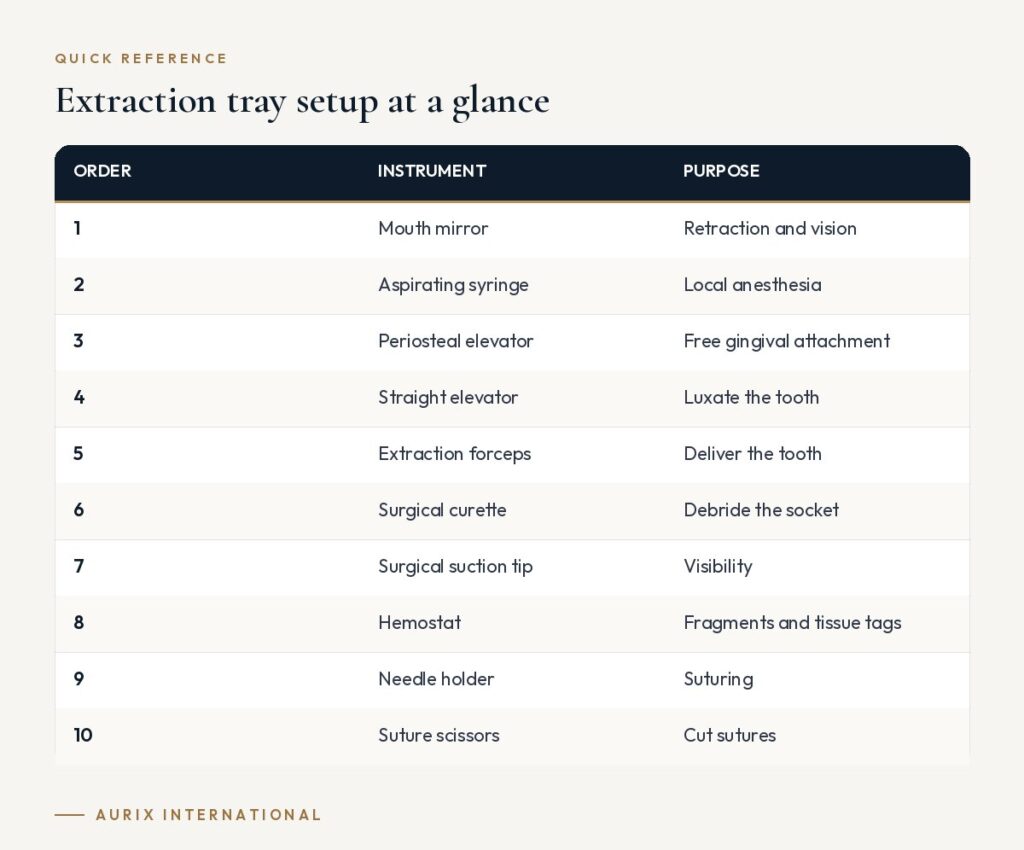
Extraction tray setup at a glance
| Order | Instrument | Purpose |
|---|---|---|
| 1 | Mouth mirror | Retraction and vision |
| 2 | Aspirating syringe | Local anesthesia |
| 3 | Periosteal elevator | Free gingival attachment |
| 4 | Straight elevator | Luxate the tooth |
| 5 | Extraction forceps | Deliver the tooth |
| 6 | Surgical curette | Debride the socket |
| 7 | Surgical suction tip | Visibility |
| 8 | Hemostat | Fragments and tissue tags |
| 9 | Needle holder | Suturing |
| 10 | Suture scissors | Cut sutures |
Beyond instruments, the tray should include sterile gauze, cotton pliers if used for gauze handling, and a suture of an appropriate size. For a full walkthrough, see setting up an extraction tray step by step.
Tips for setting up an extraction tray
- Follow the sequence. Arrange instruments left to right in the order of use so the assistant can anticipate each pass.
- Have backups ready. Keep extra forceps, a root tip pick and a rongeur in a sealed pouch nearby rather than opening them on every case.
- Use a cassette. A dedicated cassette keeps the set together through cleaning, sterilization and storage. It also makes missing or damaged instruments easy to spot.
- Inspect before use. Check beaks, blades and hinges for damage when packing the cassette, not at chairside.
- Respect sterility. Open packages just before the procedure and follow CDC guidance and the instrument IFU for reprocessing.
Adapting the tray to the case
A standard extraction tray covers most routine cases, but it pays to review the radiograph before the patient sits down. Teeth with curved, divergent or ankylosed roots, heavily restored crowns or a history of root canal treatment are more likely to fracture, so a surgical add-on pack with a scalpel, Minnesota retractor, rongeur, bone file and root tip picks should be within reach. For posterior maxillary teeth close to the sinus, fine root tip elevators and good suction become more important. Keeping these add-ons in separate sealed pouches means they stay sterile and are only reprocessed when actually used.
Practices that do a high volume of extractions often standardize on one tray layout for every operator, which makes it easier for assistants to move between rooms. If you are comparing ready-made sets with buying instruments one at a time, our article on pre-assembled kits vs individual instruments lays out the pros and cons.
Frequently asked questions
What is the minimum set of instruments for a simple extraction?
At a minimum, a simple extraction needs a mirror, anesthetic syringe, periosteal elevator, straight elevator, appropriate forceps, gauze and suction. A curette and hemostat are strongly recommended.
Should I include suturing instruments on every extraction tray?
Yes, it is good practice. Even simple extractions sometimes need a suture to control bleeding or approximate tissue, and having the instruments ready avoids delays.
How is a surgical extraction tray different?
A surgical tray adds a scalpel and blades, retractors such as the Minnesota or Seldin, a rongeur, a bone file and a handpiece with burs for bone removal and sectioning.
How many extraction trays does a practice need?
That depends on daily volume and reprocessing time. Having enough trays to cover appointments while others are being cleaned and sterilized prevents rushed reprocessing.
Make every extraction tray complete. Aurix International can assemble extraction instruments into a custom kit so each tray arrives ready for your workflow. Start your custom kit →


