

Dental students spend their first years learning to handle a core group of hand instruments, first on typodonts and then on patients. Getting to know these instruments well, including their names, numbers and correct grasp, makes preclinical work smoother and clinical sessions safer. This list covers the ten instruments students use most and how to look after them.
Key takeaways
- Always follow your school’s official instrument list; patterns and numbers vary between programs.
- The basic setup (mirror, explorer, probe, cotton pliers) is used in every clinical session.
- Preclinical operative courses rely on cutting instruments such as hatchets and margin trimmers, plus carvers and condensers.
- Good habits now, such as cleaning, inspection and sharpening, protect your instruments and your patients later.
The top 10 instruments for dental students
1. Mouth mirror
The first instrument students learn to use well. Indirect vision takes practice because movements appear reversed in the mirror. Practice holding the mirror in the non-dominant hand while working with the dominant hand, and use it to retract the cheek or tongue at the same time.
2. Explorer
A No. 23 shepherd’s hook or a double-ended explorer is used to check margins, surfaces and calculus. Students should learn to use a light, exploratory stroke that maximizes tactile feedback.
3. Periodontal probe
Learning to probe accurately is a core clinical skill. Know the markings on your school’s probe, whether it is a UNC-15, Williams or another pattern, and practice walking the probe around the tooth.
4. Cotton pliers
Used constantly for placing cotton rolls and pellets. Locking pliers are helpful for beginners who are still developing fine control.
5. Spoon excavator
Used in operative courses to remove soft caries and temporary restorations. Learn to use it with a scooping motion and keep it sharp.
6. Enamel hatchet and chisels
Hand cutting instruments such as enamel hatchets and chisels are used to plane walls and remove unsupported enamel in cavity preparations. Many preclinical courses still teach their use alongside rotary instruments.
Tip: learn the instrument formula printed on many cutting instruments. The numbers describe blade width, blade length and angle, and help you identify instruments quickly.
7. Gingival margin trimmer
Paired mesial and distal trimmers bevel and smooth the gingival margin of Class II preparations. Students often confuse the pair, so check the markings and the direction of the blade curve.
8. Plastic filling instrument and condenser
Used to place, pack and shape restorative materials in preclinical restorations. A paddle end carries material; the condenser end packs it into the preparation.
9. Carvers
The Hollenback and discoid-cleoid carvers are used to recreate occlusal anatomy. Carving well is a skill assessed in many operative courses, so practice controlled strokes with the blade partly resting on the tooth surface.
10. Scalers and curettes
Clinical periodontics introduces sickle scalers, universal curettes and Gracey curettes. Students learn adaptation, angulation and activation, and how to choose the correct Gracey for each area. Our guide to Gracey curette numbers is a useful revision aid.
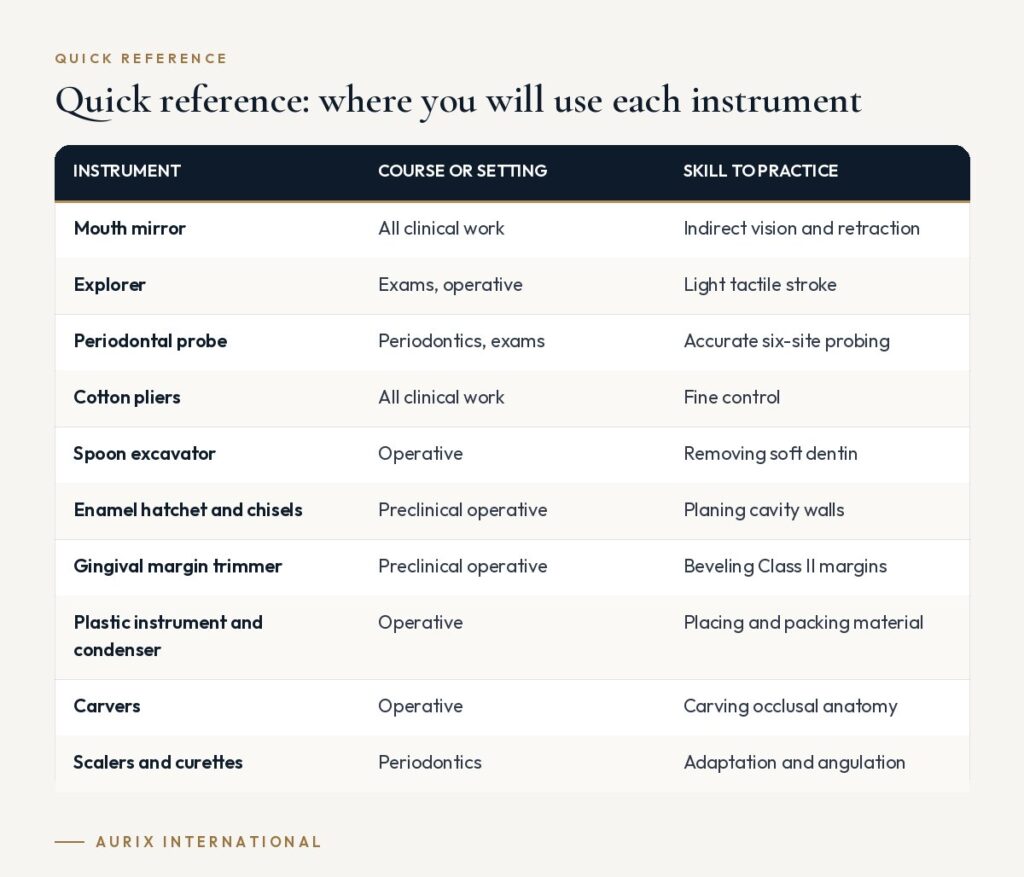
Quick reference: where you will use each instrument
| Instrument | Course or setting | Skill to practice |
|---|---|---|
| Mouth mirror | All clinical work | Indirect vision and retraction |
| Explorer | Exams, operative | Light tactile stroke |
| Periodontal probe | Periodontics, exams | Accurate six-site probing |
| Cotton pliers | All clinical work | Fine control |
| Spoon excavator | Operative | Removing soft dentin |
| Enamel hatchet and chisels | Preclinical operative | Planing cavity walls |
| Gingival margin trimmer | Preclinical operative | Beveling Class II margins |
| Plastic instrument and condenser | Operative | Placing and packing material |
| Carvers | Operative | Carving occlusal anatomy |
| Scalers and curettes | Periodontics | Adaptation and angulation |
Mastering the basics: grasps and fulcrums
Whatever instrument you hold, technique matters as much as the instrument itself. Most hand instruments are used with a modified pen grasp, in which the thumb, index finger and middle finger hold the handle and the pad of the middle finger rests on the shank for tactile feedback. A stable fulcrum, usually the ring finger resting on a nearby tooth, gives control and reduces the risk of slipping.
Practice these fundamentals early on typodonts. Good posture, correct patient positioning and indirect vision with the mirror all help you keep the wrist in a neutral position, which reduces fatigue and the risk of strain over a long career. Ask instructors to check your grasp regularly, since habits formed in preclinical courses tend to stay with you.
Buying and care tips for students
- Follow the school list first. Schools specify exact patterns for teaching and assessment. Buy what is listed, then add personal preferences later.
- Use a cassette. A cassette keeps your instruments organized through cleaning and sterilization and makes it easy to spot missing items.
- Mark your instruments. Color bands or laser marking help identify your instruments in shared clinics. See our article on color coding instruments.
- Clean promptly. Remove debris soon after use and keep instruments moist if cleaning is delayed. Our guide to instrument care for dental students covers the full routine.
- Learn to sharpen. Curettes, scalers and excavators lose their edge with use. Learning to sharpen correctly extends their life and improves clinical results.
- Inspect regularly. Check tips under magnification for bends, chips and wear, and replace instruments that can no longer do their job.
Frequently asked questions
Do dental students have to buy their own instruments?
It depends on the program. Some schools issue instrument kits as part of fees, some rent them, and some require students to buy from an approved list. Check with your school before buying anything.
What instruments are used in preclinical operative courses?
Typically the basic setup plus hand cutting instruments (hatchets, chisels, gingival margin trimmers), excavators, plastic filling instruments, condensers, burnishers and carvers, along with handpieces and burs.
How should students store their instruments?
Keep sterilized instruments in their sealed pouches or wrapped cassettes in a clean, dry place until use. Do not open packaging early, and reprocess any package that is wet or damaged.
Is it worth buying higher-quality instruments as a student?
Good instruments hold an edge longer, feel more balanced and can last well into practice. Focus on the instruments you use most, such as the basic setup, curettes and carvers, and follow your school’s specifications.
Supplying a dental school or student cohort? Aurix International can assemble student kits of surgical-grade stainless steel instruments to match your program’s list. Explore custom kits →


