

Dental diagnostic instruments are the hand instruments used to see, feel and measure the teeth and supporting tissues during an examination. Choosing the right mirror, explorer and probe makes findings more accurate and charting more consistent. This list covers the ten diagnostic instruments found in most practices, how each is used and what to look for.
Key takeaways
- Diagnostic instruments fall into three groups: mirrors, explorers and probes, plus cotton pliers and bite-checking forceps.
- Different explorers suit different jobs: the No. 23 for general use, paired curved explorers for interproximal and subgingival areas.
- Probe markings vary by pattern, so the same depth can be read differently if clinicians mix probes without knowing them.
- Inspect diagnostic instruments regularly; bent tips and worn markings reduce accuracy.
The top 10 dental diagnostic instruments
1. Mouth mirror
The mirror provides indirect vision, illumination and soft-tissue retraction. Standard (rear-surface) mirrors are durable but can show a faint double image; front-surface mirrors give a sharper image but the coating is more easily scratched. Rhodium-coated front-surface mirrors are another option.
Tip: keep mirror heads and handles separate in stock so you can replace scratched heads without discarding handles.
2. Shepherd’s hook explorer (No. 23)
The No. 23 explorer has a single curved, fine tip and is the classic general-purpose explorer for checking surfaces, sealants and restoration margins. It is less suited to deep subgingival areas.
Tip: use light pressure. Also, probing suspected carious lesions forcefully can damage demineralized enamel; most caries detection today relies on visual inspection, drying and radiographs.
3. Pigtail or cowhorn explorer (No. 2, No. 3CH)
These double-ended explorers have short, curved, mirror-image tips that wrap around the proximal surfaces. Also, they are useful for feeling interproximal calculus and the margins of crowns and fillings.
4. ODU 11/12 explorer
The 11/12 explorer has a long, angled shank similar to a Gracey 11/12 curette. It reaches deep into periodontal pockets and around root surfaces on posterior teeth, making it a favorite for detecting subgingival calculus before and after root planing.
5. UNC-15 periodontal probe
Marked at every millimeter from 1 to 15, with color-coded bands that make the 5, 10 and 15 mm zones easy to read. The detailed scale suits full periodontal charting.
Tip: walk the probe around each tooth in small steps, keeping it parallel to the long axis, and record the deepest reading at each of the six sites.
6. Williams probe
Marked at 1, 2, 3, 5, 7, 8, 9 and 10 mm, with no marks at 4 and 6 mm. The gaps make it quick to read but easy to misread by a millimeter if you are not familiar with it.
7. WHO probe
The WHO probe has a 0.5 mm ball tip and a color band from 3.5 to 5.5 mm, with further marks on some versions. In addition, it targets screening indices such as the Community Periodontal Index and the Basic Periodontal Examination, where the operator notes whether the band disappears into the pocket.
8. Nabers furcation probe
A curved, blunt probe for detecting and classifying furcation involvement on multi-rooted teeth. Common versions are the 1N and 2N, and color-coded markings are available on some patterns.
Tip: approach maxillary molar furcations from the buccal, mesial-palatal and distal-palatal, and mandibular molars from the buccal and lingual.
9. Cotton pliers
Cotton pliers are essential during exams for drying with cotton rolls, placing gauze and handling small items. In addition, locking or serrated tips help with control.
10. Miller articulating paper forceps
These forceps hold articulating paper or film to mark occlusal contacts. They are used during diagnosis of occlusal problems and when checking restorations and prosthetics.
For more detail on specific groups, see our guides to periodontal probe markings, dental explorers and mouth mirrors and diagnostic sets.
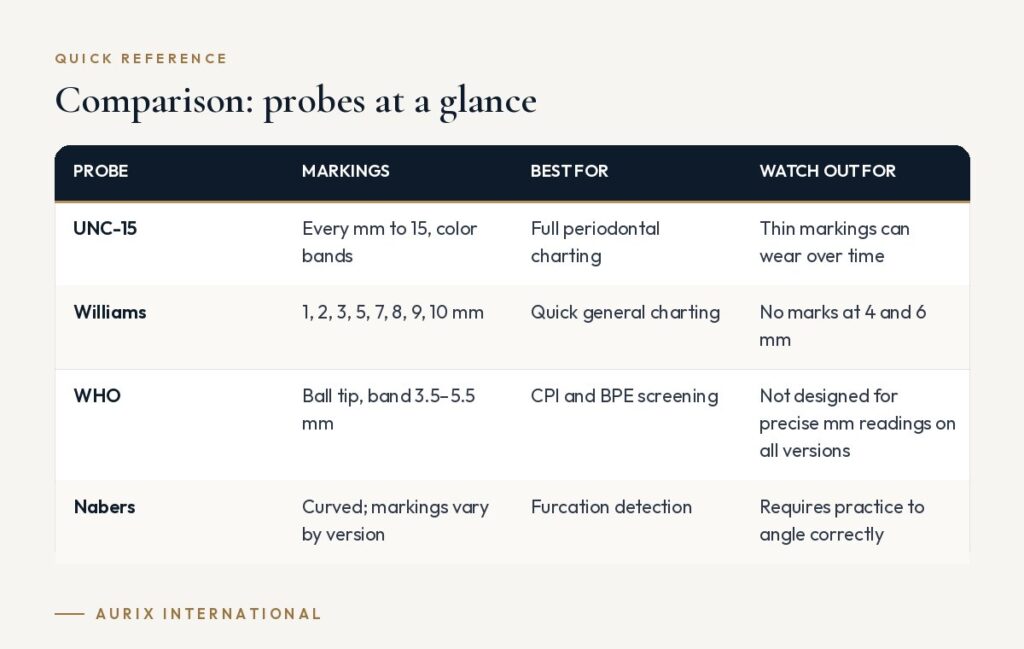
Comparison: probes at a glance
| Probe | Markings | Best for | Watch out for |
|---|---|---|---|
| UNC-15 | Every mm to 15, color bands | Full periodontal charting | Thin markings can wear over time |
| Williams | 1, 2, 3, 5, 7, 8, 9, 10 mm | Quick general charting | No marks at 4 and 6 mm |
| WHO | Ball tip, band 3.5–5.5 mm | CPI and BPE screening | Not designed for precise mm readings on all versions |
| Nabers | Curved; markings vary by version | Furcation detection | Requires practice to angle correctly |
Getting accurate readings
Accuracy depends on technique as well as instruments. Keep the probe parallel to the long axis of the tooth, use light, consistent pressure and record readings at six sites per tooth. Good lighting, a clean mirror and a dry field make it easier to see margins, calculus and soft-tissue changes, and calibrating as a team helps keep findings consistent between clinicians.
How to choose diagnostic instruments
- Standardize probes. Agree as a team on one or two probe types for charting so readings are comparable between visits and clinicians.
- Check marking legibility. Laser-etched or color-banded markings should be clear and durable through repeated sterilization.
- Look at tip quality. Explorer tips should be fine, sharp and flexible but not fragile; probe tips should be rounded and smooth.
- Balance and handle size. A lighter, wider handle can reduce fatigue during long exams and charting sessions.
- Stock enough sets. Diagnostic instruments appear on almost every tray, so plan for many more sets than any other instrument group.
- Follow the IFU. Mirror heads, in particular, may have specific instructions for ultrasonic cleaning and autoclaving.
Frequently asked questions
What are the basic diagnostic instruments in dentistry?
The mouth mirror, explorer, periodontal probe and cotton pliers. Together they let the clinician see, feel, measure and keep the field dry during an examination.
Which periodontal probe is best?
There is no single best probe. Generally, the UNC-15 is popular for detailed charting, the Williams probe for quick readings, the WHO probe for screening indices, and the Nabers probe for furcations. Consistency within a practice matters more than the specific pattern.
Should explorers be used to detect caries?
Explorers are still useful for checking surfaces, margins and calculus, but heavy probing of suspected lesions is discouraged because it can damage weakened enamel. Generally, visual examination with good lighting and drying, plus radiographs, is the main approach.
How often should diagnostic instruments be replaced?
Replace them when they fail inspection: scratched or cloudy mirrors, bent or blunt explorer tips, worn probe markings or any corrosion that cannot be removed.
Stock every exam tray with dependable instruments. Aurix International supplies surgical-grade stainless steel mirrors, explorers, probes and pliers individually or as diagnostic kits. Request a quote →


