

Training dental assistants on instruments is one of the best investments a practice can make. An assistant who can identify instruments quickly, set up trays correctly and anticipate the clinician’s next request makes every appointment smoother and safer. These ten tips help practice managers, lead assistants and educators build training that sticks.
Key takeaways
- Teach instruments by family and function before memorizing individual names.
- Use real instruments, real trays and the practice’s own setups from day one.
- Build sharps safety and reprocessing according to IFU and CDC guidance into every lesson.
- Check progress with short, regular quizzes and chairside observation.
The top 10 tips for training dental assistants on instruments
1. Start with instrument anatomy
Before learning names, new assistants should understand the parts of an instrument: handle, shank and working end. Explain how the shank angle and working-end shape tell you what the instrument does. This foundation makes it easier to identify unfamiliar instruments later.
2. Teach by family and function
Group instruments into families: examination (mirror, explorer, probe), hygiene (scalers, curettes), restorative (excavators, plastic filling instruments, condensers, carvers, burnishers), surgical (elevators, forceps, retractors, needle holders, scissors). Learning a family at a time is far easier than memorizing a random list. A resource like surgical instrument basics and families can support this step.
3. Use real instruments, not just pictures
Flashcards are useful, but handling real instruments builds recognition of weight, size and shape. Set up a training tray of spare instruments that assistants can pick up, compare and practice passing. Keep training instruments separate from patient-ready stock and reprocess any that contact patients according to IFU.
4. Explain the numbering systems
Assistants often struggle with numbers. Explain common examples: Gracey curettes are numbered in pairs for specific areas (for example 11/12 for mesial surfaces of posterior teeth and 13/14 for distal surfaces of posterior teeth), and forceps such as the 150 and 151 are designed for upper and lower teeth respectively. Understanding the logic is more useful than rote memory. Our Gracey curette numbers guide is a helpful reference.
5. Train on the practice’s own tray setups
Every practice and every clinician sets up trays slightly differently. Document standard setups for each procedure, with photos and a list of instruments in order of use, left to right. Assistants learn faster when they can compare their tray with a clear reference.
6. Practice instrument transfer
Smooth transfer is a key four-handed dentistry skill. Teach assistants to pass instruments in the transfer zone, with the working end oriented for use, and to receive the used instrument at the same time. Practice with the dentist or lead assistant until it becomes routine.
7. Make sharps safety non-negotiable
From the first day, teach safe handling of sharp instruments: never reaching blindly into a tray, using cassettes and instruments that reduce hand contact, wearing appropriate PPE and following the practice’s exposure control plan. Reinforce that clinicians and assistants should agree on where sharps are placed during procedures. See our guide to handling sharp instruments safely.
8. Connect instruments to reprocessing
Assistants usually handle instrument processing, so training should cover the full cycle: point-of-use care, transport, cleaning, inspection, packaging, sterilization and storage. Base procedures on CDC guidance for dental settings and the manufacturer’s instructions for use (IFU) for each instrument and device. Teach assistants to spot damage, corrosion or dull edges during inspection and report them.
9. Quiz little and often
Short, frequent checks beat long exams. Try quick tray challenges (“set up a composite tray”), instrument identification rounds or “what is missing?” exercises. Track progress and revisit weak areas without making training feel punitive.
10. Pair new assistants with a mentor
A designated mentor answers questions, demonstrates techniques and observes chairside performance. Schedule regular check-ins during the first weeks and gradually increase responsibility. Encourage experienced assistants to share practical tips they have learned over the years.
Practical tip: ask new assistants to keep a short notebook of instruments or setups they found confusing. Reviewing it together at weekly check-ins shows the mentor exactly where to focus and helps the trainee see how much they have learned. It also highlights gaps in your written tray setups that are worth fixing for future hires.
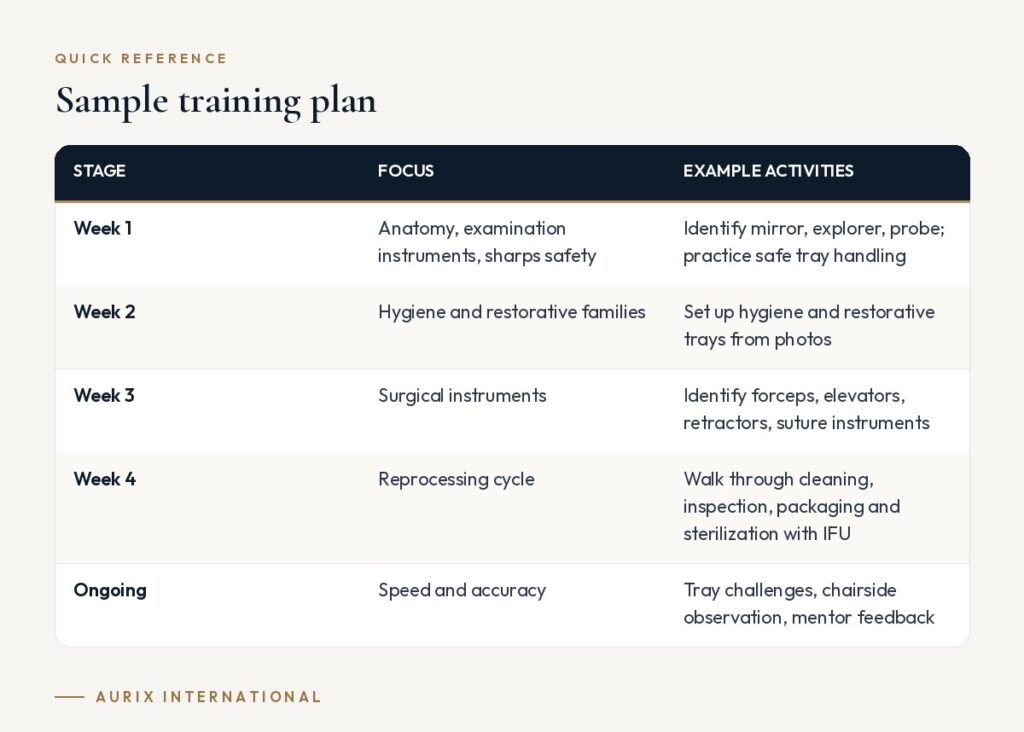
Sample training plan
| Stage | Focus | Example activities |
|---|---|---|
| Week 1 | Anatomy, examination instruments, sharps safety | Identify mirror, explorer, probe; practice safe tray handling |
| Week 2 | Hygiene and restorative families | Set up hygiene and restorative trays from photos |
| Week 3 | Surgical instruments | Identify forceps, elevators, retractors, suture instruments |
| Week 4 | Reprocessing cycle | Walk through cleaning, inspection, packaging and sterilization with IFU |
| Ongoing | Speed and accuracy | Tray challenges, chairside observation, mentor feedback |
How to choose training tools and materials
- Labeled reference trays. A complete, labeled set of common instruments is the best visual aid.
- Tray setup cards. Laminated photo cards for each procedure speed up learning and reduce errors.
- Color coding. Color-coded rings or cassettes can help new staff match instruments to trays, provided the system is applied consistently.
- Organized cassettes. Cassettes with fixed positions for each instrument make missing items obvious and support safer handling.
- Consistent instrument stock. Standardizing on the same patterns across operatories makes training transferable from room to room.
Frequently asked questions
How long does it take to train a new dental assistant on instruments?
It varies with prior experience and the practice’s procedures. Many assistants learn core examination, hygiene and restorative instruments in their first weeks, while surgical and specialist instruments take longer.
What are the first instruments an assistant should learn?
The basic examination set: mouth mirror, explorer, periodontal probe and cotton pliers. These appear on almost every tray.
Should assistants learn sharpening?
That depends on practice policy. If assistants are responsible for sharpening, provide structured training with the correct technique for each instrument type and regular checks of results.
How can I keep training consistent across multiple locations?
Standardize tray setups, instrument patterns and written procedures across locations, and use the same reference materials and quizzes everywhere.
Make training easier with standardized trays. Aurix International offers pre-assembled and custom instrument kits so every operatory uses the same instruments in the same order. Build a custom kit →


