


Ultrasonic cleaning is one of the most effective and safest ways to remove debris from dental instruments before sterilization. CDC guidance recommends automated cleaning equipment such as ultrasonic cleaners because it improves cleaning and reduces the hand scrubbing that leads to sharps injuries. But an ultrasonic unit only performs well when it is used correctly. These ten tips cover solution, loading, timing and maintenance, and should be read alongside the instructions for use (IFU) for your unit and your instruments.
Key takeaways
- Use a detergent formulated for ultrasonic instrument cleaning at the correct dilution, and degas fresh solution.
- Always use a basket or cassette, never overload, and keep hinged instruments open.
- Run the lid closed to reduce aerosols and follow the cycle time in the manufacturer’s IFU.
- Rinse and dry after cleaning, change solution regularly and test the unit’s performance.
The top 10 ultrasonic cleaning tips
1. Remove gross debris and do not let instruments dry
Ultrasonic cleaners are designed to remove fine debris, not large deposits of cement, blood clots or tissue. Wipe instruments at chairside and keep them moist with a holding solution or enzymatic spray if they cannot be processed promptly. Dried material takes longer to remove and may not come off at all. See our guide to cleaning instruments immediately after use.
2. Use the right solution at the right dilution
Plain water does not clean effectively. Use a detergent or enzymatic solution made specifically for ultrasonic cleaning of medical or dental instruments, mixed exactly as the label directs. Too weak and cleaning suffers; too strong and residues or staining can result.
Practical tip: mark the fill line and the correct amount of concentrate on the unit so every team member mixes it the same way.
3. Degas fresh solution before the first cycle
Freshly mixed solution contains dissolved air that reduces cavitation, the formation and collapse of tiny bubbles that does the cleaning. Most manufacturers recommend running the empty unit for a few minutes after filling to degas the solution. Check your unit’s IFU for the recommended time.
4. Always use a basket, rack or cassette
Instruments placed directly on the tank floor can block sound energy, damage the transducers and get damaged themselves. A basket or cassette holds instruments in the active zone and lets staff lift the load out without reaching into the solution.
5. Do not overload the tank
Sound energy needs to reach every surface. Overcrowded baskets create shadows where debris is not removed. Open hinged instruments such as forceps, scissors and needle holders, and avoid stacking cassettes unless the manufacturer allows it.
- Keep instruments from nesting tightly against each other.
- Place heavier instruments at the bottom of the basket and delicate tips on top.
- Split large loads into two cycles.
6. Fully submerge instruments and keep the lid on
Every part of the instrument must sit below the solution level to be cleaned. Running the unit with the lid closed helps reduce aerosols and splashing, which protects staff in the reprocessing area.
7. Follow the recommended cycle time
Cycle times depend on the unit, the solution and whether instruments are loose or in cassettes. Cassettes usually need longer cycles than loose instruments. Use the times stated by the unit and cassette manufacturers rather than guessing, and do not cut cycles short when the schedule is busy.
8. Rinse and dry instruments after every cycle
Instruments come out of the ultrasonic coated with loosened debris and detergent. Rinse them thoroughly with clean water, then dry them completely before inspection and packaging. Residues left on instruments can stain during sterilization and interfere with the process.
9. Change the solution regularly
Ultrasonic solution becomes contaminated quickly and loses effectiveness. Change it at least as often as the manufacturer recommends, commonly at least daily, and sooner if it looks cloudy or soiled. When you change it, drain the tank, clean and dry it according to the IFU, then refill and degas.
10. Test performance and maintain the unit
Ultrasonic transducers can weaken over time without obvious signs. Many clinics run a simple performance check, such as a foil test or a commercial cleaning indicator, on a regular schedule and record the results. Inspect the tank, lid, baskets and drain, and arrange service if results deteriorate.
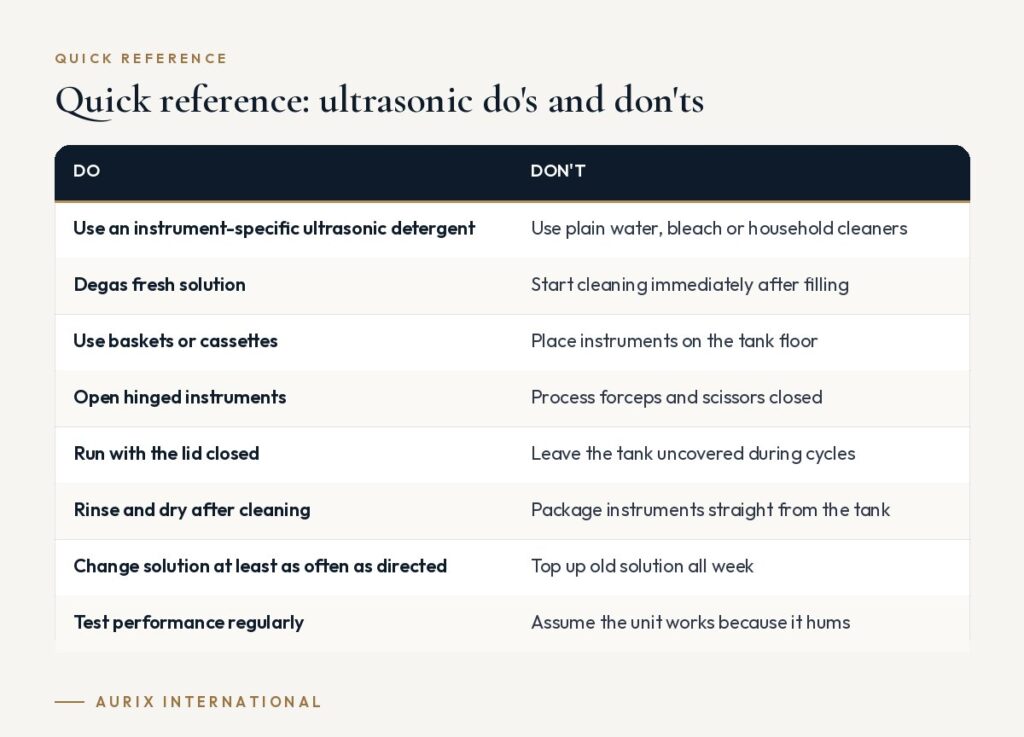
Quick reference: ultrasonic do’s and don’ts
| Do | Don’t |
|---|---|
| Use an instrument-specific ultrasonic detergent | Use plain water, bleach or household cleaners |
| Degas fresh solution | Start cleaning immediately after filling |
| Use baskets or cassettes | Place instruments on the tank floor |
| Open hinged instruments | Process forceps and scissors closed |
| Run with the lid closed | Leave the tank uncovered during cycles |
| Rinse and dry after cleaning | Package instruments straight from the tank |
| Change solution at least as often as directed | Top up old solution all week |
| Test performance regularly | Assume the unit works because it hums |
For more detail, read our article on ultrasonic cleaning do’s and don’ts.
How to choose an ultrasonic cleaner and accessories
- Tank size: choose a tank that fits your largest cassettes fully submerged, with room to spare.
- Basket and cassette fit: confirm that your cassettes are compatible and that the basket holds them in the active zone.
- Lid and drain: a well-fitting lid and an easy drain make daily changes safer and quicker.
- Timer and heater: a reliable timer helps staff follow cycle times; follow the IFU on whether heat is recommended for your solution.
- Instrument compatibility: check instrument IFUs, since some items, such as certain handpieces and some mirror types, should not be ultrasonically cleaned.
Cassette-based workflows pair well with ultrasonic cleaning. Our guide to instrument cassettes and trays explains why.
Frequently asked questions
Does ultrasonic cleaning sterilize instruments?
No. Ultrasonic cleaning removes debris, but instruments must still be rinsed, dried, packaged and sterilized afterward.
How often should ultrasonic solution be changed?
Follow the solution and unit manufacturer’s directions. Many recommend changing it at least daily, and sooner if it becomes visibly cloudy or contaminated.
Can I put all dental instruments in the ultrasonic cleaner?
Most stainless steel hand instruments can be cleaned ultrasonically, but some items, including certain handpieces and some mirrors, should not be. Always check the instrument IFU.
What PPE should staff wear when using an ultrasonic cleaner?
Staff should wear puncture-resistant utility gloves, a mask, eye protection and a protective gown when handling contaminated instruments and solution.
Make reprocessing simpler with organized kits. Aurix International can supply pre-assembled and custom instrument kits that move smoothly from chairside through cleaning and sterilization. Explore custom kits →


