


Restorative dental instruments are the hand instruments that take a tooth from diagnosis through cavity preparation to a finished, contoured restoration. Even in practices that rely heavily on rotary handpieces and composite systems, a well-chosen set of hand instruments still does the fine work: removing soft dentin, refining margins, placing and shaping material. This guide covers the 10 instruments found in almost every operative setup, what each one does and what to look for when buying.
Key takeaways
- A core restorative set covers four stages: examination, preparation, placement and finishing.
- Hand cutting instruments such as hatchets and gingival margin trimmers refine what the bur leaves behind.
- Amalgam and composite need different placement tools; non-stick tips matter for composite.
- Sharp edges, tight tolerances and consistent tip geometry matter more than the number of instruments.
The top 10 restorative dental instruments
1. Mouth mirror
The mouth mirror is used for indirect vision, retraction of the cheek and tongue, and reflecting light onto the operating field. Front-surface mirrors give a sharper image without the “double” reflection of rear-surface glass, which helps when you are checking margins on a distal box.
Tip: Mirror heads are consumables. Replace them once scratches or clouding start to interfere with the view, rather than replacing the whole handle.
2. Explorer
The explorer is a fine, pointed instrument used to check restoration margins, detect calculus and overhangs, and feel the surface texture of tooth structure. Common patterns include the No. 23 shepherd’s hook, the No. 17 and the No. 2A, often made double-ended.
Use light pressure on suspected carious enamel. Current thinking favors visual assessment and gentle tactile checks over forceful probing of pits and fissures, which can damage demineralized enamel.
3. Spoon excavator
Spoon excavators have a rounded, cupped blade with a sharp edge, used to scoop out soft, carious dentin and to remove temporary restorations or excess material. They come in several blade diameters, usually as double-ended instruments with mirror-image blades.
Tip: Keep excavators sharp. A dull spoon burnishes soft dentin instead of lifting it, which slows the procedure and makes caries removal harder to judge.
4. Enamel hatchet and chisels
Hand cutting instruments such as the enamel hatchet, straight chisel and binangle chisel are used to plane cavity walls and remove unsupported enamel after the bur has done the bulk reduction. The hatchet has its cutting edge in line with the handle axis, which makes it useful on the facial and lingual walls of proximal boxes.
Many hand cutting instruments carry an instrument formula on the handle (blade width, blade length and blade angle). Learning to read it helps you reorder exactly the same pattern.
5. Gingival margin trimmer
The gingival margin trimmer (GMT) is a curved, angled hatchet-like instrument used to bevel or smooth the gingival cavosurface margin of a Class II preparation and to round the axiopulpal line angle. It comes in paired mesial and distal versions, so you can work both sides of a proximal box.
Tip: Order GMTs in pairs, and label or color-code the mesial and distal so assistants can pass the correct one without hesitation.
6. Plastic filling instrument
Despite the name, a “plastic” filling instrument is usually stainless steel; the word refers to the plastic state of the material it handles. A typical double-ended design has a flat paddle at one end for carrying and shaping material and a small plugger at the other for condensing it.
For composite, look for highly polished or non-stick coated tips so the resin does not pull away from the cavity walls. Our guide to plastic filling instruments and condensers covers the main patterns.
7. Amalgam carrier
The amalgam carrier is a spring-loaded or lever-operated instrument that picks up triturated amalgam and delivers it into the preparation in increments. Double-ended carriers offer two barrel sizes, small and large.
Tip: Empty and clean the carrier immediately after use. Amalgam that sets inside the barrel is difficult to remove and can jam the plunger.
8. Condenser (plugger)
Condensers compact restorative material into the preparation, eliminating voids and adapting it to the walls and margins. Faces may be smooth or serrated, round or oval, and come in several diameters. Smaller faces are used first in line angles and corners, followed by larger faces for the bulk of the restoration.
9. Carver
Carvers remove excess material and restore anatomy before the material sets. Classic patterns include the discoid-cleoid (a disc-shaped blade at one end and a pointed, claw-shaped blade at the other), the Hollenback carver for proximal and occlusal contours, and the Frahm carver.
Keep the blade partly on tooth structure while carving so you follow the cavosurface margin instead of digging into the restoration.
10. Burnisher
Burnishers have smooth, rounded working ends (ball, football or acorn, beavertail and T-ball shapes) used to smooth the surface of a restoration, improve marginal adaptation and contour matrix bands before placement. Ball burnishers are also handy for shaping occlusal anatomy in composite before curing.
See our overview of cement spatulas, carvers and burnishers for more on the finishing group.
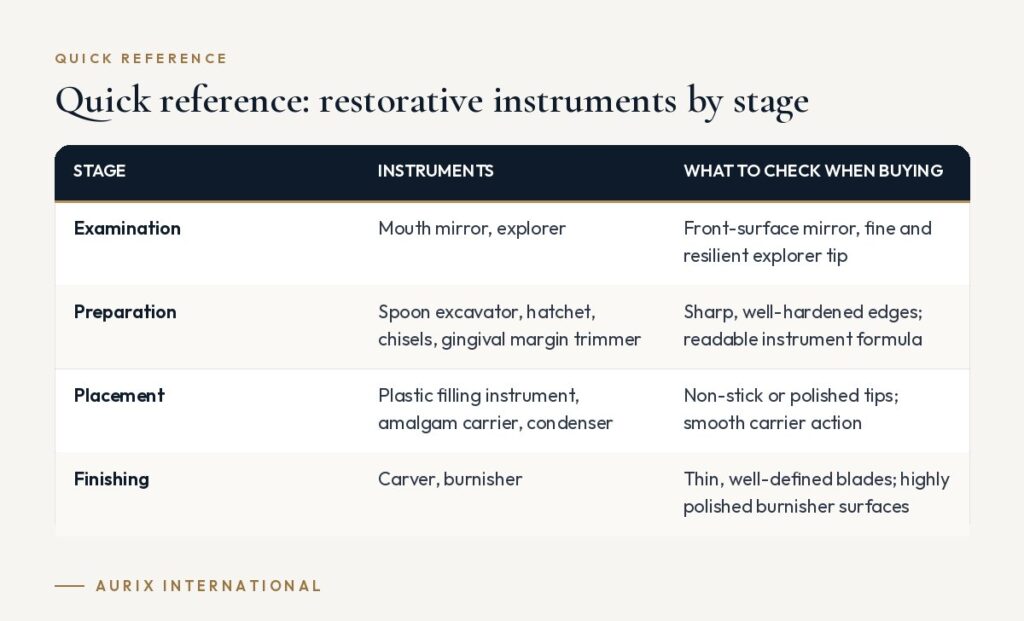
Quick reference: restorative instruments by stage
| Stage | Instruments | What to check when buying |
|---|---|---|
| Examination | Mouth mirror, explorer | Front-surface mirror, fine and resilient explorer tip |
| Preparation | Spoon excavator, hatchet, chisels, gingival margin trimmer | Sharp, well-hardened edges; readable instrument formula |
| Placement | Plastic filling instrument, amalgam carrier, condenser | Non-stick or polished tips; smooth carrier action |
| Finishing | Carver, burnisher | Thin, well-defined blades; highly polished burnisher surfaces |
How to choose restorative dental instruments
- Match the set to your materials. A composite-heavy practice may need fewer amalgam carriers and more non-stick placement instruments; a practice still placing amalgam needs both.
- Standardize patterns across operatories. When every room has the same excavator sizes and carver patterns, assistants set up faster and instruments are easier to restock.
- Look at the steel and the edges. Cutting instruments need a hardened stainless steel that holds an edge and can be resharpened. Placement instruments need a smooth, polished finish.
- Consider handle diameter and weight. Larger-diameter, lighter handles can reduce pinch force over a full day of restorative work.
- Think in trays, not single instruments. Grouping the set into a cassette supports a consistent order of use. Our step-by-step guide to setting up a restorative tray shows one layout, and the companion list of instruments for a restorative tray covers what goes in it.
Suppliers such as Aurix International offer many of these patterns individually and as part of pre-assembled or custom kits, which can make it easier to standardize several operatories at once.
Frequently asked questions
What is the difference between a carver and a burnisher?
A carver has a sharp blade that removes excess material and creates anatomy. A burnisher has a smooth, rounded end that polishes and adapts material or matrix bands without cutting.
Do I still need hand cutting instruments if I use high-speed burs?
Yes, in most operative work. Burs remove bulk tooth structure quickly, while hatchets, chisels and gingival margin trimmers refine walls and margins, especially in proximal boxes where bur access is limited.
Can the same instruments be used for amalgam and composite?
Some can, such as mirrors, explorers and excavators. For placement, composite works best with polished or non-stick instruments, and many clinicians keep separate sets so amalgam residue does not contaminate composite.
How should restorative instruments be reprocessed?
Clean them promptly after use, then inspect, package and sterilize according to the manufacturer’s instructions for use (IFU) and CDC guidance for dental settings. Check cutting edges for sharpness and tips for damage as part of each cycle.
Build a restorative set that matches how you work. Aurix can help you combine excavators, hand cutting instruments, placement and finishing tools into a single kit for every operatory. Design a custom kit →


