

Choosing the right dental extraction forceps makes the difference between a controlled, predictable extraction and a fractured crown or root. Also, each pattern is shaped for a specific arch, tooth group and root form, and the numbers stamped on the hinge tell you exactly which job it suits. This guide covers the 10 forceps most general dentists and oral surgeons keep on hand, when to pick each one and what to look for when buying.
Key takeaways
- Universal patterns such as the 150 (upper) and 151 (lower) cover most single-rooted teeth and premolars.
- Molar forceps such as the 53R/53L, 88R/88L, 17 and 23 have beak tips designed to engage the furcation.
- Third molar and root forceps (210S, 222, 69, 65) handle restricted access and fragments.
- Beaks should adapt to the root surface below the CEJ, not grip the crown.
- Check beak alignment, hinge smoothness and steel quality before buying.
If you are new to forceps design, it helps to understand how to read the handles and beaks first. Our guide on telling upper and lower extraction forceps apart explains the basic rule: maxillary forceps are generally straight or bayonet-shaped in profile, while mandibular forceps have beaks set at roughly a right angle to the handles.
The top 10 dental extraction forceps
1. Forceps 150 (universal maxillary)
The 150 is the workhorse of the upper arch. Its slightly curved profile and narrow, gently concave beaks suit maxillary incisors, canines and premolars, and it also works on retained roots of single-rooted teeth. Because it works on both left and right sides, it is often the first upper forceps placed on any extraction tray.
Tip: Seat the beaks as far apically as possible along the long axis of the tooth before applying rotational or buccal-palatal movement. In addition, the modified 150A has beaks that are better suited to premolars.
2. Forceps 151 (universal mandibular)
The 151 is the lower counterpart to the 150. The downward-angled beaks let the clinician approach mandibular incisors, canines and premolars with a comfortable wrist position. Like the 150, it is universal for both sides of the arch.
Tip: Lower incisors have thin, ribbon-shaped roots, so use buccal-lingual movement with care rather than heavy rotation. Generally, pediatric versions (150S and 151S) are available for primary teeth.
3. Forceps 53R and 53L (maxillary molars)
The 53 pattern comes as a right and left pair. One beak has a pointed tip that engages the buccal furcation between the mesiobuccal and distobuccal roots, while the other has a rounded tip that adapts to the single palatal root. This anatomical fit makes them a standard choice for maxillary first and second molars with intact crowns.
Tip: The pointed beak always goes to the buccal side, which is how you tell the R and L apart at chairside.
4. Forceps 88R and 88L (upper cowhorn)
Often called upper cowhorns, the 88R and 88L have long, sharply pointed beaks on both sides. They reach into the trifurcation of maxillary first and second molars, which makes them useful when the crown is heavily broken down and a 53 pattern would have nothing solid to grip.
Tip: These forceps concentrate force at the tips, so apply firm apical pressure first and avoid crushing the surrounding alveolar bone.
5. Forceps 23 (lower cowhorn)
The 23 cowhorn has two heavy, pointed beaks that slide into the bifurcation of mandibular molars. Furthermore, as you squeeze the handles, the beaks act as wedges and lift the tooth out of the socket. It is a favorite for lower molars with sound root trunks and for teeth with a compromised crown.
Tip: Combine gentle squeezing with buccal-lingual movement. If the roots are divergent or curved, sectioning the tooth may be safer than relying on the cowhorn alone.
6. Forceps 17 (mandibular molars)
The 17 is a universal lower molar forceps with small central points on both beaks. Those points seat into the buccal and lingual furcations, giving a secure grip on intact mandibular first and second molars without the aggressive wedging action of the 23.
Tip: Many clinicians start with the 17 and switch to the 23 only if they need additional purchase.
7. Forceps 210S (maxillary third molars)
Upper third molars sit far back in the arch where access is tight. In practice, the 210S has an offset design and smooth, rounded beaks that adapt to the often conical, fused roots of maxillary third molars. It is universal for both sides.
Tip: Ask the patient to close slightly and move the mandible toward the working side to give the cheek more slack and improve access.
8. Forceps 222 (mandibular third molars)
The 222 has short beaks angled at roughly 90 degrees to the handles, giving access to erupted lower third molars behind the second molar. Moreover, the short beaks allow a direct approach without the handles hitting the opposing teeth.
Tip: The 222 suits erupted, accessible third molars. Impacted teeth usually need a flap, bone removal and sectioning rather than forceps alone.
9. Forceps 69 (root tip forceps)
The 69 has small, narrow beaks that can grasp root remnants, fractured root tips and small teeth in either arch. It is a useful backup on any tray because fractured roots happen even in careful hands.
Tip: Use an elevator to loosen the fragment first, then take it out with the 69 once it is mobile.
10. Forceps 65 (maxillary root forceps)
The 65 has long, narrow beaks in a bayonet-style profile, making it suitable for maxillary roots, retained root fragments and narrow upper teeth. Also, the slim beaks fit into tight interproximal spaces where a 150 would be too bulky.
Tip: Make sure you luxate the fragment before grasping it. In addition, narrow beaks are not designed for heavy rotational force.
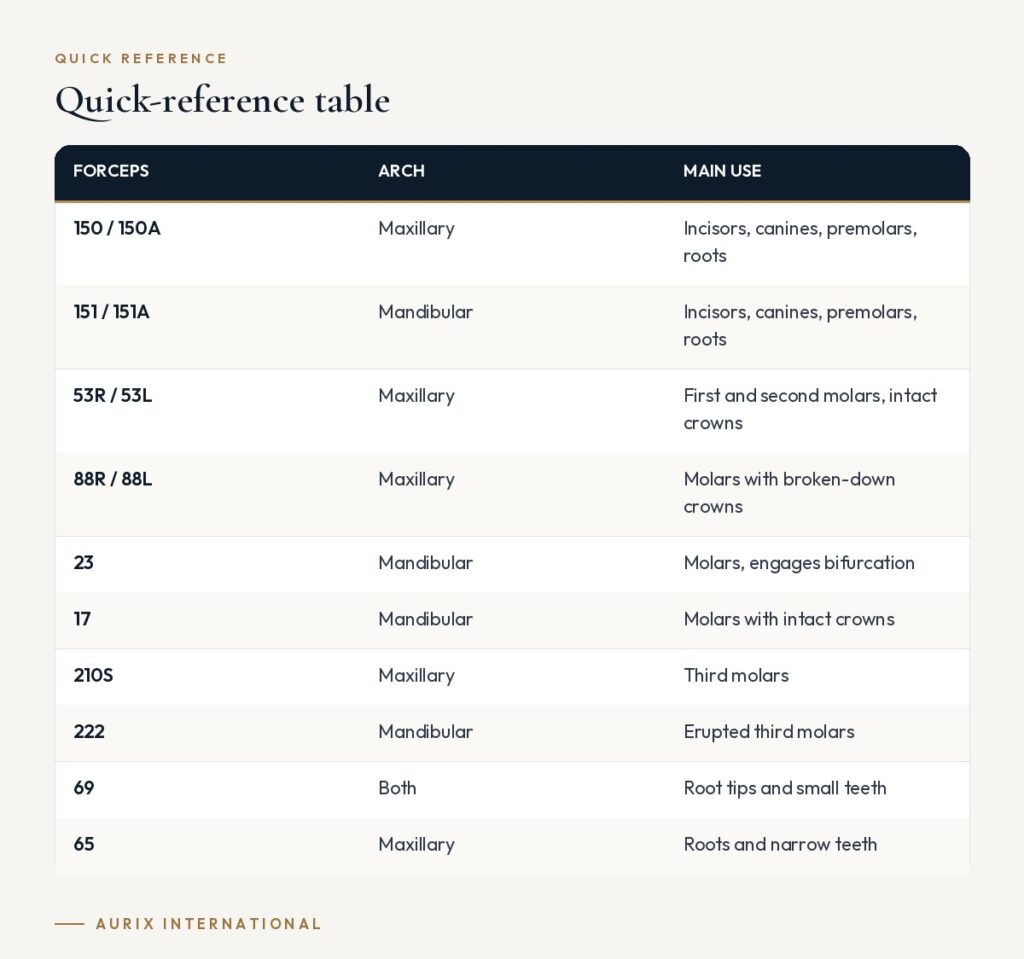
Quick-reference table
| Forceps | Arch | Main use |
|---|---|---|
| 150 / 150A | Maxillary | Incisors, canines, premolars, roots |
| 151 / 151A | Mandibular | Incisors, canines, premolars, roots |
| 53R / 53L | Maxillary | First and second molars, intact crowns |
| 88R / 88L | Maxillary | Molars with broken-down crowns |
| 23 | Mandibular | Molars, engages bifurcation |
| 17 | Mandibular | Molars with intact crowns |
| 210S | Maxillary | Third molars |
| 222 | Mandibular | Erupted third molars |
| 69 | Both | Root tips and small teeth |
| 65 | Maxillary | Roots and narrow teeth |
For a deeper look at molar patterns, see molar extraction forceps beak designs explained.
How to choose dental extraction forceps
- Start with a core set. A 150, 151, 53R/53L, 23 or 17, and a root forceps cover most routine extractions. Generally, add third molar and specialty patterns as your case mix demands.
- Check beak adaptation. The beaks should meet evenly and contact the root surface, not just the crown. Furthermore, misaligned beaks increase the risk of crown fracture.
- Test the hinge. The joint should open and close smoothly with no side-to-side play.
- Look at the steel and finish. Surgical-grade stainless steel and a satin finish resist corrosion and reduce glare. Our extraction forceps buyer’s guide covers materials and finishes in more detail.
- Consider handle design. Serrated or textured handles improve grip with wet gloves, and handle length affects leverage and comfort.
- Plan for reprocessing. Clean, inspect and sterilize forceps according to the manufacturer’s instructions for use (IFU), with the hinge open during cleaning and sterilization.
Frequently asked questions
What is the difference between the 150 and 151 forceps?
The 150 targets the maxillary arch and has a straighter profile, while the 151 targets the mandibular arch and has beaks angled downward. In practice, both are universal for left and right sides and work mainly on incisors, canines and premolars.
When should I use a cowhorn instead of a standard molar forceps?
Cowhorns (23 for lower, 88R/88L for upper) are useful when the crown is weakened or when you need the beaks to engage the furcation directly. For intact molars, many clinicians start with a 17 or 53R/53L and move to a cowhorn if needed.
Do I need left and right versions of every forceps?
No. Moreover, many patterns, including the 150, 151, 17, 23, 210S, 222 and 69, are universal. Suppliers sell the 53 and 88 patterns as R and L pairs because their beaks follow the buccal anatomy of each side.
How should extraction forceps be sterilized?
Clean them promptly after use, open the hinge, inspect for debris and damage, then package and sterilize following the instrument manufacturer’s IFU and current CDC infection-control guidance for dental settings.
Build an extraction set that fits your cases. Aurix International supplies surgical-grade stainless steel extraction forceps individually or as part of custom kits configured around your workflow. Design your custom kit →


