


Sharpening curettes and scalers is one of the most important and most neglected parts of periodontal instrument care. A sharp edge removes calculus with fewer strokes and less pressure, which is better for the patient, the root surface and the clinician’s hands. A poorly sharpened blade, on the other hand, loses its shape and its useful life quickly. These ten tips cover the fundamentals of keeping a reliable working edge.
Key takeaways
- Sharpen little and often, at the first sign of dullness, rather than waiting for an edge to fail.
- Aim for an angle of about 100 to 110 degrees between the instrument face and the stone, giving an internal angle of roughly 70 to 80 degrees.
- Preserve the original blade design: rounded toe on curettes, pointed tip on sickles, single cutting edge on Graceys.
- Check sharpness with a test stick and retire blades that have become thin.
The top 10 tips for sharpening curettes and scalers
1. Know when an edge is dull
A sharp edge does not reflect light; a dull edge has a rounded surface that shows a line of reflected light when viewed under good lighting. Clinically, a dull instrument slides over calculus, needs more lateral pressure and requires more strokes.
Tip: make edge checks part of routine instrument inspection, not something you do only when an instrument feels obviously blunt.
2. Sharpen little and often
Frequent light sharpening removes very little metal and maintains the blade’s original shape. Heavy sharpening of a very dull instrument removes much more metal and risks distorting the blade. Many practices schedule sharpening at set intervals so it is not forgotten.
3. Choose the right stone
Common sharpening stones include natural Arkansas stones (fine, often used for routine sharpening), India stones (coarser, for very dull instruments), and ceramic or synthetic composite stones. Some stones are designed to be used with oil and others with water or dry; follow the stone manufacturer’s instructions.
Tip: a medium or fine stone for regular maintenance plus a coarser stone for occasional restoration covers most needs.
4. Work on clean instruments and clean stones
Sharpen instruments that have already been cleaned and, ideally, sterilized, then clean and reprocess them again afterward. Sharpening stones that are reused should be cleaned and sterilized according to the manufacturer’s instructions. Wear gloves and eye protection, and work on a stable surface.
5. Get the angle right
The goal is to restore the internal angle between the face and the lateral surface, which is roughly 70 to 80 degrees on curettes and sickles. A common method is to hold the instrument with the face parallel to the floor and position the stone at about 100 to 110 degrees to the face (roughly at the “1 o’clock” position for a right-side cutting edge).
Tip: an angle too close to 90 degrees produces a blunt edge, while too open an angle creates a thin, weak edge that dulls quickly.
6. Preserve the original blade shape
Every design has a purpose. Keep the rounded toe on curettes, the pointed tip and triangular cross-section on sickle scalers, and the original curvature of the blade. Sharpen in sections, heel, middle and toe, and rotate the stone around the toe of a curette to keep it rounded.
7. Sharpen only the cutting edge on Graceys
Gracey curettes have one cutting edge per end, the lower edge. Sharpen only that edge, keeping the face’s offset in mind so the edge retains its correct angle. Universal curettes and sickles have two cutting edges, so both sides need attention. See our Gracey curette guide for blade details.
8. Finish on a down stroke
Use short, light up-and-down strokes with even pressure, and finish on a down stroke to reduce the formation of a wire edge (a thin burr of metal). Excessive pressure removes too much metal and can create an uneven edge.
9. Test the edge
Use a plastic or acrylic test stick to check sharpness. A sharp edge grabs or “bites” into the stick with light pressure; a dull edge slides. Check the whole length of the cutting edge, not just one point, and re-sharpen any section that slides.
Tip: magnification and good lighting make it easier to see reflected light along the edge.
10. Know when to retire an instrument
Every sharpening removes a little metal. When a blade becomes noticeably thinner or narrower, it can bend or break in use. Retire curettes and scalers whose blades are significantly reduced, or that show cracks, bends or corrosion. Our guide to signs instruments need replacing explains what to look for.
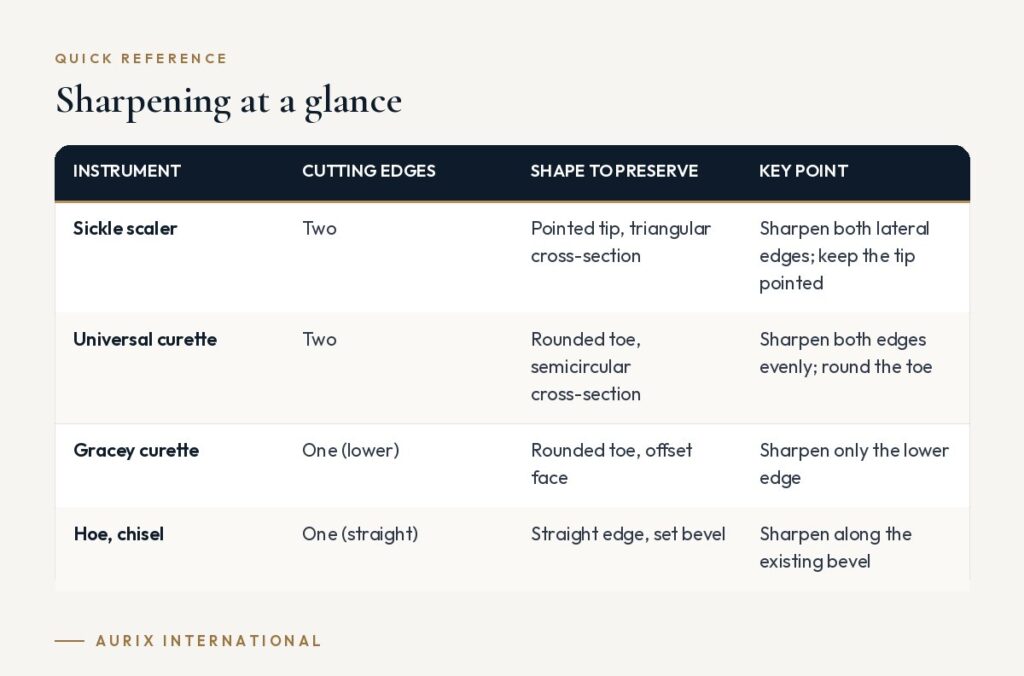
Sharpening at a glance
| Instrument | Cutting edges | Shape to preserve | Key point |
|---|---|---|---|
| Sickle scaler | Two | Pointed tip, triangular cross-section | Sharpen both lateral edges; keep the tip pointed |
| Universal curette | Two | Rounded toe, semicircular cross-section | Sharpen both edges evenly; round the toe |
| Gracey curette | One (lower) | Rounded toe, offset face | Sharpen only the lower edge |
| Hoe, chisel | One (straight) | Straight edge, set bevel | Sharpen along the existing bevel |
Buying tips: instruments and sharpening equipment
- Choose steel that holds an edge. Instrument steel and heat treatment affect how long an edge lasts between sharpenings. Our article on 410, 420 and 440A stainless steel explains the trade-offs.
- Consider sharpening guides. Guides and devices that hold the instrument or stone at a set angle can make results more consistent, especially for new team members.
- Keep spares. Having enough instruments in rotation lets you sharpen without disrupting the schedule.
- Train the team. Consistent technique across clinicians extends blade life. Our longer guide to sharpening curettes and scalers covers step-by-step methods.
When blades reach the end of their life, Aurix International can supply replacement curettes and scalers individually or in bulk.
Frequently asked questions
How often should I sharpen curettes?
There is no fixed rule. It depends on how often instruments are used and on the deposits encountered. Check edges routinely with a test stick and sharpen at the first sign of dullness.
Should I sharpen before or after sterilization?
A common approach is to sharpen instruments that have been cleaned and sterilized, then clean and sterilize them again before patient use. Follow your practice protocol and the manufacturer’s instructions for use (IFU).
Can I use a power sharpener?
Some powered sharpening devices are available. They can be efficient but may remove metal quickly, so follow the device instructions carefully and check that the original blade shape is preserved.
Replace worn blades with instruments made to hold an edge. Aurix supplies surgical-grade stainless steel curettes and scalers, including the full Gracey range. View Gracey curettes →


