

Sharps safety is a daily concern for every dental team, because scalers, explorers, burs, scalpel blades and needles are used in almost every appointment. Percutaneous injuries can expose staff to bloodborne pathogens, and most can be prevented with good habits and the right equipment. These ten tips cover the operatory, the sterilization area and what to do if an injury happens. They are consistent with CDC guidance for dental settings; also follow OSHA requirements, your exposure control plan and the instructions for use (IFU) for your devices.
Key takeaways
- Never recap needles with a two-handed technique; use a one-handed scoop or a recapping device.
- Pass sharp instruments through a neutral zone and point working ends away from hands.
- Use cassettes and automated cleaning to avoid hand sorting and scrubbing of sharp instruments.
- Report every sharps injury immediately and follow your post-exposure plan.
The top 10 sharps safety tips
1. Treat every used instrument as contaminated
From the moment an instrument is used, it should be handled as potentially infectious. This mindset encourages careful handling, appropriate PPE and safe placement on the tray. Our guide to handling sharp instruments safely covers the basics.
2. Use a neutral zone instead of hand-to-hand passing
Passing sharp instruments directly between hands creates a risk of injury for both the clinician and the assistant. Many teams use a designated neutral zone on the tray where instruments are placed and picked up. If instruments must be passed, agree on a technique and announce the transfer.
3. Never recap needles with two hands
CDC guidance advises against recapping needles with both hands or any technique that points the needle toward the body. Use a one-handed scoop technique or a mechanical recapping device, and do not bend or break needles before disposal.
4. Use safer devices where appropriate
Engineering controls, such as safety syringes, needle recapping devices and safety scalpels, reduce exposure risk. OSHA requires employers to evaluate and consider safer medical devices, with input from staff who use them. Review options regularly as new devices become available.
5. Remove scalpel blades with an instrument, never fingers
Use a blade remover or a hemostat or needle holder to mount and remove scalpel blades, directing the blade away from your body. Many single-use blade removers allow you to discard the blade directly into a sharps container.
6. Dispose of sharps immediately at the point of use
Place used needles, blades, orthodontic wire ends and other disposable sharps in a puncture-resistant, leak-proof, labeled sharps container as close as possible to where they are used. Do not overfill containers; replace them when they reach the fill line marked by the manufacturer.
- Keep containers upright and within easy reach.
- Never reach into a sharps container.
- Close and dispose of full containers according to local regulations.
7. Organize trays so sharp ends point the same way
Position reusable sharp instruments so all working ends face the same direction, away from where hands reach. Return used instruments to the same position after use. Cassettes with secure rails make this easier and help keep instruments from shifting.
8. Keep instruments in cassettes during reprocessing
Hand sorting loose instruments in a sink is a major source of injuries. Keeping instruments in cassettes from chairside through cleaning and sterilization, and using an ultrasonic cleaner or instrument washer, reduces direct handling. CDC guidance recommends automated cleaning equipment for this reason. See our article on instrument cassettes and trays.
9. Wear heavy-duty utility gloves for cleaning
Thin examination gloves offer little protection against punctures. When handling contaminated instruments, wear puncture-resistant utility gloves along with a mask, eye protection and a protective gown. If manual cleaning is unavoidable, use long-handled brushes and scrub instruments below the water line, one or a few at a time.
10. Have a post-exposure plan and report every injury
Every practice should have a written exposure control plan explaining first aid, who to report to and how to access prompt medical evaluation. Report injuries immediately, even if they seem minor, so the injured person can be evaluated quickly and the incident reviewed to prevent recurrence. Train new staff on the plan as part of onboarding.
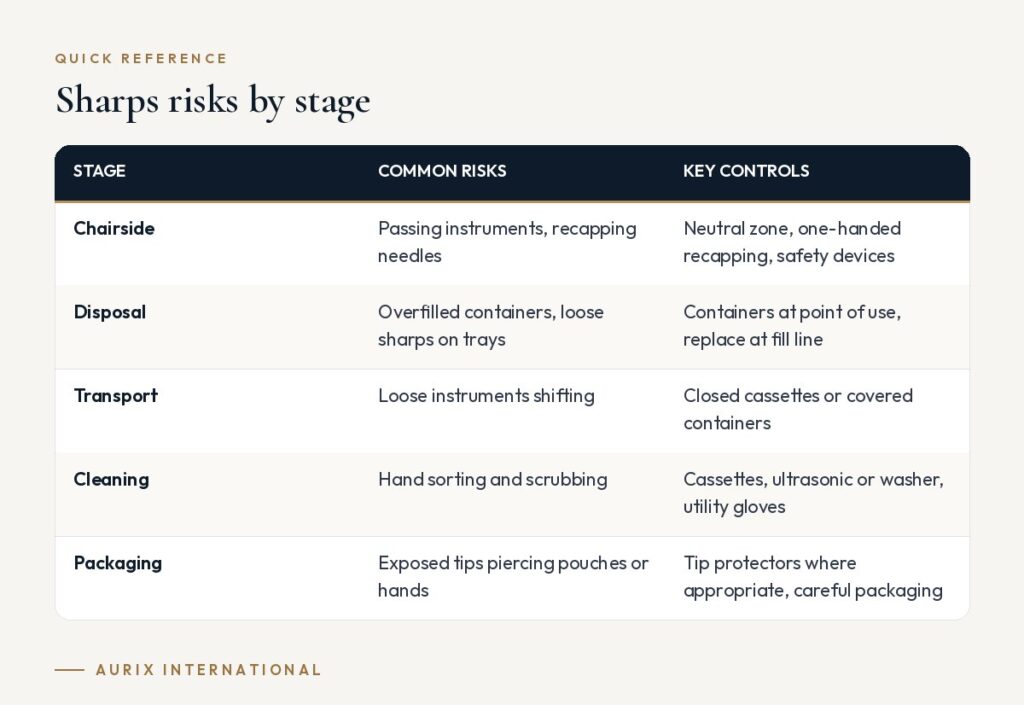
Sharps risks by stage
| Stage | Common risks | Key controls |
|---|---|---|
| Chairside | Passing instruments, recapping needles | Neutral zone, one-handed recapping, safety devices |
| Disposal | Overfilled containers, loose sharps on trays | Containers at point of use, replace at fill line |
| Transport | Loose instruments shifting | Closed cassettes or covered containers |
| Cleaning | Hand sorting and scrubbing | Cassettes, ultrasonic or washer, utility gloves |
| Packaging | Exposed tips piercing pouches or hands | Tip protectors where appropriate, careful packaging |
How to choose sharps safety equipment and instruments
- Involve the team: ask the people who use devices daily to help evaluate safer options.
- Choose cassettes with secure rails: they reduce handling and keep tips oriented.
- Check container placement: sharps containers should be within arm’s reach in every operatory.
- Keep instruments sharp and in good condition: damaged or bent instruments are harder to control and handle safely. See signs your instruments need replacing.
- Train consistently: include sharps handling in training for all new staff. Our guide to training new assistants can help.
Frequently asked questions
Is it ever acceptable to recap a needle?
When recapping is needed, for example between injections for the same patient, CDC guidance supports using a one-handed scoop technique or a recapping device rather than holding the cap in the other hand.
What should I do immediately after a sharps injury?
Wash the area with soap and water, report the injury to your supervisor or designated person right away and follow your practice’s post-exposure plan for prompt medical evaluation.
How full can a sharps container get?
Replace containers when they reach the fill line marked by the manufacturer. Overfilled containers increase the risk of injury.
Do cassettes really reduce sharps injuries?
Cassettes reduce the need to hand sort and handle loose instruments during cleaning and sterilization, which is a common source of injury.
Safer workflows start with organized kits. Aurix International supplies surgical-grade stainless steel instruments in pre-assembled and custom kits that fit cassette-based workflows. Design your custom kit →


