


Gracey curettes are area-specific instruments designed for subgingival debridement and root planing, and they reward good technique more than almost any other hand instrument. Used correctly, they adapt closely to root surfaces and remove deposits efficiently; used carelessly, they burnish calculus or gouge cementum. These ten tips cover the fundamentals that clinicians and students most often need to revisit.
Key takeaways
- Each Gracey number is designed for specific teeth and surfaces, so choose by area.
- Only the lower edge of a Gracey blade cuts; the face is offset about 70 degrees to the terminal shank.
- A terminal shank parallel to the tooth surface gives the correct working angle automatically.
- Insert at close to 0 degrees, work at roughly 60 to 80 degrees, and use short, overlapping strokes.
- Sharp blades need less force and protect your hands as well as the root surface.
The top 10 tips for using Gracey curettes
1. Choose the right number for the area
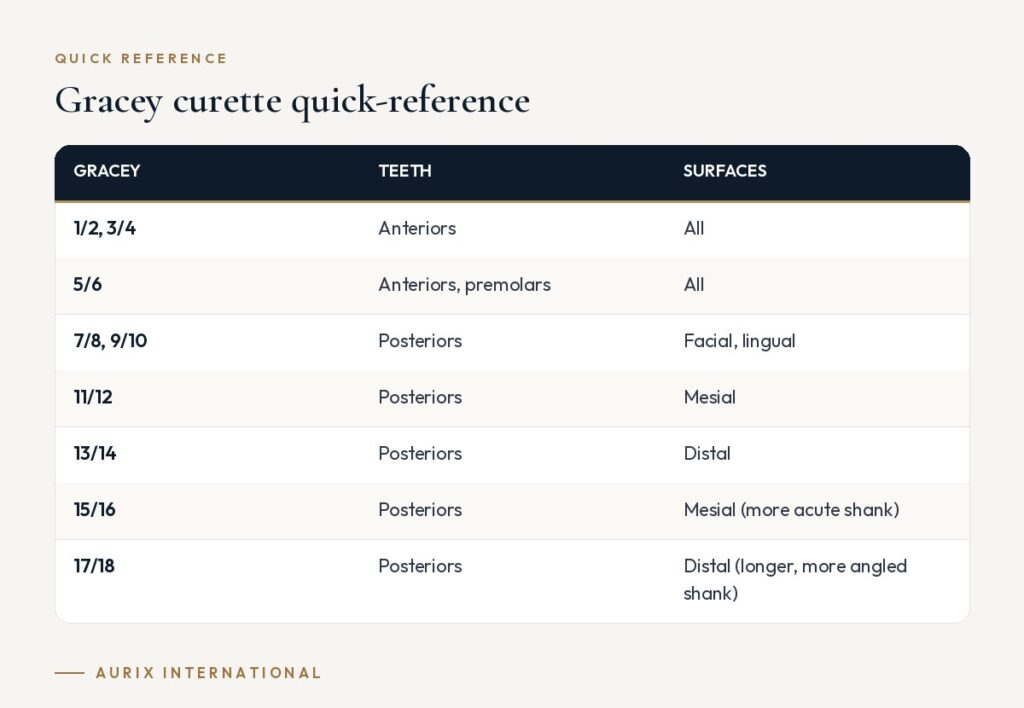
Gracey curettes are made in pairs, each designed for particular teeth and surfaces. A widely used guide:
- 1/2, 3/4: anterior teeth.
- 5/6: anterior teeth and premolars.
- 7/8, 9/10: posterior teeth, facial and lingual surfaces.
- 11/12, 15/16: posterior teeth, mesial surfaces.
- 13/14, 17/18: posterior teeth, distal surfaces.
The 15/16 is a modified 11/12 with a more acute shank angle for mesial surfaces, and the 17/18 is a modified 13/14 with a longer, more angled terminal shank and a smaller blade. Our guide to which Gracey number for which tooth explains each in more depth.
2. Identify the cutting edge before you start
Unlike universal curettes, a Gracey has only one cutting edge per end: the lower, longer edge. Hold the instrument so you are looking directly at the face of the blade with the terminal shank perpendicular to the floor. The blade will appear tilted, and the lower edge is the one that cuts.
Tip: students often practice this check at the start of every quadrant until it becomes automatic.
3. Keep the terminal shank parallel to the surface
Because the face is offset about 70 degrees, positioning the terminal shank parallel to the tooth surface you are instrumenting automatically places the blade at a correct working angle. This is the single most useful visual check with Graceys.
4. Use a modified pen grasp
Hold the handle with the pads of the thumb and index finger, and rest the side of the middle finger on the shank. This gives control and tactile feedback. Avoid squeezing: a light grasp during exploration and a firmer grip only during the working stroke reduces fatigue.
5. Establish a stable fulcrum
Place the ring finger on a tooth close to the working area, ideally on the same arch. A stable intraoral fulcrum gives control and leverage. Extraoral or opposite-arch fulcrums are useful for some maxillary posterior areas and deep pockets.
6. Insert at about 0 degrees, work at 60 to 80 degrees
Insert the blade beneath the gingival margin with the face nearly flat against the tooth (close to 0 degrees) to minimize tissue trauma. At the base of the deposit, open the angle to roughly 60 to 80 degrees for the working stroke.
Tip: angles below about 45 degrees tend to burnish calculus, while angles above 90 degrees can traumatize the soft tissue.
7. Adapt the toe third
Keep the toe third of the blade in contact with the tooth, especially around line angles and convex surfaces. Roll the handle between your fingers as you move around the tooth so the toe stays adapted rather than sticking out into the tissue.
8. Use short, controlled, overlapping strokes
Calculus removal strokes should be short, firm and powered by wrist and forearm motion rather than finger flexing. Overlap strokes in vertical, oblique or horizontal directions, then switch to longer, lighter strokes for root planing once deposits are removed.
9. Pick the right shank and blade length
Standard Graceys suit most pockets. Extended-shank versions add about 3 mm to the terminal shank for pockets deeper than about 5 mm, and mini-bladed versions have a shorter blade for narrow roots, furcations and tight anterior pockets.
Tip: having one extended-shank 11/12 and 13/14 on hand covers many deep posterior sites.
10. Keep the cutting edge sharp
A dull Gracey requires more lateral pressure, increases strokes and can leave burnished calculus behind. Check sharpness with a plastic test stick and sharpen at the first sign of dullness, preserving the original blade shape and sharpening only the cutting edge. Our sharpening tips walk through the process.
Gracey curette quick-reference
| Gracey | Teeth | Surfaces |
|---|---|---|
| 1/2, 3/4 | Anteriors | All |
| 5/6 | Anteriors, premolars | All |
| 7/8, 9/10 | Posteriors | Facial, lingual |
| 11/12 | Posteriors | Mesial |
| 13/14 | Posteriors | Distal |
| 15/16 | Posteriors | Mesial (more acute shank) |
| 17/18 | Posteriors | Distal (longer, more angled shank) |
Choosing Gracey curettes for your practice
- Start with the essentials. Many clinicians begin with 1/2 or 5/6, 7/8, 11/12 and 13/14, and add the rest of the series as needed.
- Look for consistent blade geometry. The blade offset and shank angles should match the standard design so technique transfers between instruments.
- Consider the handle. A larger, lightweight, textured handle reduces pinch force during long periodontal sessions.
- Check edge retention and finish. Quality stainless steel holds its edge and resists corrosion through repeated sterilization. Our Gracey curette buyer’s guide covers what to look for.
Frequently asked questions
How do I know which end of a Gracey to use?
Place the blade on the surface you want to instrument. If the terminal shank is parallel to that surface and the lower shank lines up with the tooth, you are using the correct end. If the shank is crossing the tooth or pointing away from it, switch ends.
Can I use a Gracey curette supragingivally?
You can, but sickle scalers are usually more efficient for heavy supragingival deposits. Graceys are designed for subgingival work and root planing.
What is the difference between a Gracey and a universal curette?
A Gracey has one cutting edge per end and a blade offset of about 70 degrees, designed for specific areas. A universal curette has two cutting edges and a face at 90 degrees to the shank, so it adapts to most surfaces.
Precision Graceys for precise technique. Aurix offers the full Gracey series in surgical-grade stainless steel, from standard to extended-shank designs, for clinics, schools and distributors. Shop Gracey curettes →


