

Knowing dental assistant instruments by sight is one of the first skills a new assistant needs, because fast, accurate instrument transfer keeps procedures safe and on time. This list covers the 20 instruments assistants handle most, what each is used for and what the assistant typically does with it. Use it alongside your practice’s own tray setups, since patterns vary between clinics.
Key takeaways
- Learn instruments in families: examination, isolation and suction, restorative, and surgical.
- Trays are usually laid out in order of use, left to right, so learning the sequence helps you anticipate the next instrument.
- Transfer instruments with the working end oriented toward the arch being treated, and handle sharps with care.
- Every reusable instrument must be cleaned and sterilized according to CDC guidance and the manufacturer’s IFU.
The top 20 instruments dental assistants must know
1. Mouth mirror
Used by the operator for indirect vision and retraction. Assistants often use a second mirror to retract the cheek or keep the operator’s mirror clear with air.
2. Explorer
A fine-tipped instrument for checking tooth surfaces and margins. It is usually passed with the mirror as the first two instruments on most trays.
3. Periodontal probe
Used for measuring pocket depths. Assistants frequently record the six readings per tooth during periodontal charting, so knowing how the probe is read helps catch errors.
4. Cotton pliers
Used to place and remove cotton rolls, pellets and small items. Assistants use them to pass items to the operator or place cotton rolls themselves.
5. Aspirating syringe
Holds the anesthetic cartridge and needle. The assistant loads it, checks that the harpoon has engaged the stopper, and passes it out of the patient’s line of sight. Recap only with a one-handed scoop technique or a recapping device.
6. High-volume evacuator (HVE) tip
Removes fluids, debris and aerosol during treatment. Correct HVE placement is one of the assistant’s most important jobs; keep the tip close to the tooth being treated without blocking the operator’s view.
7. Air/water syringe
Delivers air, water or spray to rinse and dry the field. Tips are either single-use or reprocessed according to the manufacturer’s instructions.
8. Spoon excavator
Removes soft decay and temporary materials. Passed after the handpiece phase of many restorative procedures.
9. Plastic filling instrument
Carries and shapes soft restorative materials and cements. Assistants often load material onto the paddle end before passing.
10. Amalgam carrier
Picks up and delivers amalgam into the preparation. Where amalgam is still used, the assistant loads and passes the carrier repeatedly in small increments.
11. Amalgam condenser
Packs amalgam into the preparation. It is usually exchanged with the carrier in a quick rhythm, so position both close together on the tray.
12. Tofflemire matrix retainer
Holds a matrix band around the tooth to form a missing wall. Assistants commonly assemble the retainer and band before the procedure, with the slotted side facing the gingiva.
13. Rubber dam punch
Punches holes in the rubber dam sheet for the teeth to be isolated. The rotating table has holes of different sizes for different teeth.
14. Rubber dam clamp forceps
Spreads the clamp so it can be seated on the anchor tooth. Tie floss to the clamp before placing it so it can be retrieved if it slips.
15. Cement spatula
Mixes cements, liners and bases on a pad or glass slab. Assistants should follow the material manufacturer’s mixing time and ratio.
16. Articulating paper forceps
Miller-style forceps hold articulating paper so the operator can mark and check the bite after a restoration.
17. Elevators
Used to luxate teeth before extraction. Straight elevators such as the 301 are the most common; Cryer elevators are paired left and right for root removal.
18. Extraction forceps
Designed for specific teeth and arches: 150 for upper anteriors and premolars, 151 for lowers, 23 cowhorn for lower molars and 88R/88L for upper molars. Learning the beak shapes helps you pass the correct forceps without being asked twice.
19. Scalpel handle
Holds a disposable blade such as a No. 15. Load and remove blades with a hemostat or blade remover, never with fingers, and pass the scalpel with the blade facing away from both of you.
20. Needle holder
Grips the suture needle during suturing. Mayo-Hegar patterns are common in general practice; fine Castroviejo holders are used for delicate tissue. Assistants often cut sutures with suture scissors after each knot.
For a wider reference that includes hygiene and specialty instruments, see 50 dental instruments and their uses.
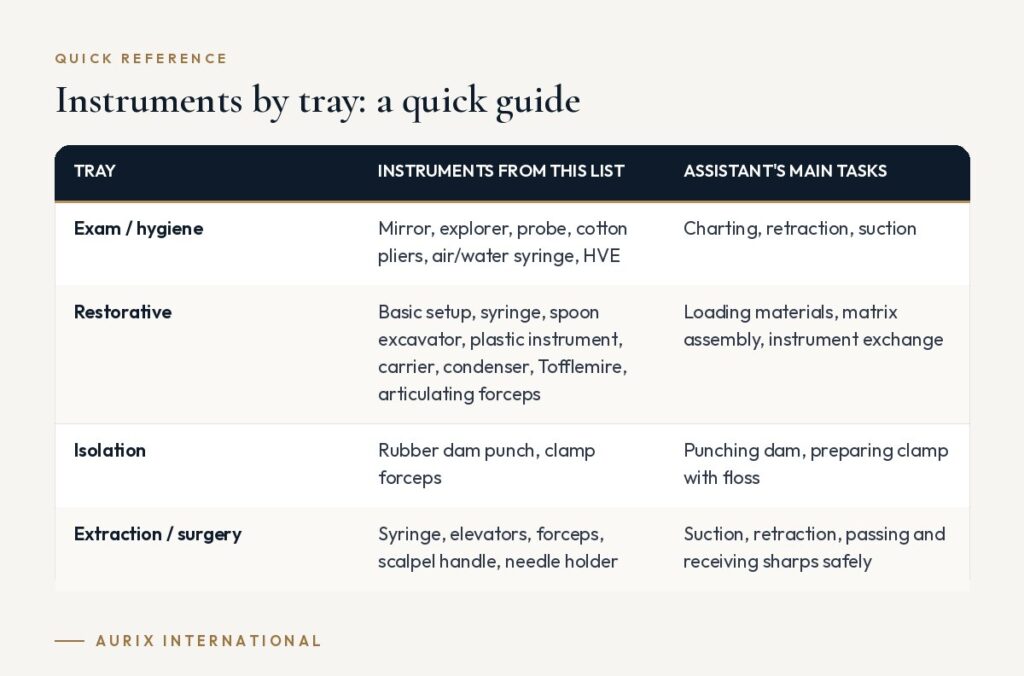
Instruments by tray: a quick guide
| Tray | Instruments from this list | Assistant’s main tasks |
|---|---|---|
| Exam / hygiene | Mirror, explorer, probe, cotton pliers, air/water syringe, HVE | Charting, retraction, suction |
| Restorative | Basic setup, syringe, spoon excavator, plastic instrument, carrier, condenser, Tofflemire, articulating forceps | Loading materials, matrix assembly, instrument exchange |
| Isolation | Rubber dam punch, clamp forceps | Punching dam, preparing clamp with floss |
| Extraction / surgery | Syringe, elevators, forceps, scalpel handle, needle holder | Suction, retraction, passing and receiving sharps safely |
Tips for learning and handling instruments
- Learn by procedure, not alphabetically. Study one tray at a time and say the instrument name as you set it up. Our guide to training assistants on instrument identification has more exercises.
- Set trays in order of use. Most practices lay out instruments left to right in the sequence they are used. Returning each instrument to its place makes it easy to see what is next and to count instruments at the end.
- Transfer in the transfer zone. Pass and receive instruments below the patient’s chin, with the working end oriented toward the arch being treated so the operator does not need to reposition the instrument.
- Treat sharps carefully. Never pass sharps directly hand to hand without a clear system; many practices use a neutral zone on the tray. See our guide to handling sharp instruments safely.
- Know the reprocessing route. After the procedure, used instruments are transported in a covered container to the sterilization area, cleaned, inspected, packaged and sterilized following CDC guidance and the manufacturer’s IFU.
Frequently asked questions
How can a new dental assistant learn instruments quickly?
Study one tray at a time, use flashcards with photos of your own practice’s instruments, and set up trays while naming each item. Ask clinicians which patterns they prefer, because preferences vary.
What is the order of instruments on a basic tray?
The basic setup of mirror, explorer and cotton pliers usually sits first on the left, followed by procedure-specific instruments in the order they will be used. Your practice may have its own standard layout.
What is the difference between a carrier and a condenser?
An amalgam carrier picks up and delivers the material into the preparation; the condenser then packs it firmly into place.
Who is responsible for instrument sterilization?
In many practices, dental assistants carry out instrument processing, but the practice as a whole is responsible for following infection control guidance, documenting sterilizer monitoring and using the manufacturer’s IFU for each instrument.
Make tray setup easier for your team. Aurix International builds pre-assembled and custom instrument kits so every tray matches your procedures. Build your custom kit →


