Dental hand instruments are the non-powered tools a clinician holds and controls directly, and they remain central to examination, hygiene, restorative and surgical care. This guide covers the 20 most widely used dental hand instruments, what each one does, and practical tips for using and buying them. It is a useful reference for students, new assistants and anyone setting up trays.
Key takeaways
- Hand instruments share a basic design: handle, shank and working end.
- The 20 instruments below cover examination, periodontal, restorative and basic surgical work.
- Shank angle and length determine where an instrument can reach; working-end shape determines what it does.
- Look for balanced handles, sharp and aligned tips, and steel that tolerates repeated sterilization.
Anatomy of a dental hand instrument
The handle is where you hold the instrument; diameter and texture affect grip and fatigue. The shank connects handle to working end; straight shanks suit anterior access, while angled or contra-angled shanks reach posterior teeth while keeping the working end aligned with the handle. The working end is the blade, nib, point or beak that does the job. Many instruments are double-ended, with mirror-image ends for opposite surfaces.
The top 20 dental hand instruments
1. Mouth mirror
Provides indirect vision, reflects light and retracts soft tissue. Replace heads when the reflective surface becomes scratched or cloudy.
2. Explorer
A fine, flexible point for feeling surfaces, calculus and restoration margins. The No. 23 shepherd’s hook and the paired No. 2 pigtail are common patterns.
3. Periodontal probe
A blunt, millimeter-marked instrument for measuring pocket depth and attachment loss. Common patterns include UNC-15, Williams and WHO probes.
4. Cotton pliers
Tweezer-like pliers for carrying cotton rolls, pellets and small items. Locking versions are useful for placing items without dropping them.
5. Sickle scaler
A pointed tip with two cutting edges and a triangular cross-section for removing supragingival calculus. The H6/H7 and 204S are popular double-ended patterns.
Tip: the pointed tip can injure soft tissue, so keep subgingival use to a minimum and use curettes below the gumline.
6. Universal curette
A rounded toe and two cutting edges allow use on most tooth surfaces, above and below the gumline. Columbia 13/14 and Barnhart 5/6 are widely used.
7. Gracey curettes
Area-specific curettes with one cutting edge per blade, offset so the lower edge is the working edge. Gracey 11/12 helps with posterior mesial surfaces and 13/14 for posterior distals; 1/2 to 5/6 cover anterior teeth.
Tip: keep the terminal shank parallel to the tooth surface being instrumented to achieve the correct blade angle.
8. Spoon excavator
A small, sharp, spoon-shaped blade for removing soft carious dentin and temporary materials.
9. Enamel hatchet
A cutting instrument whose blade is parallel to the long axis of the handle, used to plane and cleave unsupported enamel along cavity walls.
10. Gingival margin trimmer
Curved, angled blades for beveling and smoothing the gingival margin of Class II preparations. They come in paired mesial and distal versions.
11. Plastic filling instrument
A paddle-and-condenser instrument for carrying, placing and shaping soft restorative materials and cements.
12. Amalgam condenser
Flat-faced, smooth or serrated nibs that pack amalgam into the preparation in increments. Different nib sizes suit different cavity sizes.
13. Ball burnisher
A rounded end for smoothing restorations, adapting matrix bands and refining margins. Football and acorn burnishers are related patterns.
14. Carvers
The Hollenback carver and discoid-cleoid carver shape occlusal anatomy and remove excess material from amalgam restorations. The discoid end is disc-shaped; the cleoid end is claw-shaped.
15. Composite placement instrument
Designed for placing and sculpting composite resin, often with a coating or high polish that reduces sticking. Shapes include paddles, condensers and fine sculpting tips.
16. Cement spatula
A flexible or stiff blade for mixing cements, liners and some impression materials on a pad or glass slab.
17. Amalgam carrier
A spring-loaded hollow instrument that picks up amalgam and ejects it into the preparation.
18. Tofflemire matrix retainer
Holds a metal matrix band around the tooth to recreate a missing wall during a Class II restoration. It is available in straight and contra-angled versions.
19. Extraction forceps
Hinged hand instruments with beaks designed for particular teeth: 150 for the maxillary anterior and premolar region, 151 for the mandibular, 23 cowhorn for lower molars, and 88R/88L for upper molars.
20. Straight elevator
A concave blade used to luxate teeth and roots before forceps are applied. The 301 and 34S are common patterns.
For a broader list, including surgical, endodontic and orthodontic instruments, see our reference of 50 dental instruments and their uses.
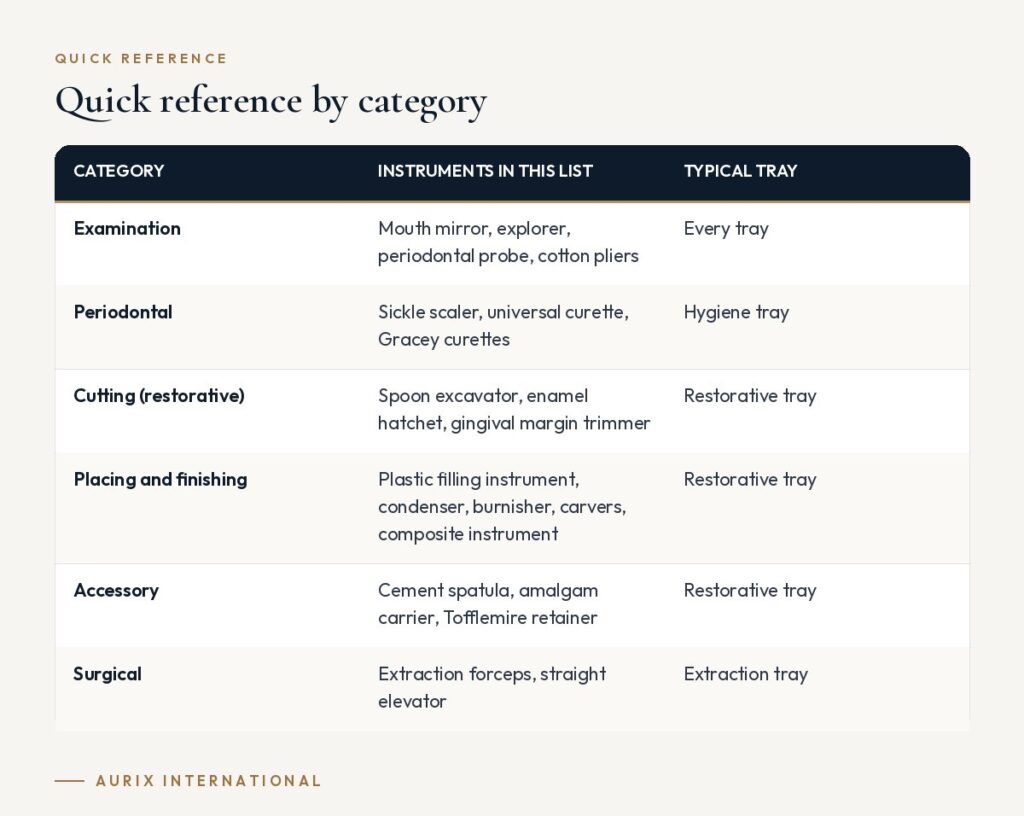
Quick reference by category
| Category | Instruments in this list | Typical tray |
|---|---|---|
| Examination | Mouth mirror, explorer, periodontal probe, cotton pliers | Every tray |
| Periodontal | Sickle scaler, universal curette, Gracey curettes | Hygiene tray |
| Cutting (restorative) | Spoon excavator, enamel hatchet, gingival margin trimmer | Restorative tray |
| Placing and finishing | Plastic filling instrument, condenser, burnisher, carvers, composite instrument | Restorative tray |
| Accessory | Cement spatula, amalgam carrier, Tofflemire retainer | Restorative tray |
| Surgical | Extraction forceps, straight elevator | Extraction tray |
How to choose dental hand instruments
- Handle diameter and texture. Wider, textured handles generally need less pinch force than thin, smooth ones, which can help during long procedures. Our guide to hollow, solid and resin handles compares the options.
- Shank design. Choose rigid shanks for heavy calculus and more flexible shanks when tactile sensitivity is the priority.
- Edge retention. Cutting instruments should be made from a hardened stainless steel and arrive sharp. Plan a sharpening routine; see our sharpening guide for curettes and scalers.
- Consistency across trays. Using the same patterns in every operatory makes setup faster and training easier.
- Care and IFU. Check the manufacturer’s instructions for cleaning and sterilization and make sure they match your equipment.
Frequently asked questions
What are dental hand instruments made of?
Most use stainless steel. Cutting instruments use hardenable martensitic grades that hold an edge, while some handles use resin or silicone to reduce weight or improve grip. Specialty instruments may use titanium or plastic tips, for example for implant maintenance.
What is the most commonly used dental hand instrument?
The mouth mirror is probably the most frequently used, since it is part of nearly every examination and procedure, closely followed by the explorer, probe and cotton pliers.
What is the difference between cutting and non-cutting hand instruments?
Cutting instruments, such as excavators, hatchets, scalers and curettes, have sharp edges designed to remove tooth structure, decay or deposits. Non-cutting instruments, such as mirrors, probes, condensers and burnishers, examine, place, pack or smooth materials.
How should hand instruments be stored after sterilization?
Keep them in their sealed pouches or wrapped cassettes in a clean, dry, enclosed area until use, and inspect the packaging before opening. Discard or reprocess any package that is wet, torn or compromised, following CDC guidance and the manufacturer’s IFU.
Need a full set of hand instruments? Aurix International supplies surgical-grade stainless steel hand instruments for examination, hygiene, restorative and surgical trays, individually or in kits. Browse oral instruments →